Tag: back-to-school

  • Oat and Flax Crackers with Avocado Ranch Dip

    Oat and Flax Crackers with Avocado Ranch Dip

    Oat and Flax Crackers with Avocado Ranch Dip

    Servings: 16

    Ingredients
      

    • 3 tablespoons ground flaxseed
    • 13 tablespoons warm water divided
    • 1 cup finely ground oat flour
    • 1 cup quick-cooking oats
    • 2 tablespoons flaxseeds
    • 6 tablespoons nutritional yeast divided
    • 3 tablespoons melted coconut oil
    • 1 19 oz. can chickpeas drained and rinsed
    • 1 large ripe avocado peeled and seeded
    • ¼ cup apple cider vinegar
    • 1 tablespoon extra-virgin olive oil
    • 1 tablespoon onion powder
    • 1 teaspoon garlic powder
    • 3 tablespoons finely chopped fresh dill or 1 tablespoon dried dill

    Method
     

    1. Preheat oven to 325°F.
    2. In small bowl, whisk together ground flaxseed and 9 tablespoons water. Set aside for 5 minutes to allow flax mixture to thicken.
    3. Meanwhile, in medium bowl, whisk together oat flour, oats, flaxseeds, and 3 tablespoons nutritional yeast. Make a well in centre of dry ingredients and add coconut oil and reserved flax mixture. Stir together with a fork until a dough forms.
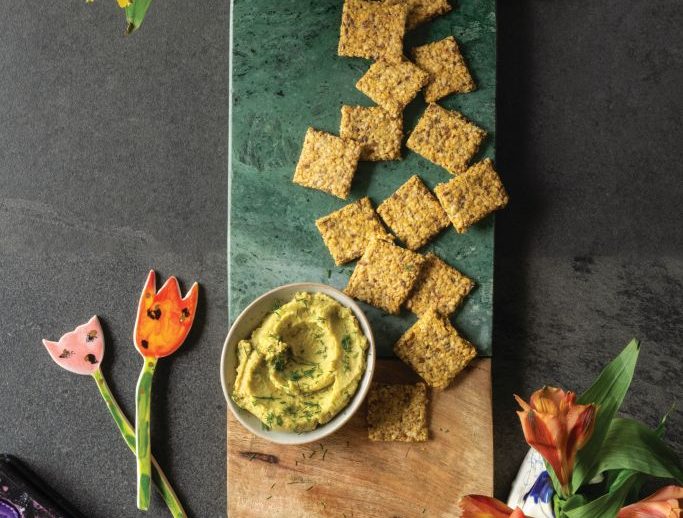
    4. Place large piece of parchment paper on clean work surface. Place dough in centre of parchment and gently press into a rectangle shape. Cover dough with another piece of parchment paper and roll, still covered, into a 12 x 10 inch rectangle. Remove top piece of parchment, trim as necessary, and cut dough into 1 inch squares. Using a spatula, transfer squares to parchment-lined baking tray, leaving a little room between each one. Reroll any trimmed pieces of dough and cut into more crackers.
    5. Bake crackers until golden brown and crisp, about 40 minutes. Transfer crackers to wire rack; cool to room temperature. Crackers may be stored in an airtight container at room temperature for up to 1 week.
    6. For avocado ranch dip: to food processor or blender, add chickpeas, avocado flesh, apple cider vinegar, olive oil, onion powder, garlic powder, dill, remaining 1/4 cup water, and 3 tablespoons nutritional yeast. Blend until smooth and creamy. Dip may be refrigerated in an airtight container for up to 1 week.
    7. Serve oat and flax crackers alongside avocado ranch dip and enjoy!

    By Lawren Moneta

    Article Courtesy of Alive Magazine

  • Banana Chocolate Zucchini Bread

    Banana Chocolate Zucchini Bread

    Banana Chocolate Zucchini Bread

    Servings: 12

    Ingredients
      

    • 1 cup buckwheat flour
    • ¼ cup hemp hearts
    • 3 tablespoons raw cacao powder
    • ½ teaspoon baking soda
    • ½ teaspoon fine sea salt
    • 1 teaspoon ground cinnamon
    • 1 small zucchini coarsely grated
    • 2 large, over-ripe bananas well mashed
    • 2 tablespoons maple syrup
    • 2 tablespoons coconut oil melted and cooled slightly
    • 1 teaspoon vanilla extract
    • 2 large organic eggs

    Method
     

    1. Preheat oven to 350°F. Line a 4 x 8 inch loaf pan with parchment paper and set aside.
    2. In large bowl, whisk together flour, hemp hearts, cacao powder, baking soda, salt, and cinnamon until well combined.
    3. Squeeze out any excess water from grated zucchini before adding to a medium bowl along with mashed banana, maple syrup, coconut oil, vanilla, and eggs. Whisk together until well combined.
    4. Add wet ingredients to dry ingredients and, with a rubber spatula, fold together until just combined. Pour batter into prepared loaf tin and bake in preheated oven until a wooden skewer inserted in centre of loaf comes out clean, about 45 to 60 minutes. Let loaf cool in pan on a wire rack until room temperature. Slice and enjoy.
    5. Banana Chocolate Zucchini Bread may be made up to 4 days ahead and refrigerated in an airtight container. Enjoy!

    By Lawren Moneta

    Article Courtesy of Alive Magazine

  • Squash and Lentil Rolls

    Squash and Lentil Rolls

    Squash and Lentil Rolls

    Servings: 15

    Ingredients
      

    • 1 tablespoon grapeseed oil or coconut oil plus extra for brushing phyllo
    • 1 yellow onion finely chopped
    • 1 pound skin-removed and chopped squash pieces such as kabocha or butternut
    • 1 cup no-salt-added vegetable stock
    • 1 19 oz. can brown lentils drained and rinsed
    • 2 tablespoons tomato paste
    • 2 tablespoons reduced-sodium soy sauce
    • 1 tablespoon dried Italian herb blend
    • 2 tablespoons ground flax
    • ½ cup quick-cooking oats
    • 12 sheets phyllo pastry

    Method
     

    1. Preheat oven to 400°F.
    2. In medium saucepan, heat oil over medium heat. Add onion and cook, stirring often, until softened and translucent, about 5 minutes. Add squash and vegetable stock. Bring mixture to a simmer; cover and let cook until squash is easily pierced with a fork, about 8 to 10 minutes. With fork or potato masher, mash squash into a chunky paste. Stir in lentils, tomato paste, soy sauce, herbs, ground flax, and oats. Cook, stirring often, until mixture is well combined, warmed through, and thickened, about 4 minutes. Remove from heat.
    3. Place one sheet of phyllo dough with long side facing you on a work surface. Cover remaining phyllo with a very lightly dampened kitchen towel to keep it from drying out. Lightly brush with oil and top with another piece of phyllo. Repeat twice more, resulting in a stack of four phyllo sheets. Place one third of squash and lentil mixture (about 1 1/2 cups) along bottom of phyllo edge in a thin line, spreading it out evenly end to end. Roll up from bottom to completely enclose filling. Place on parchment-lined baking tray and repeat with remaining phyllo and filling. With serrated knife, cut each log into 10 pieces. Bruch each piece with some more oil before transferring baking tray to preheated oven. Bake until phyllo is golden brown and crisp, about 25 to 30 minutes. Enjoy!

    By Lawren Moneta

    Article Courtesy of Alive Magazine

  • Your back-to-school guide

    Your back-to-school guide

    Your back-to-school guide

    10 tips for a smooth seasonal transition

    Although we’re enjoying summer, September is just around the corner with its stricter bedtimes, busy mornings, and lunch-packing routines. To help ease this transition, here are some mindful, enjoyable, and sustainable tips for the new school year.

    Familiarize yourself with your school

    Visit the school multiple times during summer to make it familiar and fun. Play on the playground, walk the route you’ll take daily, and teach safety boundaries. Attending orientation sessions is also helpful.

    Set up your home

    Designate specific areas for school gear like backpacks and lunchboxes. Creating a dedicated homework space with supplies but minimal distractions can support older students.

    Practice for independence

    Practice handling lunch items, such as lunchboxes and water bottles, using timers to simulate school lunchtime. Also, work on dressing skills, like putting on coats and using the bathroom independently, to build confidence.

    Help with worries

    Validate children’s anxieties rather than dismissing them. Common concerns include missing home or worries about friendships. Acknowledging emotions teaches children how to express their feelings and feel supported.

    Create a routine

    Establish a consistent morning routine. Prepare outfits, pack bags, and make lunches the night before. Practice the routine with children beforehand to reduce stress on the first day.

    Be strategic

    Avoid overbuying by reviewing what you already have. Have children try on clothes and assess needed supplies early. Shopping from what’s already available teaches resourcefulness and saves money.

    Choose secondhand first

    Opt for secondhand stores for supplies, clothes, and gear. Resale apps and online groups are also good options. Involving children in shopping helps them feel invested and prepares them emotionally for school.

    Get a good night’s sleep

    Establish a fixed bedtime routine weeks before school starts. Ensure children get the recommended hours of sleep for their age. Bedtime can also be a calming family time, like reading or meditation.

    Embrace downtime

    Children need time to relax after school. A snack and quiet activity help transition from school to home. Overscheduling extracurriculars can be overwhelming, so find a balance that suits your family.

    Give your kids grace

    Transitions are tough—kids face new teachers, classmates, and environments each year. After a busy day, children may have strong emotions or meltdowns at home. Recognize that behaviour is communication, and be gentle. Transitions are challenging, and patience is key.

    By Leah Payne

    Article Courtesy of Alive Magazine

  • Deviled Eggs

    Deviled Eggs

    Deviled Eggs

    Thanks to Christine Waltermyer & The Natural Kitchen Cooking School!

    Christine Waltermyer is a local and renowned Wellness Chef, private chef to celebrities, published cookbook author and founder of the Natural Kitchen Cooking School, which offers an online Plant-Based Cooking Program. She also loves shopping at Basil Bandwagon! Visit naturalkitchenschool.com to subscribe to her email newsletter for new recipes, tips, and FREE access to the Power of Veggies mini-course!


    Whether you’re getting ready for back-to-school or you’re throwing the last end of summer party, these deviled eggs are the recipe you’re looking for. Not only is it a simple appetizer, but it can fit perfectly in your lunchbox, too! Scroll down for this easy step-by-step recipe thanks to Christine Waltermyer and The Natural Kitchen Cooking School.

    Deviled Eggs

    Deviled eggs are nutritious as a snack or party appetizer. Use a pastry bag fitted with a large star tip to get that fun swirl shape of the filling.
    Course Appetizer
    Keyword appetizer, deviled eggs, snack
    Servings 10 deviled eggs

    Ingredients

    • 6 eggs
    • 2 tablespoons mayonnaise (I use a keto coconut oil brand)
    • 1 teaspoon dijon mustard
    • 1 tablespoon sweet pickle relish
    • Sea salt and white pepper to taste
    • Smoked paprika
    • Fresh chives, chopped finely optional

    Instructions

    • Place eggs in a single layer in a medium saucepan. Add enough water to cover by 2 inches. Bring to a boil, cover, remove from heat, and let stand for 12 minutes.
    • While the eggs are cooking, fill a bowl with cold water and ice. When the eggs have finished cooking, use a mesh strainer to scoop the eggs out and place them in the ice bath.
    • To peel the eggs, tap each egg on the wide end until it cracks. Peel under cold running water, using a small spoon to help remove the shell.
    • Cut the peeled eggs in half lengthwise. Carefully remove the yolks. Place the yolks in a small bowl. Mash lightly with a fork. Add the mayonnaise, mustard, pickle relish, sea salt and white pepper. Stir well.
    • Carefully spoon the egg yolk mixture into the egg whites. Feel free to use a pastry bag fitted with a large star tip to make a fancy shape. Garnish with the smoked paprika and optional chopped chives.
    • Enjoy!

    Thank you to Christine Waltermyer and the Natural Kitchen Cooking School for working with us to help promote healthy, nutritious meals and products that are affordable, full of nutrients, and simple to make at home!

  • Wild Rice Salad

    Wild Rice Salad

    Wild Rice Salad

    Thanks to Christine Waltermyer & The Natural Kitchen Cooking School!

    Christine Waltermyer is a local and renowned Wellness Chef, private chef to celebrities, published cookbook author and founder of the Natural Kitchen Cooking School, which offers an online Plant-Based Cooking Program. She also loves shopping at Basil Bandwagon! Visit naturalkitchenschool.com to subscribe to her email newsletter for new recipes, tips, and a FREE low-oxalate recipe guide!


    We’re WILD about Christine Waltermyer and The Natural Kitchen Cooking School’s Wild Rice Salad. We have to agree that “the tangy dressing, sweet mango and pungent scallions help to make this a flavorful side dish!” Keep scrolling for this simply delicious recipe.

    Wild Rice Salad

    I love the combination of nutty wild rice with fresh chopped arugula. The tangy dressing, sweet mango and pungent scallions help to make this a flavorful side dish!
    Course dinner, entree, Lunch, Salad, Side Dish
    Keyword dinner, entree, lunch, salad, side, wild rice
    Servings 4

    Ingredients

    • 1 cup wild rice rinsed
    • 3 cups water or broth
    • ½ cup sliced scallions
    • ½ cup fresh, chopped mango
    • ½ cup sliced red radishes
    • 5 ounces arugula (about 5 packed cups)

    Dressing

    • ¼ cup olive oil
    • Juice of 1 lemon
    • 2 tablespoons fresh orange juice
    • 2 teaspoons dijon mustard
    • 1-2 tablespoons honey or maple syrup
    • Sea salt and white pepper to taste

    Instructions

    • In a medium saucepan, place the wild rice. Add the water or broth and bring to boil. Reduce the heat to low, cover and simmer for 50 minutes or until the rice is tender. Drain if needed and let the rice cool.
    • Make the dressing: In a small bowl, whisk together the olive oil, lemon and orange juices, mustard, honey, sea salt and pepper.
    • Place the cooled wild rice in a large bowl. Add the arugula, chopped scallions, mango, radishes and arugula. Add the dressing, stir well, and adjust seasoning to taste. Store in the refrigerator, covered, for up to three days. It tastes best when given at least an hour to marinate before serving.
    • Enjoy!

    Thank you to Christine Waltermyer and the Natural Kitchen Cooking School for working with us to help promote healthy, nutritious meals and products that are affordable, full of nutrients, and simple to make at home!