Tag: Natural Kitchen Cooking School

  • Cinco de Mayo with Christine Waltermyer

    Cinco de Mayo with Christine Waltermyer

    Cinco de Mayo

    with Christine Waltermyer

    Christine Waltermyer is a local and renowned Wellness Chef, private chef to celebrities, published cookbook author and founder of the Natural Kitchen Cooking School, which offers an online Plant-Based Cooking Program. She also loves shopping at Basil Bandwagon! Visit naturalkitchenschool.com to subscribe to her email newsletter for new recipes, tips, and FREE access to the Power of Veggies mini-course!


    Happy Cinco de Mayo! Looking for some healthy plant-based alternatives for your favorite traditional holiday recipes? Check out two of our Cinco de Mayo favorites from Christine Waltermyer and The Natural Kitchen Cooking School below!

    Fruit Salsa with Cinnamon Pita Chips

    Course Appetizer, Dessert, Snack
    Keyword appetizer, chips and dip, cinco de mayo, dessert, fruit salsa, pita chips, salsa, snack, summer
    Servings 4

    Ingredients

    • 16 oz ripe strawberries diced
    • ½ golden delicious apple diced
    • ½ granny smith apple diced
    • ½ any red variety red-skinned apple diced
    • 1 kiwi fruit peeled and diced
    • 8 oz red raspberries
    • 2 tablespoons pure maple syrup
    • pinch sea salt
    • ½ teaspoon pure vanilla extract
    • 2 tablespoons all-fruit strawberry jam
    • juice of ½ a lime
    • juice of a mandarin orange (or a few tablespoons fresh orange juice)

    Pita Chips

    • 4 whole grain pita pockets
    • avocado oil (spray or oil)
    • 4 teaspoons cinnamon
    • 4 tablespoons raw cane sugar

    Instructions

    • Preheat the oven to 350 degrees F.
    • In a large bowl, place all of the fruit. Add the maple syrup, sea salt, vanilla, jam, lime juice and orange juice. Stir gently.
    • Place the whole pita pockets on a baking sheet. Lightly spray or brush each one with a little avocado oil. Sprinkle each one with a tablespoon of raw cane sugar and a teaspoon of cinnamon. Cut each pita pocket into 4 pieces. Bake the pita chips in the preheated 350 degrees F. oven for 8 to 10 minutes. Cool for at least 15 minutes before serving them with the salsa.
    • Enjoy!

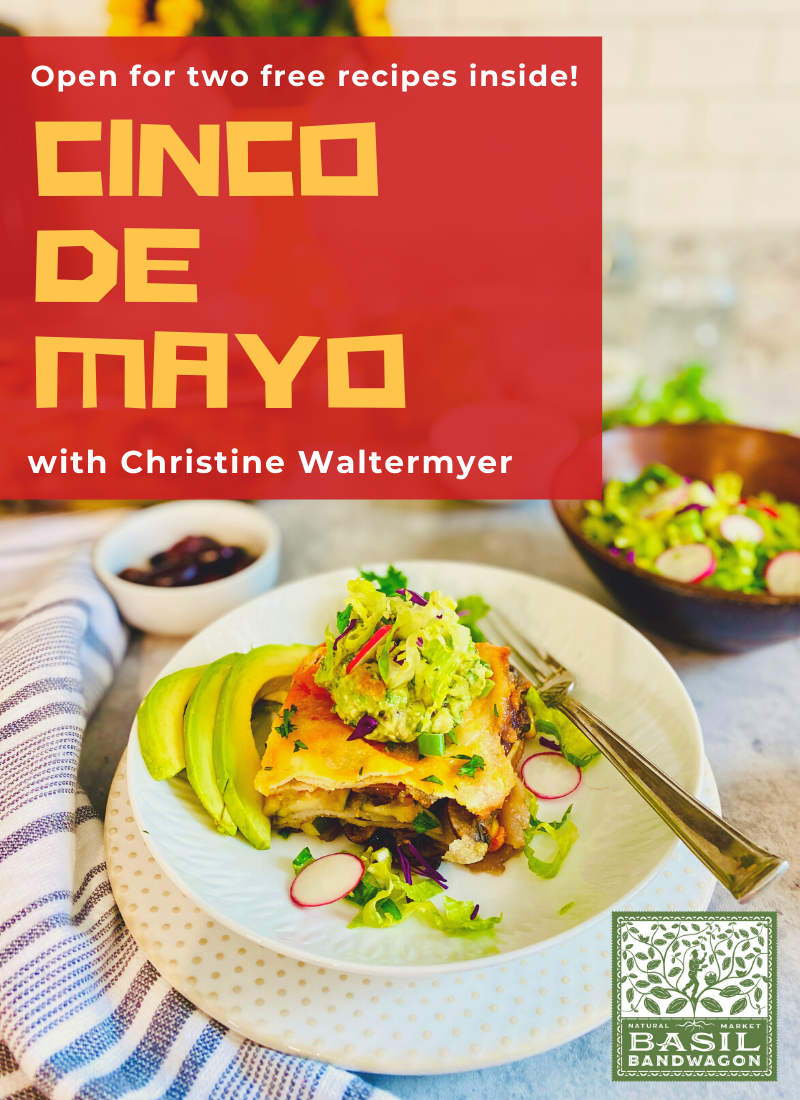
    Vegan Enchilada Casserole

    Course Main Course
    Keyword casserole, cinco de mayo, enchilada, entree, vegan
    Servings 6

    Ingredients

    Carrot Sauce

    • 3 large carrots cut into big chunks
    • ¼ large red onion chopped (½ cup)
    • 1 teaspoon chopped red beet
    • water
    • sea salt
    • lime (½ lime, juiced) optional

    Casserole

    • 2 cloves garlic minced
    • 1 yellow onion diced
    • 1 medium zucchini cut into half moons
    • 1 cup black kalamata olives chopped
    • 16 oz crimini or button mushrooms de-stemmed and sliced
    • 2 teaspoons olive oil
    • 1 teaspoon ground cumin
    • ½ cup frozen corn kernels
    • chili powder or crushed red pepper optional
    • 26 oz cooked kidney beans
    • ½ cup vegan shredded cheese or cheese of your choice, for the top (plus extra if you want to add some in the layers)
    • 1 8-count pack cassava flour tortillas or other tortillas

    Instructions

    • Lightly oil a 9 x 13 glass casserole dish.
    • Make the sauce: In a medium saucepan, place the carrots, red onion and red beet. Add just enough water to almost cover the vegetables. Bring to a boil over medium high heat. Cover and reduce the heat to simmer on low for 20 minutes, or until the vegetables are fork-tender.
    • Once the vegetables are soft, place the cooked carrots, red onion and any remaining cooking liquid in a small blender. Add ½ teaspoon of the sea salt. You can also add a squeeze of fresh lime juice.
    • Preheat the oven to 400 degrees F.
    • In a large frypan, heat the olive oil over medium heat for a minute. Add the onion and garlic. Add a sprinkle of the sea salt to help the onions soften. Cook and stir for a few minutes. Add the mushrooms. Add another generous pinch or two of sea salt. Cover and cook for a few more minutes, or until the mushrooms soften. Add the zucchini, a little more salt, the corn kernels and the black olives. If you want to add spicy ingredients like chili powder or crushed red pepper, you can add that now.
    • In the prepared casserole, place about ½ cup of the carrot sauce on the bottom. Spread it around. Add a layer of tortillas, then top with ½ of the vegetables and ½ of the kidney beans. Feel free to add a little vegan cheese in the layers. Top with ½ cup of the sauce. Repeat the layers with another layer of tortillas, then the remaining beans and veggies, another ½ cup sauce, and another layer of tortillas. Spread with any remaining sauce.
    • Cover with foil. Bake for 15 minutes. Uncover the casserole and bake for another 8 minutes. Top with cheese and bake for another minute. Let the casserole cool for 5 minutes before slicing into squares. Serve with a side salad and guacamole.
    • Enjoy!

    Notes

    Note: If you want more sauce in this casserole, feel free to double the amount of sauce ingredients.

    Thank you to Christine Waltermyer and the Natural Kitchen Cooking School for working with us to help promote healthy, nutritious meals and products that are affordable, full of nutrients, and simple to make at home!

  • Christine Waltermyer’s Quinoa Power Bowl with Orange Tahini Dressing

    Christine Waltermyer’s Quinoa Power Bowl with Orange Tahini Dressing

    Quinoa Power Bowl with Orange Tahini Dressing

    thanks to Christine Waltermyer!

    Christine Waltermyer is a local and renowned Wellness Chef, private chef to celebrities, published cookbook author and founder of the Natural Kitchen Cooking School, which offers an online Plant-Based Cooking Program. She also loves shopping at Basil Bandwagon! Visit naturalkitchenschool.com to subscribe to her email newsletter for new recipes, tips, and FREE access to the Power of Veggies mini-course!


    What comes to mind when you think about the first day of spring? For us, it’s bright, fresh, fruits and vegetables to help energize us through the day. Thanks to Christine Waltermyer, we can combine all of that into a delicious & nutritious power bowl that’s perfect for lunch or dinner! Check out the recipe below…

    Quinoa Power Bowl with Orange Tahini Dressing

    Course Main Course
    Keyword dressing, power bowl, quinoa, vegan

    Equipment

    • Baking pan
    • Small saucepan
    • Large skillet
    • Medium bowl

    Ingredients

    • 1 large sweet potato or yam peeled and diced (½-inch dices)
    • 2 tablespoons avocado oil (or vinegar or vegetable broth)
    • Sea salt and black pepper to taste
    • 1 teaspoon onion powder
    • ½ teaspoon garlic powder
    • 1 cup quinoa (I used the pre-rinsed kind)
    • 2 cloves garlic minced
    • ½ red onion thinly sliced
    • 16 ounces sliced button mushrooms
    • 1 medium zucchini cut into half moons
    • ½ cup corn kernels
    • 2-4 tablespoons sesame tahini
    • 2 tablespoons maple syrup
    • 2 tablespoons apple cider vinegar
    • The juice of one orange
    • 1 avocado pitted and diced
    • 13 ounces cooked kidney beans (I used the Jovial brand)
    • Fresh parsley chopped, as a garnish (optional)

    Instructions

    • Preheat the oven to 425 degrees F.
    • Place the peeled and chopped sweet potato in a baking pan. Lightly drizzle it with 1 tablespoon of the avocado oil. Add sea salt and black pepper to taste. Sprinkle with onion powder and garlic powder. Mix the seasoning into the sweet potato with your hands. Bake for 30 to 40 minutes, or until fork-tender.
    • Meanwhile prepare the quinoa. In a small saucepan, place the quinoa. Add 2 cups water or vegetable broth. Bring to a boil over high heat. Add an optional pinch of sea salt. Reduce the heat to simmer on low, covered, for 15 to 20 minutes.
    • Heat a large skillet over medium heat. Add a tablespoon of the avocado oil. Add the onion and cook and stir for a minute or two. Add the mushrooms and a pinch of sea salt. Cook and stir for a minute, then cover with a tight-fitting lid to help release the moisture from the mushrooms. Cook for several minutes over medium heat. If it seems to be dry on the bottom you can add a teaspoon or so of water.
    • Add the garlic, corn and zucchini to the mushrooms. Cook and stir briefly, then season with salt and pepper. Cover and cook for a few more minutes. Uncover and stir.
    • Make the dressing: In a medium bowl, combine the tahini, maple syrup, apple cider vinegar and fresh orange juice. Whisk together and add more tahini if a thicker consistency is desired.
    • Place the avocado in a small bowl. If not serving the bowls right away you can toss it with a little lemon juice, lime juice or vinegar to prevent browning.
    • Now arrange the bowls. In two serving bowls, place a scoop of the cooked quinoa (there will be leftovers or enough for a third or fourth bowl), a portion of kidney beans, some sweet potato and the sautéed mushrooms, zucchini and corn. Add some avocado as well.
      Bonus! If you want to add a teaspoon of raw sauerkraut or another raw pickle that adds a nice touch.
    • Wipe the edges of the bowls if needed. Top with a drizzle of the tahini dressing over all of the ingredients. Sprinkle with optional chopped parsley.

    Thank you to Christine Waltermyer and the Natural Kitchen Cooking School for working with us to help promote healthy, nutritious meals and products that are affordable, full of nutrients, and simple to make at home!

  • Vegan St. Patrick’s Day Traditions with Christine Waltermyer

    Vegan St. Patrick’s Day Traditions with Christine Waltermyer

    Vegan St. Patrick’s Day Traditions

    with Christine Waltermyer

    Christine Waltermyer is a local and renowned Wellness Chef, private chef to celebrities, published cookbook author and founder of the Natural Kitchen Cooking School, which offers an online Plant-Based Cooking Program. She also loves shopping at Basil Bandwagon! Visit naturalkitchenschool.com to subscribe to her email newsletter for new recipes, tips, and FREE access to the Power of Veggies mini-course!


    Who said you can’t turn holiday traditions into diet-friendly favorites! Celebrate Irish culture with a warming vegan stew and naturally colorful shamrock sugar cookies.

    Vegan Irish Stew

    Course Main Course
    Keyword gluten free, St. Patrick’s Day, stew, vegan
    Servings 4 people

    Equipment

    • Large pot
    • Large mixing bowl
    • Small mixing bowl

    Ingredients

    • 1 tablespoon olive oil
    • 1 cup onion chopped
    • 2 cloves garlic minced
    • 8 ounces button mushrooms quartered
    • sea salt
    • 1 cup sliced carrots
    • 1 cup sliced celery
    • ¼ small head of green cabbage
    • 1 large parsnip peeled and chopped
    • 3 small Yukon Gold potatoes cut into bite-sized pieces
    • 2 cups vegetable broth
    • 1 cup beer (non-alcoholic or stout beer)
    • 1 teaspoon dried thyme
    • 1 tablespoon maple syrup
    • 1 tablespoon apple butter
    • 3 tablespoons kuzu starch (or cornstarch) to thicken the stew (more as needed)
    • freshly ground black pepper

    Dumplings

    • 1 teaspoon fresh rosemary or thyme (use ½ teaspoon if using dried herbs) minced
    • 1 ½ cups gluten-free all-purpose baking flour (or regular all-purpose baking flour)
    • ¾ teaspoon baking powder (aluminum-free)
    • 1 teaspoon sea salt
    • 3 tablespoons olive oil
    • 1 cup almond milk (or oat milk or rice milk)

    Instructions

    • In a large pot, heat the olive oil (or ¼ cup vegetable broth) over medium heat. Add the onion and garlic. Cook and stir for a few minutes, then add the mushrooms. Add a pinch of the sea salt. Cook and stir for a few minutes. Cover and let cook a few more minutes to help them soften up. You can add a small splash of water if needed.
    • Add the carrots, celery, cabbage, parsnip and potatoes. Add the broth, beer, thyme, maple syrup, and apple butter. Bring to a boil over medium high heat, then reduce the heat to cook, lightly covered, on low for 20 minutes.
    • To make the dumplings, in a large mixing bowl combine the all-purpose baking flour, baking powder, sea salt and fresh rosemary. Stir well. Add the olive oil and almond milk. Stir well again.
    • In a small bowl, stir the kuzu or cornstarch with a few tablespoons of cold water to dilute it. Add to the stew and stir until thickened. Add a little more if you want to achieve a thicker stew consistency.
    • Add the black pepper.
    • Now add spoonfuls (2 to 3 tablespoons in size) of the dumpling dough all around the pot. Cook, covered, for 15 minutes. The dumplings will rise. Serve hot with Irish soda bread, sourdough bread or gluten-free bread of your choice.
      Note: If you like fluffier dumplings you can add 1 full teaspoon of the baking powder.

    Shamrock Sand Tart Cookies

    Course Dessert
    Keyword cookies, St. Patrick’s Day, vegan
    Servings 3 Dozen

    Equipment

    • Large bowl
    • Small bowl
    • Rolling Pin
    • Baking sheet
    • Shamrock cookie cutter

    Ingredients

    Wet Ingredients

    • ½ cup plant-based butter or butter of your choice
    • 1 cup maple sugar or raw cane sugar
    • 1 tablespoon golden flaxseed meal
    • 3 tablespoons water
    • ¼ cup cooked pumpkin puree
    • 1 teaspoon pure vanilla extract

    Dry Ingredients

    • 2 cups soft wheat flour (or gluten-free flour)
    • ¼ teaspoon baking soda
    • teaspoon sea salt

    Colored Sugar

    • ½ cup raw cane sugar
    • A few drops green liquid natural food coloring

    Instructions

    • In a large bowl, cream together the butter and maple sugar (or cane sugar).
    • In a small bowl stir together the flaxseed meal and water. Let sit for 5 or 10 minutes, until it has thickened up a bit.
    • Add the flaxseed meal mixture and pumpkin puree to the butter-sugar mixture. Stir well. Add the vanilla and stir again.
    • Sift together the flour, baking soda and sea salt. Add this to the butter-sugar mixture. Mix well, until you have a uniform cookie dough. Gather into a ball and wrap in wax paper. Refrigerate overnight.
    • Make the colored sugar: Mix together the raw cane sugar with the food coloring until it’s uniform in color. Let it sit overnight, uncovered, to let it dry out overnight. You can even spread it out on a piece of parchment paper to help it get really dry.
    • The next day, unwrap the chilled dough. Depending how thick the dough shape is, you can cut it half to make two flatter disks of dough. Place it on a floured board. Using a rolling pin, roll it out to about 1/8-inch thickness.
    • Preheat the oven to 350 degrees F. Lightly dust a baking sheet with a little flour.
    • Lightly dip the shamrock cookie cutter in flour, then press it into the dough to cut out shamrock shapes. Fit in as many shapes as you can over the dough’s surface. Then carefully pick them up using a spatula to place them onto the prepared baking sheet. Repeat with the remaining dough, spacing them out an inch or so apart.
    • Sprinkle each shamrock cookie evenly with some of the green-colored sugar.
      *Note: You can make other cookie shapes and use different colored sugar, depending on the holiday. For example, you can make heart-shaped cookies topped with red sugar for Valentine’s Day.
    • Bake for 7 to 8 minutes, checking them closely after 7 minutes. Lift one cookie with a spatula to check the bottom. If lightly browned and the edges are light brown, remove the baking sheet from the oven.
    • Transfer the cookies to a cooling rack to cool completely. The cookies will crisp up more as they cool. Once completely cool, serve the cookies or store in a cookie tin or glass container, loosely covered. The cookies will keep up to a week.

    Notes

    • Using the raw cane sugar will make the cookies crispier. 
    • Two eggs can be used in place of the flax egg and pumpkin puree.

    Thank you to Christine Waltermyer and the Natural Kitchen Cooking School for working with us to help promote healthy, nutritious meals and products that are affordable, full of nutrients, and simple to make at home!

  • Christine Waltermyer’s Gut-Boosting Homemade Pickles – 3 Ways!

    Christine Waltermyer’s Gut-Boosting Homemade Pickles – 3 Ways!

    Gut-Boosting Homemade Pickles

    with Christine Waltermyer

    Christine Waltermyer is a local and renowned Wellness Chef, private chef to celebrities, published cookbook author and founder of the Natural Kitchen Cooking School, which offers an online Plant-Based Cooking Program. She also loves shopping at Basil Bandwagon! Visit naturalkitchenschool.com to subscribe to her email newsletter for new recipes, tips, and FREE access to the Power of Veggies mini-course!


    Did you know that gut health is essential for a strong immune system? Some of the best gut health boosting foods are those that are fermented and pickled! There are many health benefits of pickling, but the most talked about benefit is the fact that they are probiotic – and you can pickle so many different vegetables to change up your flavor profiles. Check out (& print!) these three simple homemade pickle recipes thanks to Christine Waltermyer!

    24-Hour Mixed Vegetable Tamari Pickles

    Course Snack
    Keyword gut health, pickles
    Servings 1 cup of pickles

    Equipment

    • Wide-mouth 16 oz glass canning jar with a lid (Make sure it’s really clean. You can even boil it for a minute to sterilize it.)
    • 8 oz glass canning jar that fits inside the 16-ounce glass jar
    • Cheesecloth
    • Small pot

    Ingredients

    • ½ cup water
    • 2 ½ tablespoons tamari
    • 2 tablespoons brown rice vinegar
    • ½ cup broccoli stems (peeled) sliced into thin rounds
    • ½ cup carrot slices (thin)
    • ½ cup thinly sliced celery
    • 1 tablespoon maple syrup

    Instructions

    • Place the water in a small pot. Bring to a boil briefly, then shut off the heat and remove from the stove. Set aside to cool.
    • Once the water is cool, place it in the glass canning har. To make the pickling brine, add the tamari and brown rice vinegar. Place the lid on the har and shake well. Pour the pickling brine into a bowl.
    • Layer the vegetables in the glass jar. Pour the pickling brine over them. Place the smaller jar on top of the vegetables, inside the jar. The weight of the har will press the vegetables under the surface of the brine.
    • Cover the jar with a square of cheesecloth and secure it in place with a piece of kitchen twine or a rubber band.
    • Let the jar sit at room temperature for 24 hours. The room should be between 65 to 80 degrees F.
    • After 24 hours have passed, add the maple syrup. Place a lid on the jar and gently shake to mix the maple syrup into the brine. Refrigerate the pickles at this point. Enjoy a teaspoon or so at a time with a meal. Pickles will keep up to 5 days in the refrigerator.

    24-Hour Pink Fennel Pickles

    Course Snack
    Keyword gut health, pickles
    Servings 3 /4 cup of pickles

    Equipment

    • 16 oz glass canning jar with a lid (Make sure it’s really clean. You can even boil it for a minute to sterilize it.)
    • 8 oz glass canning jar
    • Cheesecloth
    • Small pot

    Ingredients

    • ¾ cup water
    • ¾ cup fennel thinly sliced
    • ¼ beet thinly sliced
    • ¼ cup ume ("umeboshi") vinegar

    Instructions

    • Place the water in a small pot. Bring to a boil briefly, then shut off the heat and remove from the stove. Set aside to cool.
    • Once the water is cool, place it in the glass canning jar. To make the pickling brine, add the ume vinegar. Place the lid on the jar and shake well. Pour the pickling brine into a bowl.
    • Layer the vegetables in the glass jar. Pour the pickling brine over them. Place the smaller jar on top of the vegetables, inside the har. The weight of the har will press the vegetables under the surface of the brine. If the liquid is too high in the har, you can remove it as long as all of the vegetables are submerged under the brine liquid.
    • Cover the har with a square of cheesecloth and secure it in place with a piece of kitchen twine or a rubber band.
    • Let the jar sit at room temperature for 24 hours. The room should be between 65 to 80 degrees F.
    • After 24 hours have passed, place a lid on the jar. Refrigerate the pickles at this point. Enjoy a teaspoon or so at a time with a meal. If you find the pickles too strong tasting, rinse a small amount before serving them. Pickles will keep up to 10 days in the refrigerator.

    3-Day Radish Pickles

    Course Snack
    Keyword gut health, pickles
    Servings 1 1/2 cups of pickles

    Equipment

    • 32-ounce glass canning jar with a lid (Make sure it’s really clean. You can even boil it for a minute to sterilize it.)
    • Small pot

    Ingredients

    • 2 cups water
    • 2 cups thinly sliced radishes (I used purple daikon radish and watermelon radish but red radish works too)
    • 1 ½ tablespoons sea salt
    • 1 teaspoon pickling spice OPTIONAL – In the video I used 1 tablespoon but it’s a little strong tasting so I recommend using less for most people’s taste.

    Instructions

    • Place the water in a small pot. Bring to a boil briefly, then shut off the heat and remove from the stove. Set aside to cool.
    • Once the water is cool, place it in the glass canning jar. To make the pickling brine, add the sea salt and pickling spice. Place the lid on the jar and shake well. Pour the pickling brine into a bowl.
    • Layer the vegetables in the glass jar. Pour the pickling brine over them. Make sure that all of the vegetables are submerged under the brine liquid.
    • Cover the jar with the lid.
    • Let the jar sit at room temperature for 3 days. The room should be between 65 to 80 degrees F.
      IMPORTANT: Unscrew the lid of the jar once a day to release some of the air that naturally builds up inside. At that time make sure the veggies are all submerged and if not, gently push them down under the liquid.
    • Taste after 3 days and if you want to let it ferment longer it should become more sour in another day or two. These pickles are salty so I recommend rinsing the pickles before serving. If you want to balance the flavor with some sweetness just add a tablespoon or two of your favorite sweetener and it will make them a little more mild tasting. Pickles will keep for 2 weeks in the refrigerator.

    Thank you to Christine Waltermyer and the Natural Kitchen Cooking School for working with us to help promote healthy, nutritious meals and products that are affordable, full of nutrients, and simple to make at home!

  • Plant-Based Meal Prep with Christine Waltermyer

    Plant-Based Meal Prep with Christine Waltermyer

    Plant-Based Meal Prep – What to Eat in A Day

    with Christine Waltermyer

    Christine Waltermyer is a local Wellness Chef, private chef to celebrities, published cookbook author and founder of the Natural Kitchen Cooking School, which offers an online Plant-Based Cooking Program. She also loves shopping at Basil Bandwagon! Visit naturalkitchenschool.com to get your FREE copy of her cookbook, “7 Days of Deliciousness.”

    BREAKFAST

    Creamy Brown Rice Cereal with Apple Pear Compote

    Serves 1

    Ingredients

    1 cup cooked brown rice

    1 cup water

    1 pear, cored and chopped

    1 apple, cored and chopped

    Small handful of walnuts

    Cinnamon

    1-2 tablespoons maple syrup, plus extra for drizzling


    Method

    1. Chop up the fruit and place in a small pot with a pinch of sea salt. Add 1 to 2 tablespoons of the maple syrup, and ½ teaspoon of cinnamon. Bring to a gentle boil, then lower to simmer for 20 to 25 minutes. 

    2. Place the brown rice and water in a small pot. Bring to a boil over medium high heat. Reduce the heat to simmer on low for 20 minutes or so, tilting the lid to avoid cookovers.

    3. Chop the walnuts. Using a potato masher, you can partly mash the rice at this point.

    4. Place the cooked brown rice cereal in a bowl. Top with desired amount of apple pear compote and walnuts, adding extra maple syrup if you wish.


    LUNCH

    Vegetarian Sushi

    Serves 1-2

    Ingredients

    1 cup cooked brown rice

    1 sheet sushi nori

    1 package Pumfu or firm tofu, cut into long strips

    1-2 tablespoons almond butter (or peanut butter) – I used the sprouted kind

    2 tablespoons raw sauerkraut, drained and pressed to remove liquid

    3-4 long thin carrot strips

    2 cups kale leaves, chopped up

    Coconut aminos or soy sauce 

    Equipment: bamboo sushi mat


    Method

    1. Steam the carrot strips and kale in a steamer basket over boiling water, covered, for 5 minutes or until the carrots and kale are tender but still brightly colored. 

    2. Place the pumfu or tofu strips in a frypan with a ¼ cup water and 1 tablespoon of coconut aminos or soy sauce. Bring to a boil over medium high heat, then reduce heat to simmer on medium low for about 15 minutes, or until the water has cooked off. Transfer the pumpfu or tofu to a plate to cool.

    3. Place the nori on a sushi mat. Cover most of the lower portion of the nori sheet with rice, leaving about an inch on top that is uncovered. Add a horizontal line of the almond butter, then add the carrots, pumfu and kale. Using your thumbs, lift the sushi mat up and over the fillings. Tuck the nori and rice over them and roll forward, pulling out the mat. Tightly tuck the roll, then roll all the way forward and tuck again. Using a sawing motion, carefully slice the sushi roll in half, and then into about 8 pieces. Serve with coconut aminos or soy sauce.


    DINNER

    Mexican Buddha Bowl

    Serves 1-2

    Ingredients

    2 – 4 tortillas of your choice (I love the Siete brand almond flour tortillas)

    1 13-oz.  jar or can kidney beans, black beans or pinto beans (Jovial brand is great)

    1 medium red onion, diced

    3 cloves garlic, minced

    cumin

    Cilantro

    ½ teaspoon apple cider vinegar

    2 carrots, peeled and diced

    Olive oil

    Japanese yams

    Avocados

    1 to 2 limes

    Shredded lettuce

    1 cup cooked quinoa

    Dressing:

    3 tablespoons olive oil

    1 – 2 tablespoons lime juice

    ¼ teaspoon sea salt

    1-2 teaspoons chopped cilantro

    Optional: 1 – 2 teaspoons maple syrup


    Method

    1. In a small pot, cover the carrots with water. Bring to a boil over medium high heat, then reduce heat to simmer on medium until soft. Drain and set aside. 

    2. Place the sweet potatoes in a small pot and cover with water. Boil for about 20 minutes, or until soft. When finished 

    3. Place about ⅓ cup of the diced onion in a bowl to save for later to cook with the beans. Place the remaining diced onion in a bowl and add ¼ teaspoon of the sea salt and ½ teaspoon of apple cider vinegar. Let it sit for 15 minutes.

    4. To cook the beans: Heat a small pan over medium heat. Add 1 or 2 teaspoons of the olive oil. Add the ⅓ cup diced onion, 2 cloves minced garlic and a pinch of salt. Cook and stir for 8 to 10 minutes, or until the onion has softened. 

    5. Meanwhile, make the carrot salsa: Add 1 tablespoon of apple cider vinegar or lime juice to the cooked carrots. Add 2-3 tablespoons chopped cilantro and 1-2 teaspoons of the marinated red onion. Stir to combine.

    6. To the cooking onion and garlic add the beans, cumin and sea salt to taste. Feel free to add cayenne, chopped jalapeno etc. if you like it hot. Cook for 5 to 10 minutes.

    7. Make the guacamole: Chop up a few more tablespoons of cilantro and place in a bowl. Remove the pits from 2 avocados. Score the avocado flesh into little squares and scoop out the contents into the bowl. Add 1 clove minced garlic, juice of one lime and ½ teaspoon of sea salt, or to taste. Stir together, partly mashing the avocado to make it a little creamy.

    8. Check on the sweet potatoes and beans. Cook longer if needed.

    9. Briefly warm the tortillas on a warm cast iron skillet, a few minutes on each side over medium heat. Keep the tortillas warm under a towel.

    10. When the sweet potatoes have finished cooking, peel them and slice them.

    11. In a large shallow bowl, arrange equal portions of the beans, quinoa, sweet potatoes, guacamole, lettuce, and carrot salsa. Drizzle evenly with the dressing and serve.


    Thank you to Christine Waltermyer and the Natural Kitchen Cooking School for working with us to help promote healthy, nutritious meals and products that are affordable, full of nutrients, and simple to make at home!

  • Homemade Immune Boosting Essentials thanks to Christine Waltermyer!

    Homemade Immune Boosting Essentials thanks to Christine Waltermyer!

    Homemade Immune Boosting Essentials

    thanks to Christine Waltermyer!

    Christine Waltermyer is a local Wellness Chef, private chef to celebrities, published cookbook author and founder of the Natural Kitchen Cooking School, which offers an online Plant-Based Cooking Program. She also loves shopping at Basil Bandwagon! Visit naturalkitchenschool.com to get your FREE copy of her cookbook, “7 Days of Deliciousness.”

    Vegetable Broth

    Makes 8 cups

    Ingredients

    1 cup fresh maitake mushrooms, or ½ cup dried

    2 celery stalks, cut into big chunks

    2 carrots, cut into chunks

    2 to 3 cups winter squash, cut in big chunks

    ½ cup fresh burdock root, cut into pieces (or ¼ cup dried burdock)

    1 small bunch parsley (you can leave the stems on)

    1 tablespoon fresh ginger root slices

    ½ large onion, cut into big chunks

    1 tablespoon fresh thyme (or 1 teaspoon dried thyme)

    3 dried shiitake mushrooms (or 6 fresh shiitake mushrooms)

    2 bay leaves

    2 cloves garlic

    ½ gallon water


    Method

    This vegetable broth can be made in an Instapot, pressure cooker or regular soup pot. 

    For Instant Pot or pressure cooker: Place all ingredients in the Instant Pot or a large pressure cooker. Place the lid on your pressure cooker or Instant Pot and bring to full pressure on high heat. After 15 minutes, remove the pot from the heat and let the pressure reduce naturally.  Strain out the ingredients by pouring the broth through a strainer into a large bowl. Remove the lid and cool completely before pouring into tall glass mason jars.

    For regular soup pot: Place all ingredients in a large soup pot. Cover with a lid and bring to a boil over medium high heat. Reduce heat to simmer on low for 1 hour. Remove from heat. Strain out the ingredients by pouring the broth through a strainer into a large bowl. Cool before pouring into glass mason jars.

    Store the vegetable broth in covered jars in the refrigerator for 3 to 5 days, or freeze for up to 4 months.


    Lemon Sage Cold Care Tea

    Serves 1

    Ingredients

    1 cup (8 oz.) water

    10 fresh sages leaves (or one teaspoon dried sage leaves)

    1 teaspoon fresh lemon juice

    1 teaspoon raw honey or brown rice syrup


    Method

    Place the water in a small saucepan. Bring to a boil over medium high heat. Turn off the heat and add the sage leaves. Remove from the heat and let steep for 15 minutes. Strain the tea through a small strainer into a mug. Add the lemon juice and sweetener of your choice. Enjoy warm.


    Thank you to Christine Waltermyer and the Natural Kitchen Cooking School for working with us to help promote healthy, nutritious meals and products that are affordable, full of nutrients, and simple to make at home!

  • Celebrate National Soup Month with Christine Waltmyer

    Celebrate National Soup Month with Christine Waltmyer

    Celebrate National Soup Month

    with Christine Waltermyer

    Christine Waltermyer is a local Wellness Chef, private chef to celebrities, published cookbook author and founder of the Natural Kitchen Cooking School, which offers an online Plant-Based Cooking Program. She also loves shopping at Basil Bandwagon! Visit naturalkitchenschool.com to get your FREE copy of her cookbook, “7 Days of Deliciousness.”

    Vegetable Soup

    Serves 8-10

    Ingredients

    1 tablespoon olive oil

    ½ onion, chopped

    2 cloves minced garlic

    3 carrots, sliced

    3 – 4 ribs celery, sliced

    1 cup chopped potatoes (I used baby heirloom potatoes but you could use red-skinned potatoes)

    1 medium red beet, peeled and diced

    8 cups vegetable broth

    13 ounces cooked kidney beans

    ¼ cup wild rice, soaked in water to cover for several hours, then drained

    2 teaspoons fresh thyme leaves, or 1 teaspoon dried thyme 

    1 cup chopped green beans, trimmed and cut into 1-inch pieces

    4 scallions, chopped

    1 cup baby bok choy, chopped

    1 small zucchini, chopped

    1 small bunch parsley, stems removed and chopped

    1 cup corn kernels

    1 teaspoon sea salt, or more to taste

    Optional: Black pepper


    Method

    1. In an Instant Pot, pressure cooker or large soup pot, heat the olive oil over medium heat. Add the onion and garlic. Cook and stir for five minutes. Add the carrots, celery, beets and potatoes. Add 4 cups of the vegetable broth, along with the kidney beans, drained wild rice and thyme.

    2. Place the lid on your cooking pot of choice. 

    3. If using an Instant Pot or pressure cooker, bring up to full pressure. Once full pressure is achieved, reduce heat to cook for 10 minutes. Then turn off or remove from heat to allow pressure to drop naturally.

    4. If using a regular soup pot, bring to a boil over medium high heat. Reduce heat to cook on low, covered, for 30 minutes.

    5. Add the green beans, scallions, baby bok choy, zucchini, parsley, corn kernels, sea salt and enough vegetable broth to cover everything. If your Instant Pot or pressure cooker is too full you can cook in two batches.

    6. For Instant Pot or pressure cooker bring back up to full pressure. Reduce heat to cook on low for 5 more minutes.

    7. If using a regular soup pot, bring back to a boil over medium high heat, then reduce the heat to cook on low for 10 to 15 more minutes.

    8. Season with black pepper if desired, and additional sea salt to taste. I like to serve with a drizzle of olive oil as well. If a tart taste is desired you can add a splash of apple cider vinegar as well.

    9. Store leftover soup in a covered glass container in the refrigerator for up to 3 days, or freeze leftovers for up to a month.


    Thank you to Christine Waltermyer and the Natural Kitchen Cooking School for working with us to help promote healthy, nutritious meals and products that are affordable, full of nutrients, and simple to make at home!

  • Better-For-You Thanksgiving Recipes with Christine Waltermyer!

    Better-For-You Thanksgiving Recipes with Christine Waltermyer!

    Better-For-You Thanksgiving Recipes

    with Christine Waltermyer


    MENU:

    Lentil Loaf

    Vegan Scalloped Potatoes

    Vegan Green Bean Casserole

    Vegan Squash Pie


    Thank you to Christine Waltermyer and the Natural Kitchen Cooking School for working with us to help promote healthy, nutritious meals that are affordable, full of nutrients, and simple to make at home!

  • Simple School-Night Fried Rice

    Simple School-Night Fried Rice

    Simple School-Night Fried Rice

    with Christine Waltermyer

    Christine Waltermyer is a local Wellness Chef, private chef to celebrities, published cookbook author and founder of the Natural Kitchen Cooking School, which offers an online Plant-Based Cooking Program. She also loves shopping at Basil Bandwagon! Visit naturalkitchenschool.com to get your FREE copy of her cookbook, “7 Days of Deliciousness.”


    Simple School-Night Fried Rice

    Serves 4

    Ingredients

    2 teaspoons sesame oil

    ½ onion, chopped

    1 large carrot, diced

    8 oz mushrooms, sliced

    2 ½ cups cooked rice (I used red rice)

    1 tablespoon Coconut Aminos

    ½ cup peas

    1 baby bok choy, chopped


    Method

    1. Warm a large skillet over medium heat. Add the sesame oil and onion. Cook and stir for 1 minute. Add the carrots and mushrooms. Cook for 3 to 4 minutes, stirring occasionally.  Add the rice and the coconut aminos.  Stir and cook for 5 more minutes. You can cover the pot if you want, to help the vegetables to soften. Last, add the bok choy, and cook for one more minute.

    2. Season with extra Coconut Aminos, if desired.

    3. Enjoy!

    Note: Chopped garlic and ginger can also be added to this dish when cooking the onions.


    Thank you to Christine Waltermyer and the Natural Kitchen Cooking School for working with us to help promote healthy, nutritious meals and products that are affordable, full of nutrients, and simple to make at home!

  • How to Cook Corn on the Cob 3 Ways

    How to Cook Corn on the Cob 3 Ways

    Corn on the Cob 3 Ways

    with Christine Waltermyer

    Christine Waltermyer is a local Wellness Chef, private chef to celebrities, published cookbook author and founder of the Natural Kitchen Cooking School, which offers an online Plant-Based Cooking Program. She also loves shopping at Basil Bandwagon! Visit naturalkitchenschool.com to get your FREE copy of her cookbook, “7 Days of Deliciousness.”


    Ingredients

    Serves 4

    4 ears of fresh corn on the cob

    Optional: Vegan butter, olive oil or butter of your choice, Sea salt


    Boiled Corn on the Cob Method:

    1. Remove the husks from the corn. Use your fingers or a brush to remove the fine strands of corn silk.

    2. Bring a large pot of water to a boil, covered, over high heat. Salt the water if you want. Add the corn. Cook for 6 to 8 minutes. Use tongs to carefully remove from the water. Serve as is or with optional vegan butter, olive oil or butter of your choice. Sprinkle lightly with sea salt if you want.

    3. Enjoy!


    Steamed Corn Method:

    1. Remove the husks from the corn. Use your fingers or a brush to remove the fine strands of corn silk.

    2. Add about ½ inch of water on the bottom of a medium size pot. Place a steamer basket inside. Bring the water to a boil over medium high heat. Add the corn to the pot, on top of the steamer basket. Cover the pot and cook for 4-6 minutes. Serve as is or with optional vegan butter, olive oil or butter of your choice. Sprinkle lightly with sea salt if you want.

    3. Enjoy!


    Pressure Cooked or Instant Pot Corn Method:

    1. Remove the husks from the corn. Use your fingers or a brush to remove the fine strands of corn silk.

    2. Place ½-inch of water on the bottom of a pressure cooker or an Instant Pot. You can place a trivet on top if you want.

    3. Place the corn in the pressure cooker or Instant Pot. Cover with lid and seal it. Bring up to pressure over medium high heat. Once the pressure is high you can reduce the heat but keep it high enough to maintain pressure for 2 minutes. Turn off the heat. Transfer the pressure cooker from the heat to a trivet to cool and let the pressure reduce naturally.

    4. Once the pressure has fully released, carefully remove the lid and serve. Serve as is or with optional vegan butter, olive oil or butter of your choice. Sprinkle lightly with sea salt if you want.

    5. Enjoy!


    Thank you to Christine Waltermyer and the Natural Kitchen Cooking School for working with us to help promote healthy, nutritious meals and products that are affordable, full of nutrients, and simple to make at home!