Category: Holidays

  • Celebrate Oktoberfest!

    Celebrate Oktoberfest!

    Celebrate Oktoberfest!

    Delicious and healthy iconic German specialties

    Anchored in tradition but updated for health, these recipes for some of the greatest Oktoberfest foods will have you ready to celebrate!

    Plant-based Schnitzel with Noodles

    Schnitzel usually means tenderized meat coated in egg and bread crumbs and deep-fried. This version of schnitzel would have even Julie Andrews singing its praises, thanks to the tender tofu that skips the fryer.
    Servings: 4

    Ingredients
      

    • 12 to 15 ounces block firm or extra-firm tofu
    • ½ cup gluten-free flour blend
    • ¾ cup water or beer
    • 1 ½ cups bread crumbs
    • 1 teaspoon smoked paprika
    • ½ teaspoon garlic powder
    • ¾ teaspoon salt divided
    • 1 ½ tablespoon sunflower oil or canola oil divided
    • 8 ounces dried egg noodles or gluten-free pasta
    • ½ cup chopped parsley to garnish

    Method
     

    1. Slice tofu twice horizontally to create 3 pieces about 1/2 in thick, then cut each piece in half vertically to make 6 pieces. Different brands are different thicknesses, so slice it however is best to make pieces slightly smaller than a deck of cards.
    2. Line baking tray with clean kitchen towels and place tofu pieces on top in a single layer. Top with more towels, followed by another baking sheet. Weight the baking sheet (with books or cans of beans) and let moisture drain for 15 minutes.
    3. Preheat oven to 350 F.
    4. In shallow bowl, combine flour and water or beer. In second shallow bowl, combine bread crumbs, paprika, garlic powder, and 1/4 tsp salt.
    5. Sprinkle drained tofu with remaining 1/2 tsp salt, then dip each piece in flour mixture followed by spiced bread crumbs. Place on paper towel-lined plate and pat extra bread crumb mixture gently on top in any bare areas.
    6. In large skillet, heat 1 Tbsp oil over medium-high heat. When hot, add half the tofu and cook 2 minutes on each side, or until golden, pressing down with flat spatula on top to ensure crumbs brown evenly. Return tofu to paper towel-lined plate to drain excess oil.
    7. Remove any loose bread crumbs from skillet, then add remaining 1/2 Tbsp oil and cook remaining tofu.
    8. Meanwhile, cook pasta as per package instructions. Heat sauce, if using.
    9. Serve drained pasta topped with schnitzel and sauce of choice. Sprinkle with chopped parsley.
    10. Enjoy!

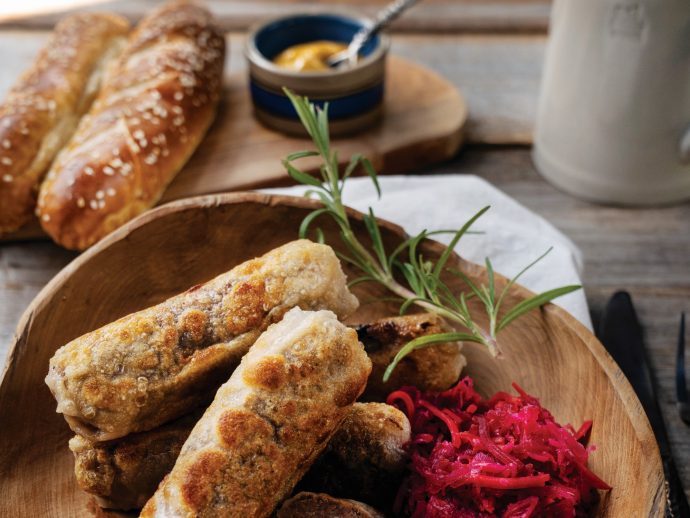
    Gluten-Free Pretzels

    Large pretzels are a staple of many Oktoberfest celebrations. The large pieces of golden, twisted pretzel dough come topped with coarse salt for a savory crunch with every bite.
    Servings: 10

    Ingredients
      

    • 2 cups sweetened or unsweetened nondairy milk divided
    • 1 tablespoon dry active yeast
    • ½ teaspoon cane sugar
    • ½ cup tapioca starch
    • ½ cup + 2 tablespoons cornstarch
    • 3 cups all-purpose gluten-free flour
    • 2 tablespoons psyllium husk powder
    • 1 ½ teaspoon salt
    • cup vegan butter or coconut oil melted
    • 5 cups water
    • ¼ cup baking soda
    • Coarse salt

    Method
     

    1. In small pot, heat 1/2 cup nondairy milk (or microwave) until warm to the touch but not scalding. In heat-proof bowl, add yeast and sugar, then pour milk overtop. Set aside for 15 minutes.
    2. In stand mixer or large bowl, whisk tapioca starch, cornstarch, flour, psyllium, and salt. Add melted butter or oil, remaining 1 1/2 cups nondairy milk, and yeast mixture. Use dough hook or hand mixer on low speed to beat until just combined.
    3. Shape dough into a ball. Transfer to lightly oiled bowl, cover with dish towel and set in a warm, draft-free place for 90 minutes.
    4. Preheat oven to 400 F.
    5. In medium pot, bring 5 cups water to a simmer with baking soda. Line 2 baking sheets with parchment paper. On cutting board or clean countertop, divide dough into 10 pieces and roll into 15 in strands. Push edges away from you into a “U” shape and twist the ends over each other twice (there are plenty of videos online for this if you need help). Then bring the ends down to the bottom of the “U.”
    6. Remove pot of water from heat. Using large, flat spatula, carefully pick up and slide a pretzel into water for 30 seconds. If water doesn’t cover the pretzel, rotate pot to submerge. Remove pretzel to parchment-lined baking sheet and repeat with remaining pretzels. You can do this all at once, but the pretzels are delicate.
    7. Sprinkle pretzels with coarse salt and bake for 15 to 20 minutes, until golden brown.
    8. Enjoy!

    Dunkel Beer-Marinated Rotisserie-Style Chicken

    This dark beer-marinated chicken uses the convection setting on your oven to create a crispy skinned bird. (If you don’t have a convection setting on your oven, you can simply bake the chicken for longer at the same temperatures as below, until a meat thermometer inserted in the thickest part of the thigh reads 165 F.)
    Servings: 5

    Ingredients
      

    • 1 lemon
    • 5 pounds whole chicken
    • 2 fresh thyme sprigs
    • 1 cup dark beer
    • 1 tablespoon olive oil
    • 1 teaspoon German mustard or any grainy or stone-ground mustard
    • 4 garlic cloves minced
    • 1 ½ teaspoon salt
    • 1 teaspoon pepper
    • 2 teaspoons dried basil

    Method
     

    1. Zest and juice lemon. Stuff chicken cavity with leftover lemon pith and fresh thyme sprigs. In medium bowl, combine lemon zest and juice with remaining ingredients and pour over chicken in large bowl, pot, or leak-proof, sealable bag. Gently separate chicken skin from breast and legs without tearing, and scoop some of the marinade juices inside. Refrigerate for at least 1 hour, up to 12 hours.
    2. Heat oven to 400 F on convection roast setting.
    3. Place chicken in roasting pan and pour remaining marinade overtop. It should be elevated above juices to allow chicken to crisp. A metal rack that fits inside the roasting pan can be used. Roast for 30 minutes. Lower heat to 375 F and roast for 50 minutes longer, basting chicken every 20 minutes, until internal temperature reads 165 F and juices run clear. Loosely tuck a large piece of parchment paper over chicken during the last 30 to 60 minutes if overly brown.
    4. Remove chicken from oven and let it rest for 10 minutes. Carve chicken and serve with sieved juices, or thicken juices with beer and cornstarch to make gravy.
    5. Enjoy!

    Recipes Provided by Alive Magazine

  • Dairy Free Carrot Cake

    Dairy Free Carrot Cake

    Dairy Free Carrot Cake

    Thanks to Christine Waltermyer, The Natural Kitchen Cooking School & MUSH Overnight Oats!

    Christine Waltermyer is a local and renowned Wellness Chef, private chef to celebrities, published cookbook author and founder of the Natural Kitchen Cooking School, which offers an online Plant-Based Cooking Program. She also loves shopping at Basil Bandwagon! Visit naturalkitchenschool.com to subscribe to her email newsletter for new recipes, tips, and FREE access to the Power of Veggies mini-course!


    What’s one of your favorite Easter desserts? One of ours is carrot cake! However, we like to make it with a fun, healthy twist – including MUSH Overnight Oats!

    Why add MUSH Overnight Oats? It gives a moist, flavorful texture to the cake while adding even more health benefits! All grains including oats contain phytic acid, which binds to nutrients and makes them harder to absorb. Soaking oats breaks down this acid and helps increase the absorption of nutrients, like zinc, iron, calcium and magnesium. Since carrots are loaded with vitamins and minerals, such as calcium, adding MUSH can even help absorb it!

    We’re not saying that you have to add them to your carrot cake – you can just eat these overnight oats straight out of the container with a spoon. Or add them to your morning smoothie. The possibilities are endless – go try all of their flavors!

    Keep scrolling to learn how to make this Dairy Free Carrot Cake with MUSH Overnight Oats thanks to Christine Waltermyer and the Natural Kitchen Cooking School. All ingredients can be found at your favorite local Basil Bandwagon Natural Market location.

    Dairy Free Carrot Cake

    Course Dessert
    Keyword cake, dairy free, dessert, easter

    Ingredients

    DRY

    • cups Bob's Red Mill Paleo Baking Flour
    • ½ teaspoon sea salt
    • 2 teaspoons cinnamon
    • ¼ teaspoon nutmeg
    • 1 teaspoon baking soda
    • ¼ cup maple sugar

    WET

    • 4 eggs
    • ¼ cup almond milk
    • 1 teaspoon vanilla extract
    • ¼ cup fresh orange juice
    • ½ cup maple syrup
    • cup melted coconut oil cooled
    • cup MUSH brand overnight oats or cooked oatmeal (or almond butter)
    • 3 cups coarsely grated carrots
    • ½ cup chopped walnuts

    CREAM CHEESE FROSTING

    • 1 stick dairy-free butter or butter of your choice
    • 8 oz. Kite Hill cream cheese or other cream cheese of your choice
    • 1 teaspoon vanilla extract
    • 2 cups powdered sugar
    • 1 cup monkfruit sweetener (or 1 more cup of powdered sugar)

    DECORATION

    • Shredded coconut
    • Edible flowers

    Instructions

    • Preheat the oven to 350 degrees F. In a large bowl, combine all of the dry ingredients.
    • In a separate bowl, combine all of the wet ingredients. Combine the wet and dry ingredients together. Fold in the MUSH overnight oats, carrots and walnuts.
    • Divide the batter between two lightly oiled 8-inch cake pans lined with parchment paper on the bottoms. Bake at 350 degrees F. for 35 minutes, or when the cakes spring back to the touch in the center. Check them after 30 minutes to avoid overbaking.
    • While the cakes are baking, prepare the frosting. Place all of the frosting ingredients in a food processor or stand mixer. Blend until smooth.
    • Remove finished cakes from the oven. Use a wet knife to loosen the sides of the cakes. Carefully flip the cakes onto cake cardboards or directly on cooling racks to cool. Once completely cool, frost the top of one cake. Place the other cake on top. Frost the top and sides of the cake.
    • Decorate with shredded coconut pressed into the sides of the cake and around the top in a circle. Add edible flowers for a pretty touch.
    • Enjoy!

    Thank you to Christine Waltermyer and the Natural Kitchen Cooking School for working with us to help promote healthy, nutritious meals and products that are affordable, full of nutrients, and simple to make at home!

    Resources:

    https://eatmush.com/pages/whats-mush

  • Valentine’s Day Snacks in 5 Minutes or Less

    Valentine’s Day Snacks in 5 Minutes or Less

    Valentine’s Day Snacks in 5 Minutes or Less

    thanks to Christine Waltermyer

    Christine Waltermyer is a local and renowned Wellness Chef, private chef to celebrities, published cookbook author and founder of the Natural Kitchen Cooking School, which offers an online Plant-Based Cooking Program. She also loves shopping at Basil Bandwagon! Visit naturalkitchenschool.com to subscribe to her email newsletter for new recipes, tips, and FREE access to the Power of Veggies mini-course!


    Are you looking for sweets and treats for your Valentine this year? Thanks to Christine Waltermyer and the Natural Kitchen Cooking School, here are three simple better-for-you snack recipes that you can make in 5 minutes or less! All ingredients can be found at your favorite local Basil Bandwagon Natural Market location.

    Strawberry Avocado Sorbet

    Course Dessert, Snack
    Keyword dessert, plant based, valentine’s day, vegan

    Ingredients

    • 1 10 oz. bag frozen strawberries
    • ½ ripe avocado
    • 1-2 tablespoons pure maple syrup OR stevia to taste
    • Juice of 1 mandarin orange or 1 lime
    • Pinch of sea salt
    • 1 teaspoon pure vanilla extract optional

    Instructions

    • Place all of the ingredients in a food processor and blend until creamy. Serve as is or topped with your favorite toppings such as chocolate chips and fresh sliced strawberries.
    • Store leftovers in the freezer. Before serving, let the strawberry sorbet at room temperature for at least 30 minutes to help it soften. It becomes very hard when frozen!
    • Enjoy!

    Hummus Sandwiches

    Course dinner, Lunch, Snack
    Keyword dinner, lunch, plant based, sandwich, snack, vegan
    Servings 2 sandwiches

    Ingredients

    • 4 slices your favorite bread
    • 6 tablespoons hummus
    • 1 cup lettuce
    • ½ cup shredded carrots
    • ½ cup sliced avocado
    • Olive oil to brush the bread slices optional

    Instructions

    • Lightly toast or grill the bread slices. If using a grill pan you can brush with olive oil.
    • Cut the grilled bread into heart shapes using a sandwich cutter: Line up the sandwich cutter in the center of a slice of bread. Press down firmly, until it cuts through completely, leaving you with a heart-shaped piece of bread.
    • Spread one slice of the prepared bread with 3 tablespoons of the hummus. Layer on top half of the lettuce, carrots and avocado. Repeat with the remaining ingredients.
    • Enjoy!

    Beet Hummus

    Course Appetizer, Snack
    Keyword appetizer, plant based, snack, valentine’s day, vegan
    Servings 4

    Ingredients

    • 3 medium size cooked beets chopped
    • ¼ cup tahini
    • 2 tablespoons lemon juice
    • ½ teaspoon sea salt
    • 1 teaspoon chopped scallions (only the white bottom part)
    • 2 tablespoons water
    • Olive oil for drizzling

    Optional garnishes for serving

    • Chopped parsley
    • Chopped pistachios
    • Fresh lemon zest
    • Za'atar
    • Flaked sea salt

    Instructions

    • Place the cooked beets in a food processor.
    • Add the tahini, lemon juice, sea salt and scallions. Blend until smooth, adding just enough of the water to reach desired consistency.
    • Serve drizzled with olive oil and sprinkled with any garnishes you like, such as chopped parsley, chopped pistachios, fresh lemon zest, za’atar, and/or flaked sea salt.
    • Enjoy!

    Thank you to Christine Waltermyer and the Natural Kitchen Cooking School for working with us to help promote healthy, nutritious meals and products that are affordable, full of nutrients, and simple to make at home!

  • Holiday Mocktails

    Holiday Mocktails

    Holiday Mocktails

    with Christine Waltermyer

    Christine Waltermyer is a local and renowned Wellness Chef, private chef to celebrities, published cookbook author and founder of the Natural Kitchen Cooking School, which offers an online Plant-Based Cooking Program. She also loves shopping at Basil Bandwagon! Visit naturalkitchenschool.com to subscribe to her email newsletter for new recipes, tips, and FREE access to the Power of Veggies mini-course!


    Holidays can be hectic, which is why we love these easy MOCKTAIL recipes thanks to Christine Waltermyer and the Natural Kitchen Cooking School. Featuring ingredients found at your local Basil Bandwagon Natural Market, these recipes can be enjoyed all year round!

    Cranberry Pomegranate Cosmo

    Course Drinks
    Keyword cosmo, drinks, holiday, mocktail

    Ingredients

    • cup pomegranate juice
    • Juice of ½ orange
    • Pink food coloring (I used 1 teaspoon of Supernatural food colors pink shade)
    • 16 ounces Mingle Mocktails Cranberry Cosmo

    Garnishes

    • cup fresh pomegranate seeds
    • ½ cup fresh cranberries
    • A few fresh rosemary sprigs
    • 2-4 strips orange peel curled around a chopstick

    Instructions

    • In a glass jar, combine the pomegranate juice, orange juice and food coloring. Shake well to combine. Add to the Mingle Mocktails Cranberry Cosmo and stir well. Pour into two martini glasses. To each glass add a few pomegranate seeds, some cranberries, a rosemary sprig and fresh orange peel.
    • Enjoy!

    Blueberry Basil Bellini

    Course Drinks
    Keyword bellini, drinks, holiday, mocktail

    Ingredients

    • 16 ounces + ½ cup Mingle Mocktails Blackberry Hibiscus Bellini
    • Juice of one lime
    • 1-2 tablespoons pure maple syrup
    • Purple or blue food coloring (I used 1 teaspoon of Supernatural food colors purple shade)

    Garnishes

    • ½ cup fresh blueberries
    • A few fresh basil sprigs
    • Fresh lime wedges
    • Colorful straws

    Instructions

    • In a glass measuring cup, combine 16 ounces of the Mingle Mocktails Blackberry Hibiscus Bellini with the lime juice and maple syrup. Stir to combine.
    • Add some ice to two glasses. Pour in enough of the mocktail to fill two third’s full.
    • In a glass jar combine another ½ cup of the Mingle Mocktails Blackberry Hibiscus Bellini with the food coloring. Stir well or place a lid on the jar and shake well. Divide this mixture evenly between the two glasses. Stir to combine.
    • Garnish the glasses with the fresh blueberries, basil sprigs, lime wedges and colorful straws.
    • Enjoy!

    Thank you to Christine Waltermyer and the Natural Kitchen Cooking School for working with us to help promote healthy, nutritious meals and products that are affordable, full of nutrients, and simple to make at home!

  • 2021 Holiday Gift Guide

    2021 Holiday Gift Guide

    2021 Holiday Gift Guide

    with Basil Bandwagon Natural Market

    Happy Holidays! We have gifts for everyone on your list this holiday season – kids, parents, grandparents, uncles, aunts, pets – you name it!

  • Holiday Stuffed Mushroom Appetizer

    Holiday Stuffed Mushroom Appetizer

    Stuffed Mushroom Appetizer

    with Christine Waltermyer

    Christine Waltermyer is a local and renowned Wellness Chef, private chef to celebrities, published cookbook author and founder of the Natural Kitchen Cooking School, which offers an online Plant-Based Cooking Program. She also loves shopping at Basil Bandwagon! Visit naturalkitchenschool.com to subscribe to her email newsletter for new recipes, tips, and FREE access to the Power of Veggies mini-course!


    ‘Tis the season for delicious food and family gatherings! These flavorful stuffed mushrooms will add a nice touch to your holiday entertaining buffet. Featuring ingredients found at your local Basil Bandwagon Natural Market.

    Stuffed Mushroom Appetizer

    Course Appetizer, Snack
    Keyword appetizer, holiday, snack
    Servings 12

    Ingredients

    • 16 ounces button mushrooms cleaned and stems removed
    • ¼ cup avocado oil
    • 1 tablespoon olive oil
    • ¼ cup diced shallot
    • ½ cup finely diced carrot (about 1 medium carrot)
    • Sea salt
    • cup mushroom jerky (or sun-dried tomatoes) finely chopped
    • 2 tablespoons minced parsley
    • ¾ cup walnuts finely chopped
    • ½ cup cooked black rice
    • 1 tablespoon Annie's Worcestershire Sauce
    • Freshly ground black pepper
    • cup scallions thinly sliced

    Instructions

    • Preheat the oven to 375 degrees F. Line a baking sheet with parchment paper.
    • Finely chop the mushroom stems. Place the cleaned and de-stemmed mushroom caps on the prepared baking sheet. Lightly brush with the avocado oil. Bake, stem side facing up, for 8 to 10 minutes.
    • Make the filling mixture: In a large skillet over medium high heat, add the olive oil and the shallot. Cook and stir for a few minutes. Add the carrot and a pinch of the sea salt. Cook and stir for a few more minutes. Add the mushroom jerky. Cook a few more minutes, then add the parsley. If the vegetables stick to the skillet you can a splash of white wine or vegetable broth. Add the mushroom stems and another pinch of sea salt. Cook and stir for another minute or two. Add the walnuts and cook for another minute. Add the cooked black rice, Worcestershire sauce, black pepper and scallions. Cook and stir a few minutes more.
    • Remove the mushrooms from the oven. Drain out any liquid from the centers of the mushrooms. Fill each mushroom cap with a rounded tablespoon of the filling mixture. Press the filling firmly, squeezing it over the mushroom cap.
    • Bake the stuffed mushrooms for 10 more minutes at 375 degrees F. Serve warm or cooled to room temperature. Serve garnished with fresh parsley. Optional: Drizzle with a little balsamic glaze just before serving.
    • Enjoy!

    Thank you to Christine Waltermyer and the Natural Kitchen Cooking School for working with us to help promote healthy, nutritious meals and products that are affordable, full of nutrients, and simple to make at home!

  • Give the Gift of Aromatherapy with Pranarom

    Give the Gift of Aromatherapy with Pranarom

    Give the gift of aromatherapy – but with a personal touch ✨🎁 The thought of taking time to make something with your hands makes the idea of gift giving so much more special. Check out fun, simple DIY recipes featuring Pranarom organic aromatherapy products ❤️

    Stock up on their products in any of our locations while they’re 20% off all December long!

    DIY AROMATHERAPY CANDLE

    Ingredients:

    • 6 oz Glass Jar
    • 7.5 oz. Beeswax
    • 40-50 Drops of Essential Oils
    • 1 Wick

    Instructions:

    1. Stick the wick to the bottom of jar using a little melted wax.
    2. Hold wick up using two sticks tied together at each end, with your wick in the middle
    3. Place beeswax in a double broiler on stovetop
    4. Melt beeswax until completely dissolved
    5. Remove from stove
    6. Let cool slightly
    7. Stir in essential oils
    8. Pour into jar
    9. Let cool

    *If layering the two waxes, follow the steps above but use half the amount of wax for each color. Pour the first color and let sit until set and then follow with the next color.


    One thing to keep in mind when making candles with essential oils is that the fragrance is subtle. If you are looking for a stronger scent, you may want to diffuse your oils. Or better yet, a combination of the two. Who doesn’t love the beautiful scent of diffused oils while enjoying the flicker of a candle? A powerful relaxing combo indeed!

    Feel free to make it your own combinations and make sure to have some fun!


    DIY Honey Bath

    Ingredients:

    • 1 Tablespoon Honey
    • 3 Drops of Pranarom Essential Oil
    • ¼-1 Cup of Pranarom Hydrosol

    Instructions:

    1. Add honey to a jar, add the essential oil and mix well. Then add hydrosol and mix until the honey has dissolved. Pour directly into your bath water.

    Honey is a humectant, giving this combination a moisturizing effect. It also works as a dispersant for the essential oils (which is furthered by mixing with the hydrosol) so that it seamlessly integrates with the bath water.

    This will make your skin feel SO soft and luxurious!


    DIY Essential Oil Clay Diffuser

    Ingredients:

    • Airdry clay (they used Terracotta for an organic feel)
    • Hemp Cording
    • Wooden Beads (wide hole)
    • Essential Oil (like Pranarom Zen diffusion blend)
    • Rubber Stamp (or household items to make patterns)
    • Circle Cutter
    • Drinking Straw or Large Skewer (to make hole)
    • Rolling Pin

    Instructions:

    1. Roll out clay into a slab about ¼” thick. Stamp design into clay.
    2. Cut out clay into circles and make hole at the top using a straw or skewer.
    3. Set aside to dry for 24-48 hours, until fully hardened. Flip pieces occasionally to dry both sides.
    4. Once dry, cut a piece of hemp cord approximately 18 inches and thread through hole.
    5. Add beads and tie a knot at the top of your last bead.
    6. Add an additional knot at the end of the two pieces of cord.
    7. Add a few drops of your favorite essential oil and enjoy the beautiful aroma.

    You can make these as elaborate as you want. Add some metal embellishments, join a couple shapes together, etc. This diffuser can be hung in a car, closet, or anywhere you want to aromatize your space.


    DIY Valencia Bath Salts

    Ingredients:

    • 1 Cup Epsom Salts
    • ¼ Cup Coarse Sea Salt
    • 7 Drops of Valencia Diffusion Blend
    • Zest of 1 Orange

    Instructions:

    1. In a medium-sized glass mixing bowl, add sea salt and Epsom salt. Do not use plastic (the essential oils will absorb into the bowl).
    2. Mix the salts until well combined.
    3. Add essential oils and mix again.
    4. Store in an airtight glass container until ready to use.
    5. When ready, add to bath and enjoy!


    DIY Oh So Luxurious Skincare Roller

    Ingredients:

    10 Drops of Pranarom Frankincense Essential Oil
    10 Drops of Lavender Essential Oil
    5  Drops of Helichrysum Essential Oil
    Pranarom Rosehip Extra Virgin Plant Oil (to fill)
    Roller Bottle


    Instructions:

    1. Add essential oils to a roller bottle. Fill the remainder of the bottle with Rosehip oil and voila!
    2. Apply to directly to dry skin or mix with your favorite moisturizer for some extra hydration.

    These statements have not been evaluated by the Food and Drug Administration (FDA). These products are not intended to diagnose, treat, cure or prevent any diseases.

    Resources:

    http://veriditasblog.blogspot.com/2021/11/handmade-for-holidays.html

    http://veriditasblog.blogspot.com/2021/06/aromatherapy-candle-diy.html

    https://www.instagram.com/p/CMzv2rbHNFw/?epik=dj0yJnU9dFBNZUpfOThLMDg4N3hoRHVJX193elUwLUdpQXlfV3gmcD0wJm49TWhGVFhGbGtPc3BoMTRzaTVQazNEQSZ0PUFBQUFBR0dlZ180

    http://veriditasblog.blogspot.com/2021/01/new-destination-diffusion-blends-diy.html

    https://www.instagram.com/p/COI2OHxrp6A/?epik=dj0yJnU9QURJdnJEazhVSGpsYXV0TzZHU2ZuVVV3bnZ4YTVQcDYmcD0wJm49eDMzcmpsM3BwR2FZYzV5dGFkUGdnQSZ0PUFBQUFBR0dlZ3Vj

    https://www.instagram.com/p/CW_IO1uMgPX/?utm_source=ig_web_copy_link

    https://basilbandwagon.com/2020/12/08/peace-love-joy-with-pranarom/

    https://basilbandwagon.com/2021/04/06/plant-beautiful-skincare-thanks-to-pranarom/

    https://www.instagram.com/p/CS7cze1gint/

  • Vegan Potato Soup

    Vegan Potato Soup

    Vegan Potato Soup

    with Christine Waltermyer

    Christine Waltermyer is a local and renowned Wellness Chef, private chef to celebrities, published cookbook author and founder of the Natural Kitchen Cooking School, which offers an online Plant-Based Cooking Program. She also loves shopping at Basil Bandwagon! Visit naturalkitchenschool.com to subscribe to her email newsletter for new recipes, tips, and FREE access to the Power of Veggies mini-course!


    Soups’ on! How do you keep yourself warm during the colder months? There are plenty of different ways – like warm sweaters, cozy blankets, and sitting by the fireplace. But our favorite way is enjoying a delicious hot soup with family and friends. Thanks to Christine Waltermyer and the Natural Kitchen Cooking School, we may have found our next favorite soup recipe – and it’s vegan! Featuring all products that can be found at Basil Bandwagon Natural Market 😊

    Vegan Potato Soup

    Course Lunch, Main Course, Soup
    Keyword dinner, lunch, main course, soup
    Servings 4

    Ingredients

    • 3 medium white flesh sweet potatoes such as Hannah or Japanese sweet potatoes peeled (or an equivalent amount of white potatoes)
    • 1 tablespoon olive oil
    • 1 cup onion diced (about 1 medium onion)
    • Sea salt
    • 2 stalks celery diced
    • 2 carrots peeled and diced
    • 4 cups vegetable broth
    • 1 6 oz package Lightlife Tempeh Smoky Bacon
    • Avocado oil
    • 1 cup thinly sliced leeks
    • ½ cup coconut cream

    Instructions

    • Peel the sweet potatoes. Cut into small dice pieces and place them in a pot of cold, salted water.
    • Heat a large skillet or large soup pot over medium high heat. Add the olive oil, onion and a pinch of the sea salt. Cook and stir for a few minutes. Add the carrots, celery and another pinch of sea salt. Cook and stir for five minutes. If the vegetables begin to stick to the pan add a small splash of vegetable broth or water.
    • Meanwhile, in a medium size saucepan, warm the vegetable broth over medium heat. If you used a skillet, transfer the cooked vegetables to a large soup pot. Drain the potatoes and add them to the pot. Add the warmed vegetable broth. Bring to a boil over medium high heat, then reduce the heat to simmer on medium low, lightly covered, for 20 minutes.
    • Cut the tempeh bacon strips in half. Heat a large skillet over medium heat. Add about a tablespoon of the avocado oil, then add the tempeh bacon in a single layer. Fry for a few minutes on one side, then turn to fry on the other side for a few more minutes, until lightly browned on both sides. Remove and transfer to a plate to cool. Chop the cooked tempeh into smaller pieces.
    • To the soup pot, add the coconut cream, 1 teaspoon of sea salt and a few grinds of freshly ground black pepper. Puree one third of the soup by using an immersion blender. Or, place a few cups of the soup into a blender and blend until smooth. Return the pureed soup to the pot and stir to combine.
    • In the large skillet, heat another 2 teaspoons of the avocado oil. Add the leeks, a pinch of sea salt and a few grinds of black pepper. Cook and stir for 5 to 10 minutes, or until the leeks are very tender and lightly browned. Serve the soup hot, topping each bowl with a tablespoon of the tempeh bacon bits and a couple of teaspoons of sautéed leeks.
    • Enjoy!

    Thank you to Christine Waltermyer and the Natural Kitchen Cooking School for working with us to help promote healthy, nutritious meals and products that are affordable, full of nutrients, and simple to make at home!

  • Holiday Frosted Sugar Cookies

    Holiday Frosted Sugar Cookies

    Holiday Frosted Sugar Cookies

    with Christine Waltermyer

    Christine Waltermyer is a local and renowned Wellness Chef, private chef to celebrities, published cookbook author and founder of the Natural Kitchen Cooking School, which offers an online Plant-Based Cooking Program. She also loves shopping at Basil Bandwagon! Visit naturalkitchenschool.com to subscribe to her email newsletter for new recipes, tips, and FREE access to the Power of Veggies mini-course!


    Impress your friends at this year’s cookie exchange with Christine Waltermyer’s Holiday Frosted Sugar Cookies! This sweet recipe can be decorated any way you’d like – maybe plant-based food dyes? How about festive Supernatural sprinkles? The sky’s the limit!

    Share your special creations by tagging us on social media:

    Instagram – @basilbandwagon & @naturalkitchenschool

    Facebook – @BasilBandwagonOfficial & @NaturalKitchenCookingSchool

    Find these ingredients at your local Basil Bandwagon Natural Market today!

    Holiday Frosted Sugar Cookies

    Course Dessert
    Keyword cookies, dessert, holiday
    Servings 24 cookies

    Ingredients

    • ¼ cup ghee or butter of your choice
    • 6 tablespoons maple syrup
    • 1 room temperature egg
    • 1 teaspoon pure vanilla extract
    • 1 ¾ cup fine almond flour
    • ¼ cup arrowroot flour
    • ¼ cup cassava flour
    • ¼ teaspoon sea salt
    • ½ teaspoon cream of tartar

    Toppings

    • Simple Mills frosting
    • sprinkles of your choice (I used Supernatural Sprinkles)
    • colored sugar
    • coconut sugar
    • cinnamon

    Instructions

    • In a large bowl (or stand mixer or food processor), combine the ghee, maple syrup, egg and vanilla. Whisk well to blend.
    • Add the almond flour, arrowroot flour, cassava flour, sea salt and cream of tartar. Whisk again or use a fork to combine into a smooth dough.
    • Wrap the dough with plastic wrap and form into a flat disc. Refrigerate for two hours.
    • Preheat the oven to 350 degrees F. Line a baking sheet with parchment paper. Place the chilled dough on a piece of parchment paper. Place another piece of parchment paper on top. Roll out the dough to desired thickness, about ¼-inch thick. Or you can make it slightly thinner if you prefer. Use cookie cutters or a glass jar to cut out shapes of your choice.
    • Transfer the cut out cookies onto the prepared baking sheet. If you want to make some cinnamon sugar variety, top them with a mixture of half coconut sugar mixed with half cinnamon. Leave the rest of the cookies plain for frosting later when cool. Bake for 10 minutes, or until lightly golden on the bottoms.
    • Cool the cookies. Prepare your toppings. If you want to add food coloring to white frosting, place ½ cup of the frosting in a small bowl and add a teaspoon of the desired dry food coloring powder. If using liquid food coloring drops you will need less. Mix until completely uniform in color. Carefully frost the cookies and add sprinkles of your choice. Store cookies in a single layer in a glass storage container, lightly covered.
    • Enjoy!

    Thank you to Christine Waltermyer and the Natural Kitchen Cooking School for working with us to help promote healthy, nutritious meals and products that are affordable, full of nutrients, and simple to make at home!

  • Cinco de Mayo with Christine Waltermyer

    Cinco de Mayo with Christine Waltermyer

    Cinco de Mayo

    with Christine Waltermyer

    Christine Waltermyer is a local and renowned Wellness Chef, private chef to celebrities, published cookbook author and founder of the Natural Kitchen Cooking School, which offers an online Plant-Based Cooking Program. She also loves shopping at Basil Bandwagon! Visit naturalkitchenschool.com to subscribe to her email newsletter for new recipes, tips, and FREE access to the Power of Veggies mini-course!


    Happy Cinco de Mayo! Looking for some healthy plant-based alternatives for your favorite traditional holiday recipes? Check out two of our Cinco de Mayo favorites from Christine Waltermyer and The Natural Kitchen Cooking School below!

    Fruit Salsa with Cinnamon Pita Chips

    Course Appetizer, Dessert, Snack
    Keyword appetizer, chips and dip, cinco de mayo, dessert, fruit salsa, pita chips, salsa, snack, summer
    Servings 4

    Ingredients

    • 16 oz ripe strawberries diced
    • ½ golden delicious apple diced
    • ½ granny smith apple diced
    • ½ any red variety red-skinned apple diced
    • 1 kiwi fruit peeled and diced
    • 8 oz red raspberries
    • 2 tablespoons pure maple syrup
    • pinch sea salt
    • ½ teaspoon pure vanilla extract
    • 2 tablespoons all-fruit strawberry jam
    • juice of ½ a lime
    • juice of a mandarin orange (or a few tablespoons fresh orange juice)

    Pita Chips

    • 4 whole grain pita pockets
    • avocado oil (spray or oil)
    • 4 teaspoons cinnamon
    • 4 tablespoons raw cane sugar

    Instructions

    • Preheat the oven to 350 degrees F.
    • In a large bowl, place all of the fruit. Add the maple syrup, sea salt, vanilla, jam, lime juice and orange juice. Stir gently.
    • Place the whole pita pockets on a baking sheet. Lightly spray or brush each one with a little avocado oil. Sprinkle each one with a tablespoon of raw cane sugar and a teaspoon of cinnamon. Cut each pita pocket into 4 pieces. Bake the pita chips in the preheated 350 degrees F. oven for 8 to 10 minutes. Cool for at least 15 minutes before serving them with the salsa.
    • Enjoy!

    Vegan Enchilada Casserole

    Course Main Course
    Keyword casserole, cinco de mayo, enchilada, entree, vegan
    Servings 6

    Ingredients

    Carrot Sauce

    • 3 large carrots cut into big chunks
    • ¼ large red onion chopped (½ cup)
    • 1 teaspoon chopped red beet
    • water
    • sea salt
    • lime (½ lime, juiced) optional

    Casserole

    • 2 cloves garlic minced
    • 1 yellow onion diced
    • 1 medium zucchini cut into half moons
    • 1 cup black kalamata olives chopped
    • 16 oz crimini or button mushrooms de-stemmed and sliced
    • 2 teaspoons olive oil
    • 1 teaspoon ground cumin
    • ½ cup frozen corn kernels
    • chili powder or crushed red pepper optional
    • 26 oz cooked kidney beans
    • ½ cup vegan shredded cheese or cheese of your choice, for the top (plus extra if you want to add some in the layers)
    • 1 8-count pack cassava flour tortillas or other tortillas

    Instructions

    • Lightly oil a 9 x 13 glass casserole dish.
    • Make the sauce: In a medium saucepan, place the carrots, red onion and red beet. Add just enough water to almost cover the vegetables. Bring to a boil over medium high heat. Cover and reduce the heat to simmer on low for 20 minutes, or until the vegetables are fork-tender.
    • Once the vegetables are soft, place the cooked carrots, red onion and any remaining cooking liquid in a small blender. Add ½ teaspoon of the sea salt. You can also add a squeeze of fresh lime juice.
    • Preheat the oven to 400 degrees F.
    • In a large frypan, heat the olive oil over medium heat for a minute. Add the onion and garlic. Add a sprinkle of the sea salt to help the onions soften. Cook and stir for a few minutes. Add the mushrooms. Add another generous pinch or two of sea salt. Cover and cook for a few more minutes, or until the mushrooms soften. Add the zucchini, a little more salt, the corn kernels and the black olives. If you want to add spicy ingredients like chili powder or crushed red pepper, you can add that now.
    • In the prepared casserole, place about ½ cup of the carrot sauce on the bottom. Spread it around. Add a layer of tortillas, then top with ½ of the vegetables and ½ of the kidney beans. Feel free to add a little vegan cheese in the layers. Top with ½ cup of the sauce. Repeat the layers with another layer of tortillas, then the remaining beans and veggies, another ½ cup sauce, and another layer of tortillas. Spread with any remaining sauce.
    • Cover with foil. Bake for 15 minutes. Uncover the casserole and bake for another 8 minutes. Top with cheese and bake for another minute. Let the casserole cool for 5 minutes before slicing into squares. Serve with a side salad and guacamole.
    • Enjoy!

    Notes

    Note: If you want more sauce in this casserole, feel free to double the amount of sauce ingredients.

    Thank you to Christine Waltermyer and the Natural Kitchen Cooking School for working with us to help promote healthy, nutritious meals and products that are affordable, full of nutrients, and simple to make at home!