Category: Organic

  • Baked Sweet Potato Fries

    Baked Sweet Potato Fries


    Baked Sweet Potato Fries

    Looking for a healthier alternative to traditional French fries for your Thanksgiving gathering? These Baked Sweet Potato Fries are a tasty and nutritious choice. They’re crispy on the outside and tender on the inside, making them a perfect side dish for the holiday.


    Elisa Franco

    Baked Sweet Potato Fries

    These Baked Sweet Potato Fries are a crowd-pleaser that won't leave you feeling guilty after indulging. Add them to your Thanksgiving menu for a healthier twist on a classic favorite. Your guests will love the crispy, flavorful goodness of these fries!
    Servings: 4

    Ingredients
      

    • 3 large sweet potatoes peeled and cut into fries
    • 2 tblsp olive oil
    • 1 tsp paprika
    • 1/2 tsp garlic powder
    • 1/2 tsp salt flakes
    • 1/4 tsp coarse ground black pepper
    • fresh thyme for garnish

    Method
     

    1. Preheat your oven to 425°F and line a baking sheet with parchment paper.
    2. In a large bowl, toss the sweet potato fries with olive oil, paprika, garlic powder, salt flakes, and black pepper until evenly coated.
    3. Arrange the fries in a single layer on the prepared baking sheet, making sure they are not crowded.
    4. Bake for 20-25 minutes, flipping the fries halfway through, until they are golden brown and crispy.
    5. Garnish with thyme, serve with your favorite dipping sauce.
    6. Enjoy!

  • Cranberry and Walnut Stuffed Acorn Squash

    Cranberry and Walnut Stuffed Acorn Squash


    Cranberry and Walnut Stuffed Acorn Squash

    Acorn squash is a quintessential fall ingredient, and this Cranberry and Walnut Stuffed Acorn Squash recipe celebrates its natural sweetness while adding a delightful twist. It’s a gorgeous and healthy dish that will elevate your Thanksgiving table.


    Elisa Franco

    Cranberry and Walnut Stuffed Acorn Squash

    This Cranberry and Walnut Stuffed Acorn Squash is a work of art on your Thanksgiving table, and its taste is just as impressive. With the sweetness of the squash, the tartness of cranberries, and the crunch of walnuts, it's a symphony of flavors. Enjoy this healthy, elegant dish as you give thanks this holiday season.

    Ingredients
      

    • 2 acorn squashes halved and seeds removed
    • 1 cup quinoa rinsed
    • 2 cups vegetable broth or bone broth
    • 1/2 cup dried cranberries
    • 1/2 cup chopped walnuts
    • 2 tblsp maple syrup
    • 2 tblsp olive oil
    • salt and pepper to taste

    Method
     

    1. Preheat your oven to 375°F.
    2. Place the halved acorn squashes on a baking sheet, cut side up, and drizzle them with olive oil, maple syrup, salt, and pepper.
    3. Roast the squashes for about 35-40 minutes, or until they are tender.
    4. While the squashes are roasting, rinse the quinoa thoroughly and cook it in vegetable or bone broth according to package instructions.
    5. Once the quinoa is cooked, fluff it with a fork and stir in dried cranberries and chopped walnuts.
    6. Fill each roasted acorn squash half with the quinoa mixture.
    7. Place the stuffed squash back in the oven for an additional 10 minutes.
    8. Serve warm, drizzled with a bit of maple syrup if desired.

  • Roasted Butternut Squash and Quinoa Salad

    Roasted Butternut Squash and Quinoa Salad


    Roasted Butternut Squash and Quinoa Salad

    As Thanksgiving approaches, it’s essential to have some healthier options on the menu. This Roasted Butternut Squash and Quinoa Salad is not only delicious but also packed with nutrients. It’s a perfect side dish to balance out the indulgent treats on your Thanksgiving table.


    Elisa Franco

    Roasted Butternut Squash and Quinoa Salad

    This Roasted Butternut Squash and Quinoa Salad is a delightful addition to your Thanksgiving spread. It's not only a treat for your taste buds but also a nourishing choice for your body. Enjoy this healthy, colorful dish as you celebrate gratitude and good food this Thanksgiving!
    Servings: 4

    Ingredients
      

    • 1 small butternut squash peeled and diced
    • 1 cup quinoa rinsed
    • 1 cup kale chopped
    • 2 cups vegetable broth
    • 1/2 cup pomegranate seeds
    • 1/4 cup fresh parsley chopped
    • 1/4 cup pecans chopped
    • 2 tbsp olive oil
    • salt and pepper to taste

    Method
     

    1. Preheat your oven to 400°F.
    2. Toss the diced butternut squash with olive oil, salt, and pepper. Roast in the oven for 25-30 minutes or until tender and slightly caramelized.
    3. While the squash is roasting, rinse the quinoa thoroughly and cook it in vegetable broth according to package instructions.
    4. Once the quinoa and butternut squash are ready, combine them in a large bowl.
    5. Add pomegranate seeds, chopped parsley, chopped kale and chopped pecans. Mix well.
    6. Season with salt and pepper to taste.
    7. Serve warm or at room temperature.

  • Gluten Free Banana Bread with Oats

    Gluten Free Banana Bread with Oats


    Gluten Free Banana Bread with Oats

    Are you looking for a delicious and wholesome twist on classic banana bread?

    You’re in for a treat! This recipe combines the comforting flavor of ripe bananas with the heartiness of oats, making it a perfect breakfast or snack option.

    Plus, it’s gluten-free without the need for any specialty flour. Let’s dive into making this delectable oat-based banana bread.


    Elisa Franco

    Gluten Free Banana Bread with Oats

    A delicious and gluten-free banana bread recipe made with hearty oats!
    Servings: 6

    Ingredients
      

    • 3 ripe bananas mashed
    • 1/3 cup melted butter or a dairy-free alternative
    • 1 tsp baking soda
    • 1 tsp baking powder
    • Pinch of salt
    • 1/2 cup coconut sugar or sweetener of choice
    • 1 large egg beaten
    • 1 tsp vanilla extract
    • 1.5 cups old-fashioned rolled oats
    • 1 tsp ground cinnamon
    • 1/2 tsp ground cardamom
    • 1/2 cup chopped nuts optional
    • 1/2 cup chocolate chips optional

    Method
     

    1. Preheat Your Oven: Start by preheating your oven to 350°F. Grease a 4×8 inch loaf pan or line it with parchment paper.
    2. Prepare the Bananas: In a mixing bowl, mash the ripe bananas with a fork until they form a smooth puree.
    3. Combine Wet Ingredients: Stir the melted butter into the mashed bananas. Then, add the baking soda, and a pinch of salt. Mix well.
    4. Sweeten It Up: Add the coconut sugar to the banana mixture, followed by the beaten egg and vanilla extract. Stir until all the ingredients are thoroughly combined.
    5. Oats and More: In a separate bowl, combine the old-fashioned rolled oats, baking powder, and ground cinnamon.
    6. Mix Everything Together: Gradually add the dry oat mixture to the banana mixture, stirring until just incorporated. Be careful not to overmix; simply combine until there are no visible streaks of dry ingredients.
    7. Optional Add-Ins: If you desire extra texture and flavor, fold in the chopped nuts or chocolate chips.
    8. Baking Time: Pour the batter into your prepared loaf pan.
    9. Bake to Perfection: Bake in the preheated oven for approximately 45-60 minutes. To check for doneness, insert a toothpick or cake tester into the center of the loaf; it should come out clean. Depending on your oven, start checking around 40 minutes.
    10. Cooling and Serving: Once done, remove your oat-based banana bread from the oven and let it cool in the pan for about 10 minutes. Afterward, transfer it to a wire rack to cool completely.

  • Hot Horchata

    Hot Horchata


    Hot Horchata

    There’s something truly comforting about a hot cup of this sweet, spiced rice beverage. In this recipe, we’ll show you how to create a soothing and aromatic hot horchata that’s perfect for those cozy moments when you need a little comfort and indulgence. Let’s dive into this simple hot horchata recipe.


    Elisa Franco

    Hot Horchata

    As the sweet and spicy aroma fills your kitchen, you'll find that hot horchata is delightful for those chilly evenings when you're craving a comforting treat. So, cozy up, savor the moment, and let the warmth of this drink serve you comfort in a cup!
    Servings: 4

    Ingredients
      

    • 1 cup long-grain white rice
    • 4 cups water
    • 1 cup milk of choice
    • 1 cinnamon stick
    • 1/4 cup honey, or sweetener of choice adjust to taste
    • 1 tsp vanilla extract
    • ground cinnamon for garnish

    Method
     

    1. Begin by rinsing the rice thoroughly under cold water until the water runs clear. This helps remove excess starch from the rice.
    2. Place the rinsed rice and cinnamon stick in a bowl, and add 4 cups of water. Allow the rice to soak for at least 3 hours or overnight. Soaking softens the rice and makes it easier to blend.
    3. After soaking, remove the cinnamon stick and transfer the rice and water to a blender. Blend until you have a smooth, creamy mixture. This may take a few minutes.
    4. Set a fine-mesh strainer or a nut milk bag over a large saucepan. Pour the blended rice mixture through the strainer, pressing on the solids to extract as much liquid as possible. Compost the rice solids.
    5. Place the saucepan with the strained rice liquid over medium heat. Add the honey or sweetener of choice, vanilla extract, and milk of choice, and stir until the honey dissolves completely. Heat the mixture gently, but do not let it boil over.
    6. Pour your hot horchata into cups or mugs. Sprinkle a pinch of ground cinnamon on top for garnish. Enjoy the soothing and comforting flavors of this hot horchata!

  • Herbal Rehydration Drink

    Herbal Rehydration Drink


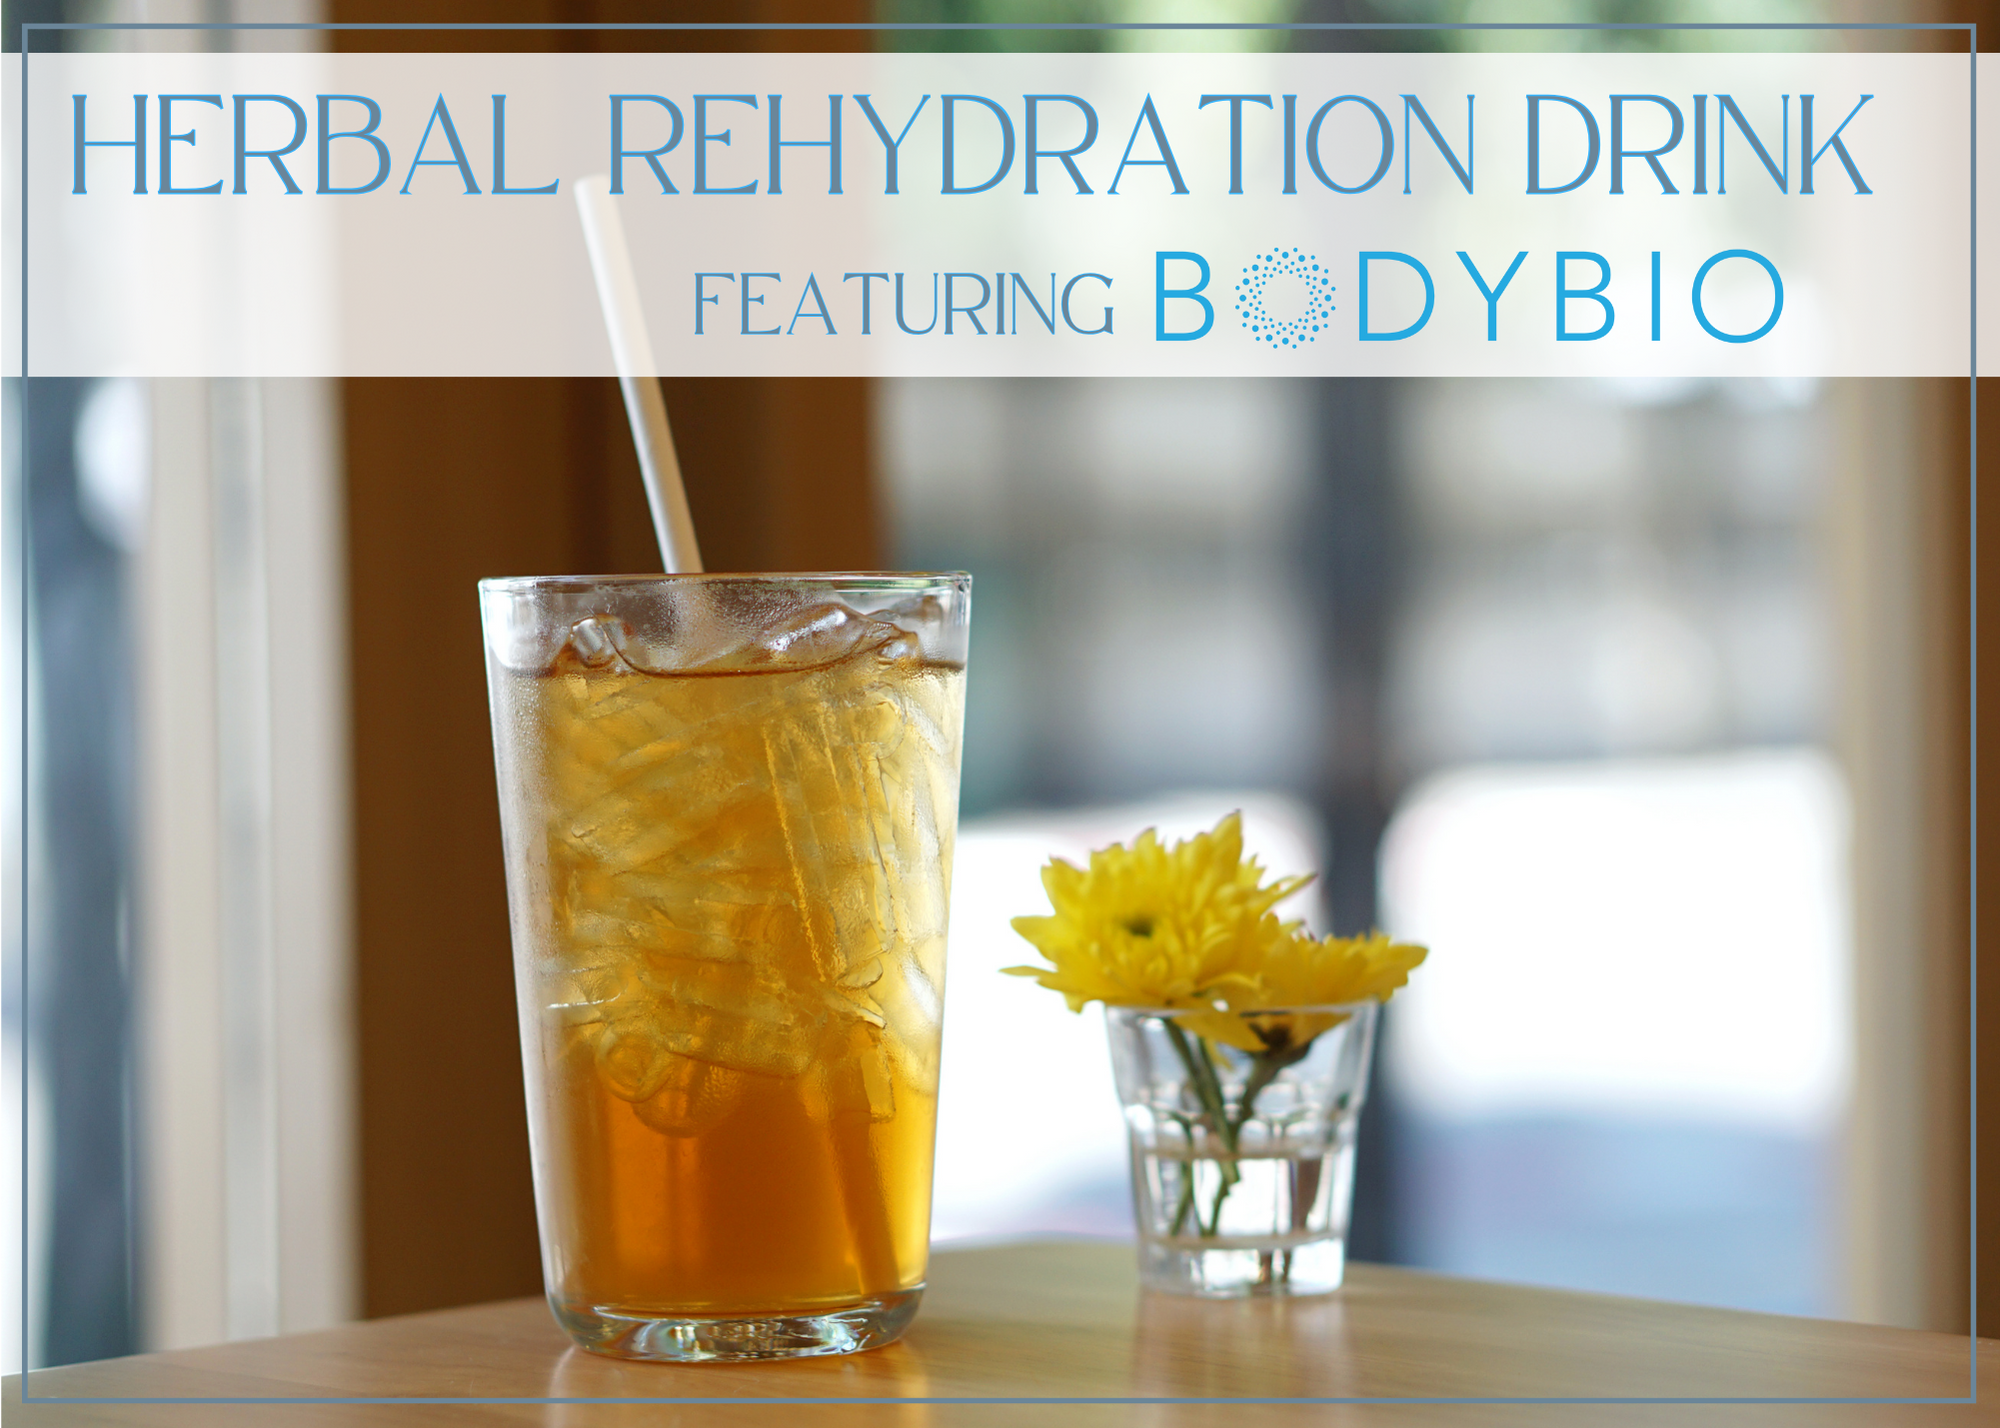
    Herbal Rehydration Drink featuring BodyBio

    A cold, long infusion of nourishing and healing herbs combine with the rehydration benefits of BodyBio’s E-Lyte. Think iced tea that is healing and hydrating on every level. Drink as a replacement of sugary sports drinks, after or during illness, or daily for optimal full spectrum health.


    This drink recipe was formulated for people who need a boost in hydration, vitality, and overall health. An excellent choice for pre and post-workouts and sports activities, nourishing during and after an illness where dehydration is a symptom, and an informed choice for those who seek to support adaptogenic homeostasis of their bodies.

    Below is a breakdown of the medicinal properties of each ingredient:

    E-Lyte by BodyBio:

    Simply put, E-Lyte mimics electrolyte levels in the body for optimal hydration. Think Gatorade, but more powerful, and without all the nasty ingredients.

    It is specially formulated to:

    • Fight cramps
    • Improve stamina and reduce fatigue
    • Boost energy
    • Maintain body temperature
    • Aid neurological function and enhance nerve signaling

    No sugars, no artificial sweeteners, just pure electrolytes in the millequivalent of human blood. E-Lyte is the perfect combination of sodium which contracts muscles, potassium, which relaxes them, and magnesium, which plays a role in more than 300 enzymatic processes and is the force that drives potassium to relax a contracted muscle. Ideal for everyday athletes, pregnant women, or anyone looking to reduce painful cramps and stay energized all day—without all the unnecessary ingredients.

    Most electrolyte concentrates are formulated specifically for professional athletes and contain levels of sodium and sugar that are way too high for daily use. That’s why we formulated E-Lyte with more potassium, less sodium, and no sugar to mimic human blood and give the body exactly what it needs!

    Marshmallow Root:

    (Althaea officinalis) has been used for centuries in traditional medicine for its potential healing properties. While scientific research on its benefits is ongoing, marshmallow root is believed to possess several potential health benefits, primarily due to its mucilage content—a thick, gel-like substance that forms when the root is mixed with water. Here are some of the healing properties associated with marshmallow root:

    Soothing Sore Throats and Coughs: Marshmallow root is known for its soothing properties and is often used to alleviate sore throats, dry coughs, and irritation. It forms a protective layer on the throat’s mucous membranes, providing relief from discomfort.

    Gastrointestinal Relief: The mucilage in marshmallow root may help soothe and protect the digestive tract. It can be used to relieve symptoms of conditions like gastritis, acid reflux, and irritable bowel syndrome (IBS). It may also help alleviate constipation by promoting regular bowel movements.

    Anti-Inflammatory Effects: Marshmallow root may have mild anti-inflammatory properties, making it useful for conditions involving inflammation, such as skin irritations, eczema, and joint pain.

    Respiratory Health: In addition to soothing sore throats and coughs, marshmallow root may help with respiratory issues like bronchitis and asthma by reducing irritation and inflammation in the airways.

    Urinary Health: Marshmallow root is sometimes used to alleviate symptoms of urinary tract infections (UTIs) and bladder issues due to its potential anti-inflammatory and soothing properties.

    Tulsi Leaf:

    Also known as holy basil (Ocimum sanctum or Ocimum tenuiflorum), is a popular herb in traditional Ayurvedic medicine and is revered in many cultures for its potential healing properties. While more research is needed to fully understand the extent of its therapeutic effects, tulsi is believed to have several healing properties:

    Adaptogenic: Tulsi is often classified as an adaptogen, which means it may help the body adapt to stress and promote overall resilience. It can help manage the body’s response to physical and emotional stressors.

    Immune Support: Tulsi is believed to boost the immune system. Its anti-inflammatory and antioxidant properties may help the body defend against infections and illnesses.

    Antioxidant: Tulsi is rich in antioxidants, which can help protect cells from damage caused by free radicals. This may contribute to its potential anti-aging and disease-fighting properties.

    Anti-Inflammatory: Tulsi has anti-inflammatory properties that can help reduce inflammation in the body. It may be beneficial for conditions characterized by chronic inflammation.

    Respiratory Health: Tulsi is often used to relieve respiratory issues, such as coughs, colds, and asthma. Its antimicrobial and anti-inflammatory properties may help clear the respiratory tract and provide relief from congestion.

    Digestive Health: Tulsi can aid in digestion and help alleviate digestive discomfort. It may be used to relieve symptoms of indigestion, gas, and bloating.

    Cardiovascular Health: Some studies suggest that tulsi may help lower cholesterol levels and regulate blood pressure, potentially reducing the risk of heart disease.

    Stress Reduction: Tulsi is known for its calming properties and is used to reduce stress and anxiety. It may help improve mental clarity and promote a sense of well-being.

    Antimicrobial: Tulsi possesses antimicrobial properties that can help combat various infections, including bacterial, viral, and fungal infections.

    Chamomile Flower:

    Chamomile is a well-known herb that has been used for centuries for its potential healing properties. Chamomile flowers, particularly those from the German chamomile (Matricaria chamomilla) and Roman chamomile (Chamaemelum nobile) species, are the parts of the plant most commonly used for therapeutic purposes. Here are some of the healing properties associated with chamomile flowers:

    Anti-Inflammatory: Chamomile contains compounds like chamazulene and alpha-bisabolol, which have anti-inflammatory properties. These properties make chamomile useful for reducing inflammation in various conditions, including skin irritations and gastrointestinal discomfort.

    Digestive Aid: Chamomile tea is often used to soothe digestive issues such as indigestion, bloating, and gas. It can help relax the muscles of the gastrointestinal tract and ease discomfort.

    Stress and Anxiety Reduction: Chamomile is known for its calming and mild sedative effects. Drinking chamomile tea or using chamomile essential oil in aromatherapy can help reduce stress and anxiety, promote relaxation, and improve sleep.

    Skin Health: Chamomile can be used topically to soothe skin irritations, such as insect bites, rashes, and minor burns. It may also help with conditions like eczema and psoriasis due to its anti-inflammatory and anti-itch properties.

    Oral Health: Chamomile’s anti-inflammatory and antimicrobial properties can be beneficial for oral health. It may help reduce gum inflammation, soothe mouth sores, and alleviate toothache discomfort.

    Respiratory Health: Inhaling steam from chamomile tea may help relieve congestion and ease respiratory discomfort associated with colds and allergies.

    Menstrual Pain Relief: Chamomile tea may help alleviate menstrual cramps and reduce the severity of premenstrual symptoms due to its muscle-relaxant and anti-inflammatory properties.

    Wound Healing: Chamomile may promote wound healing when applied topically, as it can help reduce inflammation and provide a soothing effect.

    Antioxidant Properties: Chamomile is rich in antioxidants, which can help protect cells from oxidative stress and may contribute to its anti-aging and disease-preventing effects.

    Anti-allergic: Chamomile may help reduce allergic reactions and symptoms by inhibiting the release of histamines, which play a role in allergy-related inflammation.

    Nettle Leaf:

    Nettle leaf, derived from the common stinging nettle plant (Urtica dioica), has been used traditionally for various medicinal purposes. It is rich in nutrients and bioactive compounds, which contribute to its potential healing properties. Here are some of the healing properties associated with nettle leaf:

    Anti-Inflammatory: Nettle leaf contains compounds like flavonoids and polyphenols that have anti-inflammatory properties. It may help reduce inflammation in conditions like arthritis, allergies, and inflammatory bowel diseases.

    Allergy Relief: Nettle leaf is often used to alleviate symptoms of seasonal allergies, such as hay fever. It may help reduce the release of histamines, which are responsible for allergy symptoms like sneezing and itching.

    Joint Health: Nettle leaf may provide relief from joint pain and stiffness in conditions like osteoarthritis and rheumatoid arthritis due to its anti-inflammatory and pain-reducing properties.

    Diuretic Effect: Nettle leaf has mild diuretic properties, which can promote the removal of excess fluids from the body. This may be beneficial for individuals with conditions like edema and high blood pressure.

    Prostate Health: Some studies suggest that nettle root, rather than the leaves, may have benefits for prostate health by reducing symptoms of benign prostatic hyperplasia (BPH), such as urinary frequency and urgency.

    Digestive Health: Nettle leaf can be used to soothe gastrointestinal discomfort, reduce symptoms of indigestion, and alleviate diarrhea. It may also support a healthy digestive tract.

    Hair and Skin Health: Topical application of nettle leaf extract or oil is believed to promote hair growth, reduce dandruff, and improve skin conditions like eczema and acne.

    Nutrient-Rich: Nettle leaf is a rich source of vitamins (such as A, C, and K), minerals (including iron, calcium, and magnesium), and antioxidants. Consuming nettle leaf as a tea or supplement can help meet nutritional needs.

    Blood Sugar Control: Some research suggests that nettle leaf may help regulate blood sugar levels, potentially benefiting individuals with diabetes or those at risk of developing the condition.

    Urinary Tract Health: Nettle leaf may be used to support urinary tract health, as it can help soothe irritation and reduce symptoms of urinary tract infections (UTIs).

    Give this drink a try, it’s not only nourishing, healing, and rehydrating, it is actually also very delicious and refreshing! Have questions? Come on in to any of our locations to speak with our wellness ambassadors, and don’t forget that we carry herbs in bulk for all of your herbalism and wellness needs!


    Elisa Franco

    Herbal Rehydration Drink

    A cold, long infusion of nourishing and healing herbs combine with the rehydration benefits of BodyBio's E-Lyte. Think iced tea that is healing and hydrating on every level. Drink as a replacement of sugary sports drinks, after or during illness, or daily for optimal full spectrum health.
    Servings: 4

    Ingredients
      

    • 30 ounces Water
    • 3 teabags Nettle Leaf
    • 3 teabags Chamomile Flower
    • 3 teabags Tulsi Leaf
    • 2 teabags Marshmallow Root
    • 2 capfuls BodyBio E-Lyte
    • 1 tblsp Honey, or sweetener of choice optional

    Equipment

    • 1 32 ounce Mason Jar with Lid

    Method
     

    1. Add water to a 32 ounce (quart size) mason jar, or other glass vessel with a lid.
    2. Add all of the tea bags to the water, no need to boil the water, room temperature or cold is fine.
    3. Put the lid on your mason jar. Place it in the fridge and let the herbs infuse into the water for 12-24 hours.
    4. After 12-24 hours, remove from fridge, remove all tea bags, add the 2 capfuls of E-Lyte, honey or sweetener of choice, cover with the lid again, and vigorously shake.
    5. Serve over ice, or as is, and enjoy!

    Product Information about E-Lyte is from BodyBio’s website.

  • Camper’s Stuffed Apples

    Camper’s Stuffed Apples


    Camper’s Stuffed Apples

    These stuffed apples are EASIER than pie! With a quick oat streusel filling, you can recreate the fall flavors of apple pie without fussing with a crust. If you really want to lean into the name, you can wrap the stuffed apples in foil and toss them in the embers of a campfire or pop them on the grill to slow roast them directly in the fire.


    If you have one foot in summer and one in fall, this recipe is for you! Still enjoying the outdoors with camping trips or grilling? This is the perfect dessert to cap a day in nature. You can also toss this together and pop it in the oven for a satisfying, warming peek into fall flavors. Stuffed apples give you all the flavor of apple pie with half the work. That’s a good recipe in any season.


    Camper’s Stuffed Apples

    These stuffed apples are EASIER than pie! With a quick oat streusel filling, you can recreate the fall flavors of apple pie without fussing with a crust. If you really want to lean into the name, you can wrap the stuffed apples in foil and toss them in the embers of a campfire or pop them on the grill to slow roast them directly in the fire.

    Ingredients
      

    • 6 Braeburn apples
    • 1/2 cup rolled oats
    • 1/3 cup light brown sugar
    • 4 tblsp unsalted butter or plant-based alternative 
    • 1/2 tsp ground cinnamon 

    Method
     

    1. Preheat oven to 375° F. Combine oats, brown sugar, butter, and cinnamon in a small bowl until well mixed.
    2. Core apples, starting at the stem and core towards the base, leaving the bottom intact.
    3. Fill apples with oat mixture and arrange in an oven safe baking dish. 
    4. Bake apples for 40 minutes or until knife tender. Alternatively, cover apples with aluminum foil and place pan on the grill to bake. 

    Recipe courtesy of INFRA

  • Healing Herb & Vegetable Broth

    Healing Herb & Vegetable Broth


    Healing Herb & Vegetable Broth

    When you’re looking for a soothing and nourishing recipe that can help boost your immune system and provide comfort, a healing herbal vegetable broth is the perfect choice.


    Packed with a variety of vegetables and aromatic herbs, this broth not only tastes delicious but also provides a wealth of vitamins, minerals, and antioxidants. Whether you’re feeling under the weather or just want to warm up on a chilly day, this recipe is sure to become a go-to in your kitchen.


    Elisa Franco

    Healing Herb & Vegetable Broth

    This healing herbal vegetable broth is a kitchen staple that you'll want to keep on hand year-round. Its nourishing properties make it a go-to when you're feeling unwell, and its delicious taste makes it a versatile addition to various recipes. Sip and enjoy the benefits of this homemade broth and share it with your loved ones. Store extra in the freezer to have at the ready.
    Servings: 4

    Ingredients
      

    • 2 carrots chopped
    • 2 celery stalks chopped
    • 1 onion peeled and quartered
    • 6 cloves garlic smashed
    • 1/2 whole lemon washed thoroughly
    • 1 leek cleaned and sliced
    • 1 red or green pepper chopped
    • 1 parsnip chopped
    • 1 small bunch of fresh parsley or cilantro
    • 1 sprig of fresh thyme, or 1 tsp dried
    • 1 sprig of fresh rosemary, or 1 tsp dried
    • 1 bay leaf
    • 1 tsp whole black peppercorns
    • 1 tsp coriander seeds
    • 1 tsp fennel seeds
    • 1 tsp turmeric powder or a small piece of fresh turmeric root
    • 1-inch knob of ginger sliced
    • 1 small handful of dried shiitake mushrooms
    • 12 cups water
    • salt and pepper to taste
    • 3 jalapeño slices optional, for heat
    • 1/2 cup sliced reishi mushroom, or 2 tbsp powdered optional, for immune boost
    • 1 piece kombu optional, for immune boost
    • 1 tbsp dried astragalus optional, for immune boost

    Method
     

    1. Gather all your ingredients and chop the vegetables as indicated.
    2. In a large soup pot, dry-toast the coriander seeds and fennel seeds over medium heat for a few minutes until fragrant. This step enhances their flavors.
    3. Add all of your ingredients, except the water, to the pot. Stir to combine.
    4. Pour 12 cups of water into the pot, covering all the ingredients. Slowly bring the mixture to a soft boil over medium high heat.
    5. Once it boils, reduce the heat to low, cover, and let the broth simmer for about 1.5 to 3 hours. This allows the flavors to meld and the vegetables to release their goodness. Add salt and pepper to taste during this time.
    6. After simmering, carefully strain the broth into another pot or large bowl. Discard the solids or save them for compost.
    7. Your healing herbal vegetable broth is ready to serve. Sip it as a comforting and soothing drink or use it as a base for soups, stews, or any recipe that calls for broth. It's a wonderful way to nourish your body and support your immune system.

  • Homemade Fire Cider

    Homemade Fire Cider


    Homemade Fire Cider

    Fire cider is a traditional herbal remedy known for its immune-boosting and warming properties. It is a potent infusion of herbs, spices, and vegetables steeped in apple cider vinegar.


    Fire cider is known for its potent and spicy flavor, as well as its potential health benefits. Feel free to adjust the ingredients to suit your taste and heat tolerance.

    Here are some common uses for fire cider:

    Immune Support

    Fire cider is often consumed as a daily tonic or during cold and flu season to help support the immune system. Its ingredients, such as garlic, ginger, and horseradish, are believed to have immune-boosting properties.

    Cold and Flu Relief

    Many people use fire cider at the onset of a cold or flu to help alleviate symptoms and speed up recovery. The warming and spicy nature of fire cider can help clear congestion and soothe a sore throat.

    Digestive Aid

    Fire cider can aid digestion and help relieve symptoms like indigestion, gas, and bloating. The combination of apple cider vinegar and herbs like ginger and rosemary may promote digestive health.

    Anti-Inflammatory

    Some of the ingredients in fire cider, such as turmeric and cayenne pepper, are known for their anti-inflammatory properties. It may be used by some individuals to help reduce inflammation in the body.

    Energy Booster

    The spicy and tangy nature of fire cider can provide an energy boost. It’s often taken in the morning as a natural pick-me-up.

    Circulation Support

    Ingredients like cayenne pepper in fire cider may help improve blood circulation. Some people use it to promote cardiovascular health.

    Sinus Congestion Relief

    The spicy components in fire cider, particularly horseradish and chili peppers, can help clear sinuses and provide relief from nasal congestion.

    General Wellness

    Many people incorporate fire cider into their wellness routines as a preventive measure to maintain overall health and vitality.

    Before using fire cider or any herbal remedy, it’s advisable to consult with a healthcare professional, especially if you have underlying health conditions, are pregnant or nursing, or are taking medications.


    Homemade Fire Cider

    Fire cider is a traditional immune-supporting remedy with deep roots in folk medicine.

    Ingredients
      

    • 1 medium onion chopped
    • 1/2 cup fresh horseradish root grated
    • 1/2 cup fresh ginger root grated
    • 1/2 cup fresh turmeric root grated
    • 10 cloves garlic crushed or minced
    • 2 jalapeño peppers chopped, adjust for spice preference
    • Zest and juice of 1 lemon
    • Zest and juice of 1 orange
    • 2 tbsp dried rosemary
    • 2 tbsp dried thyme
    • 1/4 tsp cayenne pepper adjust for spice preference
    • raw, unfiltered apple cider vinegar enough to cover all ingredients
    • raw honey to taste, optional

    Method
     

    1. Wash and chop the onion, horseradish, ginger, turmeric, garlic, and jalapeño peppers. You can leave the seeds in the jalapeños for extra heat, or remove them for milder fire cider.
    2. Zest the lemon and orange, and then juice them.
    3. In a clean, quart-sized glass jar, layer the chopped onion, grated horseradish, grated ginger, minced garlic, chopped jalapeño peppers, lemon zest, orange zest, dried rosemary, dried thyme, and cayenne pepper.
    4. Pour raw, unfiltered apple cider vinegar over the ingredients in the jar until they are completely covered. Make sure to leave a little space at the top for expansion.
    5. Seal the jar with a tight-fitting lid. If using a metal lid, place a piece of parchment paper or plastic wrap between the jar and the lid to prevent corrosion.
    6. Place the jar in a dark, cool place (like a pantry) for about 3 to 4 weeks. Shake the jar daily to help mix the ingredients.
    7. After 3 to 4 weeks, strain the mixture through a fine-mesh sieve or cheesecloth into a clean glass container.
    8. If you find the fire cider too strong, you can add raw honey to taste. This will also sweeten it a bit and make it more palatable.
    9. Store your fire cider in the refrigerator, where it can last for several months.
    10. To use, take 1-2 tablespoons daily as a tonic or when you feel like you need an immune boost. You can also use it in cooking or as a salad dressing ingredient.

  • Back to School Snack Ideas

    Back to School Snack Ideas


    Back to School Snack Ideas

    Creating delicious and healthy snacks for kids as they head back to school is a great way to ensure they have energy and focus throughout the day. Here are some simple and nutritious snack ideas:

    Fruit Kabobs:

    Ingredients: Assorted fruits (e.g., strawberries, grapes, pineapple chunks, melon), wooden skewers, yogurt or honey for dipping.
    Instructions: Thread the fruit onto the skewers and serve with yogurt or honey for dipping.


    Homemade Trail Mix:

    Ingredients: Nuts (almonds, cashews, or mixed nuts), dried fruits (raisins, cranberries, apricots), whole-grain cereal, and dark chocolate chips (in moderation).
    Instructions: Mix these ingredients together in a bowl, and portion them into small snack bags for easy grab-and-go snacks.


    Vegetable Sticks with Hummus:

    Ingredients: Carrot sticks, cucumber slices, celery sticks, bell pepper strips, and your child’s favorite flavor of hummus.
    Instructions: Wash and cut the vegetables, and serve with hummus for dipping.


    Yogurt Parfait:

    Ingredients: Greek yogurt, granola, fresh berries, and a drizzle of honey.
    Instructions: Layer yogurt, granola, and berries in a glass or container. Drizzle honey on top.


    Mini Quesadillas:

    Ingredients: Whole-grain tortillas, shredded cheese, and diced cooked chicken (optional).
    Instructions: Sprinkle cheese and chicken (if using) on a tortilla, top with another tortilla, and heat in a skillet until the cheese melts. Cut into wedges.


    Homemade Energy Bites:

    Ingredients: Rolled oats, honey, peanut butter, mini chocolate chips, and chia seeds.
    Instructions: Mix all the ingredients together, roll into small balls, and refrigerate until firm.


    Apple “Cookies”:

    Ingredients: Apple slices, peanut butter or almond butter, and toppings like raisins, shredded coconut, or mini chocolate chips.
    Instructions: Spread nut butter on apple slices and sprinkle with toppings.


    Ants on a Log:

    Ingredients: Celery sticks, peanut butter or cream cheese, and raisins.
    Instructions: Fill the celery with peanut butter or cream cheese and top with raisins.


    Cheese and Whole-Grain Crackers:

    Ingredients: Sliced cheese and whole-grain crackers.
    Instructions: Pair slices of cheese with whole-grain crackers for a simple yet satisfying snack.


    Smoothie Popsicles:

    Ingredients: Blend yogurt, fresh or frozen fruit, a bit of honey, and pour into popsicle molds.
    Instructions: Freeze until solid for a refreshing, healthy treat.

    Remember to consider any food allergies or dietary restrictions your child may have when preparing these snacks. These snacks are not only tasty but also provide essential nutrients to help your kids stay energized and focused throughout the school day.