Who says you can’t indulge in something sweet and refreshing that’s also healthy and affordable?
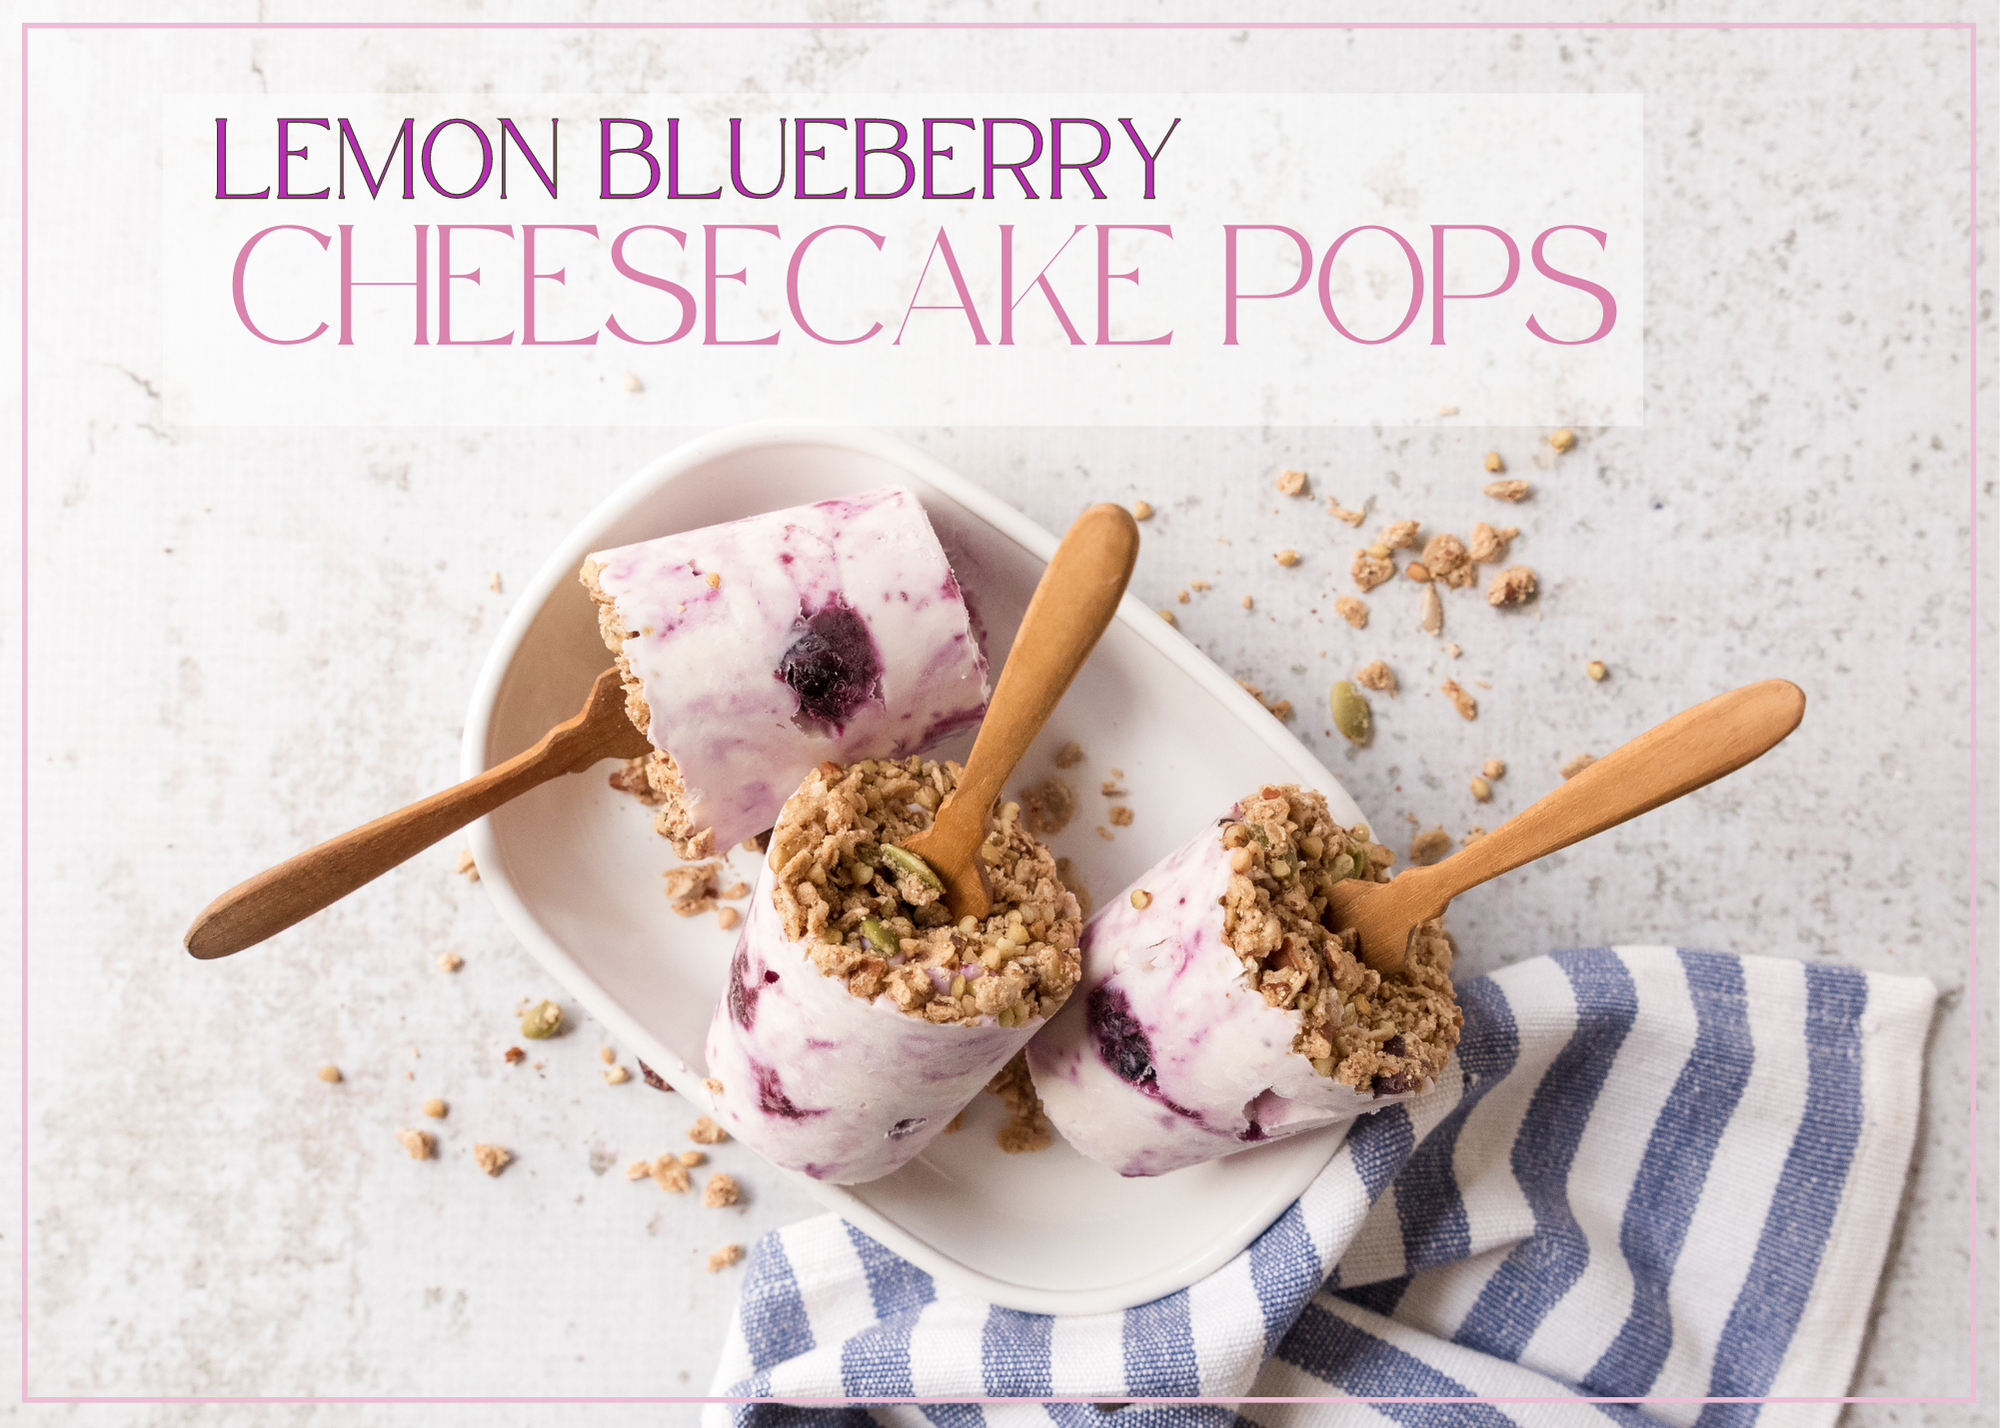
Made with whole ingredients like lemon yogurt, fresh blueberries, and a crunchy granola topping, these pops are tasty and nutritious. Plus, making your own summer treats at home can be a lot more affordable than buying them at the store.
Not only are these pops healthy, they’re also easy to make. Simply combine the ingredients with a hand mixer, pour into popsicle molds, and let them freeze. In just a few hours, you’ll have a batch of delicious and refreshing treats that you can enjoy guilt-free all summer long.
The next time you’re craving something sweet, skip the store-bought options and make your own Lemon Blueberry Cheesecake Pops. Not only will your taste buds thank you, but your wallet and your body will too!
Lemon Blueberry Cheesecake Pops
Lemon blueberry cheesecake pops are a refreshing and delicious treat that's perfect for summer! Made with whole ingredients, these pops are easy and a cinch to make!
8wooden popsicle sticks or small reusable popsicle molds with sticks
Method
Place blueberries, two tablespoons sugar, water, and lemon zest in a small saucepan and bring to a simmer. Cook for five minutes or until blueberries are tender and mixture has thickened. Set aside to cool.
In a mixing bowl, use a hand mixer to cream together cream cheese and remaining sugar until fluffy. Stir in yogurt until thoroughly mixed. Fold in blueberry mixture to create swirls of fruit.
Spoon mixture into eight small paper cups leaving a quarter inch of space from the top of the cups.
Top off cups with granola and gently press into the cheesecake mixture. Insert a popsicle stick into the center of each cup and freeze for a minimum of four hours.
When it comes to cooking with sun-ripened garden crops, it’s best to keep it simple and let the flavor of your main ingredients shine. Garden-harvested foods are at their peak ripeness and will have more nutrients and flavor than store-bought fruits or vegetables that would have had to be picked early for market.
Pea, Basil, and Feta Dip
This dip can be whipped up in a flash and goes perfectly with any array of garden-fresh veggies available this time of year.
Ingredients:
8 oz (225 g) feta cheese
1/4 cup (60 mL) plain Greek yogurt
1/2 cup (125 mL) blanched fresh green peas, plus extra for garnish
1/4 cup (60 mL) raw walnuts
3/4 cup (180 mL) packed basil leaves and tender stems, plus extra for garnish
1 garlic clove, peeled
1 lemon
2 Tbsp (30 mL) olive oil
Salt, to taste
Instructions:
In food processor fitted with steel blade attachment, pulse together feta cheese and yogurt, scraping down bowl as needed, until smooth and creamy. Transfer to large plate, spreading over bottom of plate to cover. Set aside and wipe out food processor.
To food processor, add peas, walnuts, basil, garlic, zest of half a lemon, juice of whole lemon, and olive oil. Blend, scraping down sides of bowl as needed, until textured but creamy and well combined. Taste and adjust seasoning with salt. Dollop basil mixture over whipped feta, running a knife lightly through mixture to marble the two dips together. Garnish with extra peas and basil leaves, if desired. Serve alongside crackers and vegetables for dipping.
Serves 6
Each serving contains: 215 calories; 14 g protein; 15 g total fat (7 g sat. fat); 7 g total carbohydrates (6 g sugars, 1 g fiber); 456 mg sodium
Carrot, Raspberry, and Olive Tartine
This lovely open-faced sandwich is at once earthy, bright, briny, and fruity.
Ingredients:
3/4 cup (180 mL) fresh raspberries, divided
3 Tbsp (45 mL) olive oil
1 large lemon
1/3 lb (150 g) carrots, about 3 medium carrots
1/2 cup (125 mL) coarsely chopped flat-leaf parsley leaves
1/4 cup (60 mL) roughly chopped Castelvetrano olives
1/3 cup (80 mL) ricotta cheese
3 slices whole grain country loaf, toasted
Instructions:
In medium bowl, smash 1/4 cup (60 mL) raspberries with a fork. Add olive oil and zest and juice of lemon. Whisk until well combined and set aside.
On large holes of box grater, grate carrots and add to dressing mixture. Gently fold in chopped parsley and olives.
Divide ricotta cheese, spreading evenly over slices of bread. Generously heap on carrot mixture and top with fresh raspberries. Drizzle over any remaining vinaigrette left in bowl and serve.
Serves 3
Each serving contains: 332 calories; 7 g protein; 19 g total fat (4 g sat. fat); 33 g total carbohydrates (5 g sugars, 6 g fiber); 373 mg sodium
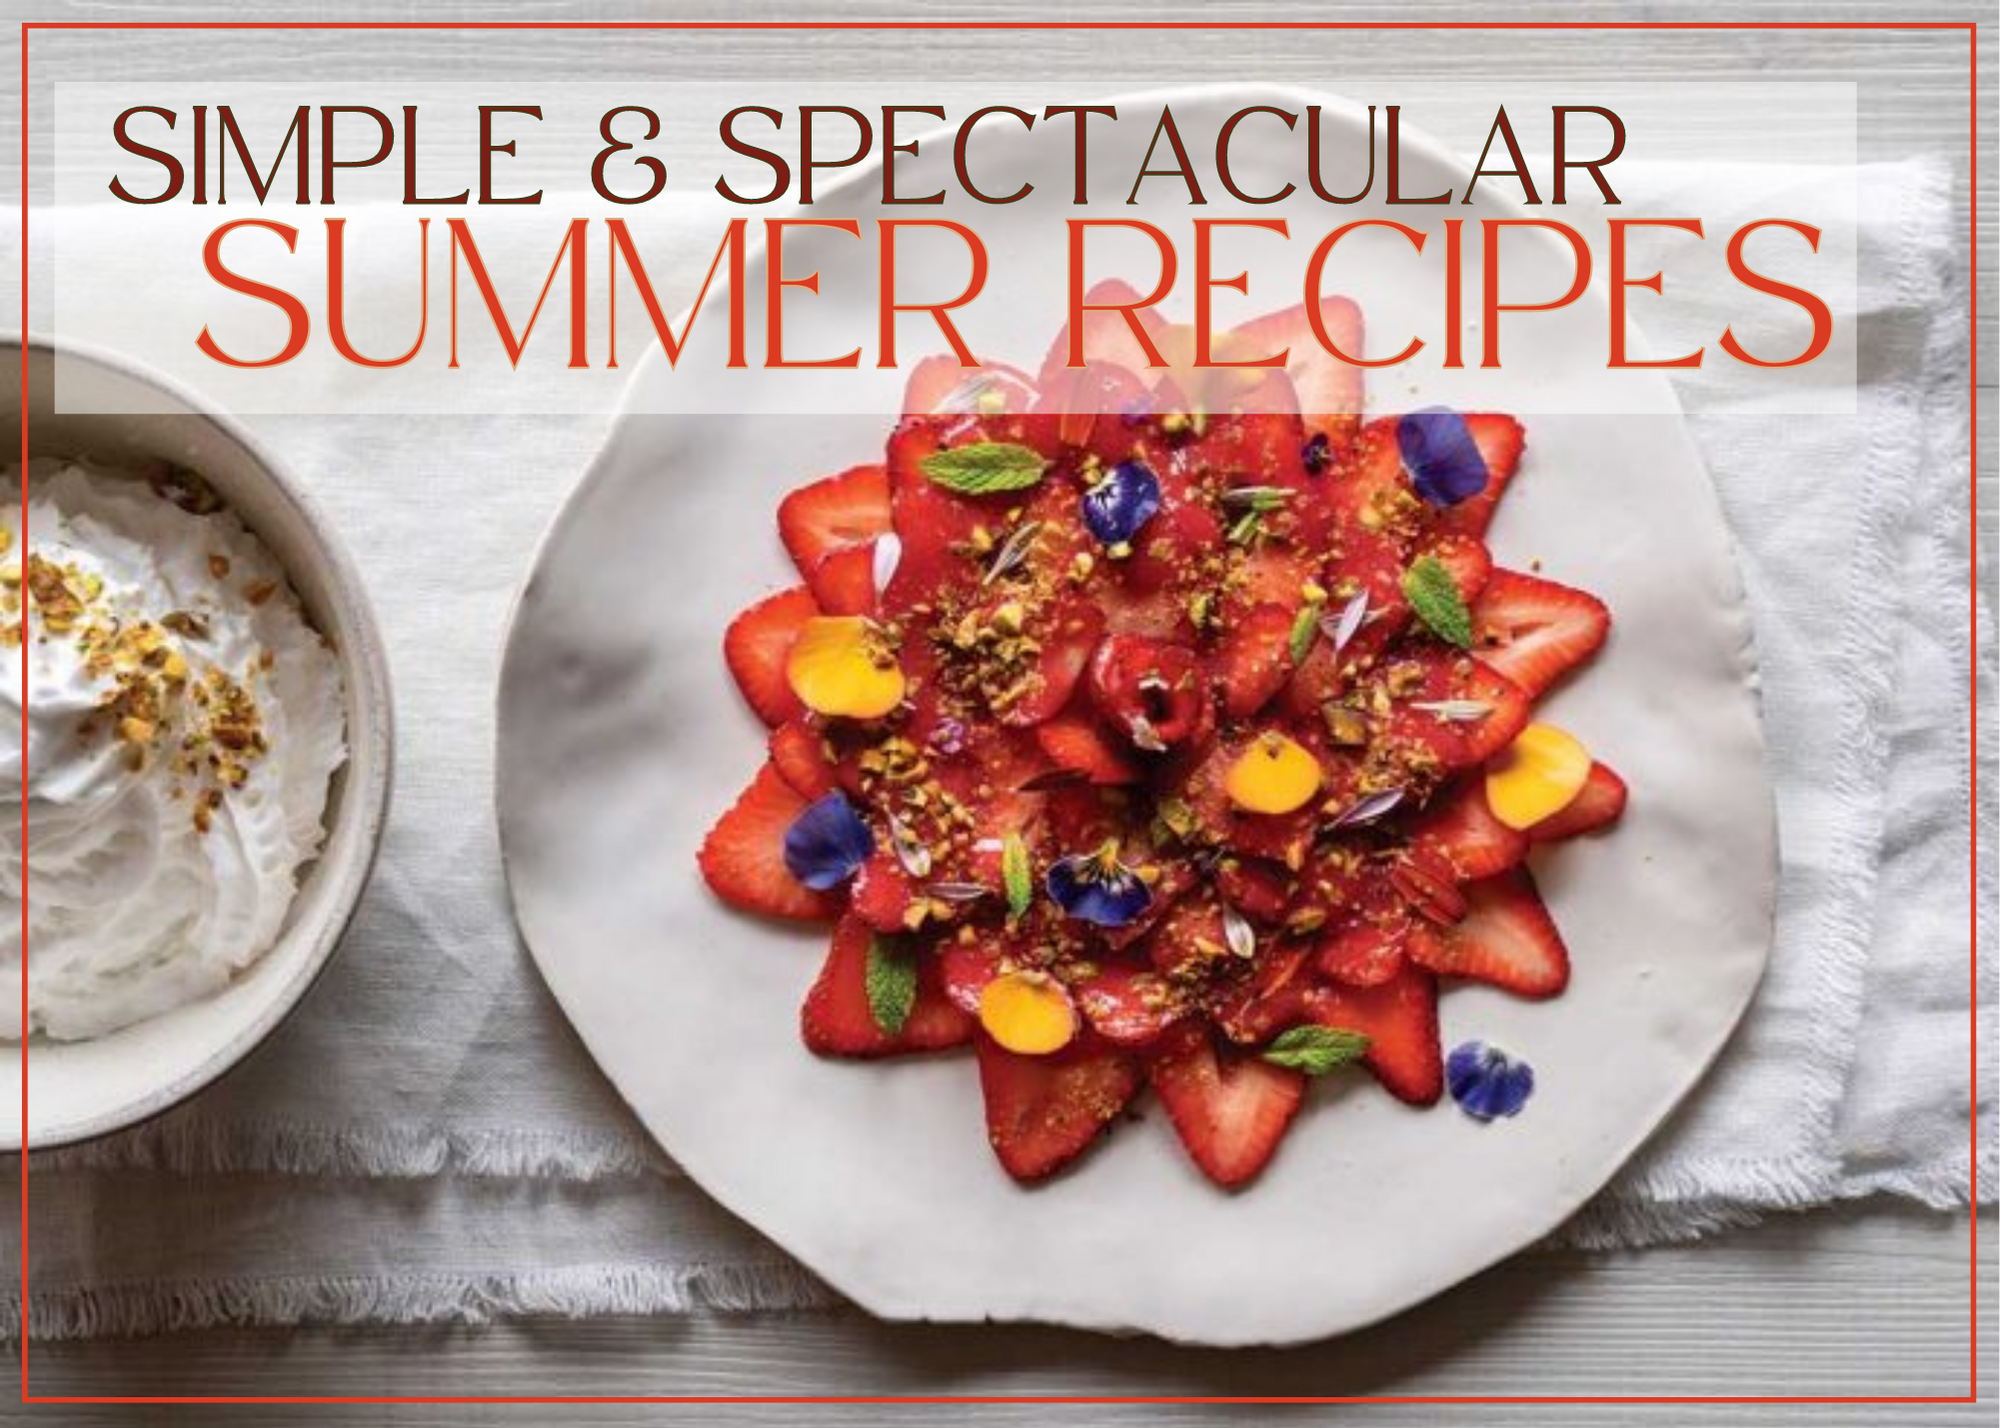
Strawberry Carpaccio
This simple dessert celebrates the glory that is the summer strawberry.
Ingredients:
3/4 lb (340 g) strawberries, washed and hulled, divided
1/2 tsp (2 mL) orange blossom water
1 to 2 tsp (5 to 10 mL) honey (optional)
1/4 cup (60 mL) toasted pistachios, roughly chopped
2 Tbsp (30 mL) mint leaves
Edible flower petals, for garnish
Instructions:
In blender, add 1/4 lb (113 g) strawberries and orange blossom water. Blend until smooth. Taste and adjust sweetness with honey, if desired. Into small bowl, strain strawberry puree through fine-mesh sieve. Discard any pulp left in sieve and set aside.
Cut remaining strawberries into thin slices, lengthwise. Arrange them over chilled serving plates in a single layer, slightly overlapping. Drizzle with a few spoonfuls of strawberry puree before garnishing with a scattering of pistachios, mint leaves, and edible flower petals.
Serves 2
Each serving contains: 108 calories; 3 g protein; 4 g total fat (0 g sat. fat); 19 g total carbohydrates (12 g sugars, 5 g fiber); 44 mg sodium
Whether you’re hitting the trails or embarking on a summer road trip, having a convenient and nutritious snack on hand is a must!
That’s where these Cacao Superfood Trail Bars come in.
Packed with all the goodness of trail mix, including nuts, seeds, and dried fruit, these bars are the perfect fuel for any adventure. Plus, they’re super easy to make and can be customized to your liking. One of the best things about these bars is their portability. Simply pack them in a reusable container or wrap them in wax paper for a grab-and-go snack that’s perfect for hiking, camping, or any outdoor activity. And because they’re made with whole ingredients like oats, nuts, and dried fruit, you’ll feel satisfied and energized for hours.
Not only are these bars convenient and nutritious, but they’re also affordable. Making your own snacks at home is a great way to save money, and these bars can be made in large batches to last you through multiple adventures. You can also get most of the ingredients from the bulk section, so you can avoid the single-use packaging that normally comes with granola bars.
Next time you’re gearing up for an outdoor adventure, don’t forget to make a batch of Cacao Superfood Trail Bars!
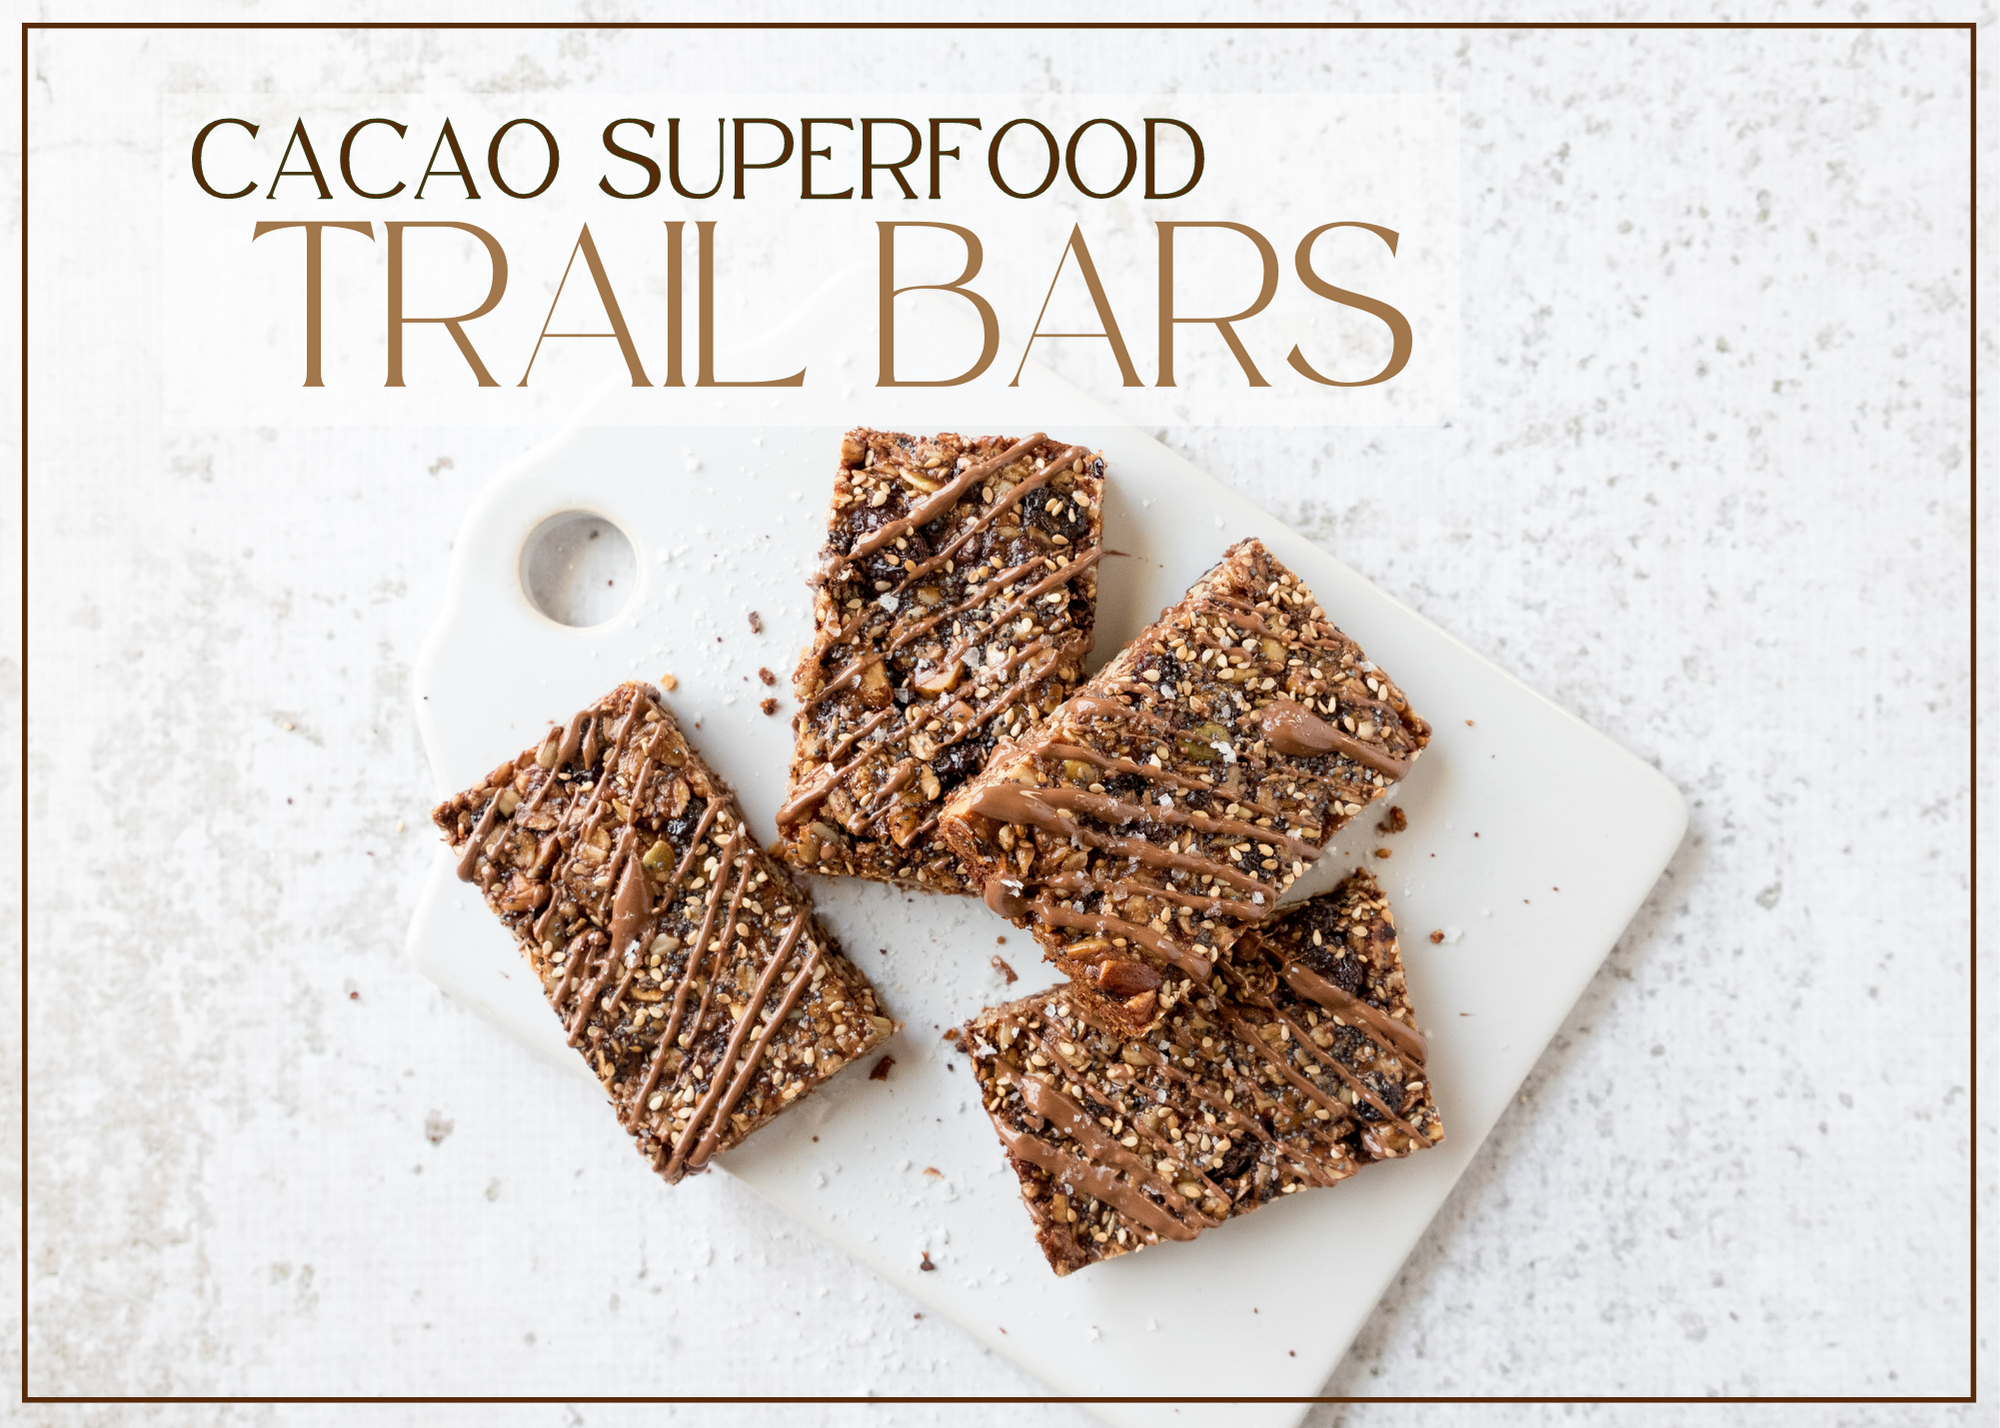
Cacao Superfood Trail Bars
If you're looking for a delicious and portable snack that's perfect for your summer adventures, look no further than these Cacao Superfood Trail Bars!
Preheat oven to 350° F. In a medium-size mixing bowl, combine oats, nuts, cacao nibs, sunflower seeds, hemp seeds, sesame seeds, and currants.
Heat peanut or almond butter and honey or syrup sweetener in a small saucepan and stir until very warm. Pour over oat mixture and stir until well blended and everything is coated.
Line a 9'x9" baking pan with parchment paper. Add mixture to the pan and with wet hands, press mixture flat.
Bake for 15 minutes. Allow bars to cool before removing from the pan. Cut into eight bars and place on a cooling rack.
Fill a medium-sized pot with two inches of water and place a heatproof metal or glass mixing bowl on top. You want it to fit snugly without touching the water. Bring the water to a simmer over medium-low heat. Add the chocolate and olive oil to the bowl and stir until melted and combined.
The combination of sweet and savory flavors from the mango chutney paired with the smoky and satisfying taste of plant-based hot dogs creates a truly delicious and satisfying experience.
Give a new flavor profile to the folks sitting around your table—whether they be picky kids or adventurous eaters, experienced in plant-based or just experimenting with alternatives. There are many reasons to enjoy plant-based mango chutney hot dogs.
Looking for another way to spice things up? Customize your mayo with a touch of sriracha and black pepper or lime zest and chopped cilantro.
Whether it’s for the unique flavor, nutritional benefits, or ethical considerations, these hot dogs are a delicious and satisfying choice for any occasion. Plus, you can have a meal ready to go in less than 20 minutes! You can have more time to enjoy time outside after warming up the grill.
Mango Relish Dogs
These are perfect for those who love a little bit of sweetness and tanginess in their hot dogs. Plus, it's vegan and plant-based!
Combine all relish ingredients in a bowl and adjust seasoning to taste.
Butterfly hot dogs and sear each side in a hot skillet with olive oil until golden crisp, approximately three minutes per side. Alternatively, grill hot dogs.
To assemble, place hot dogs in buns then fill with relish. Drizzle on mayo and garnish with red onion.
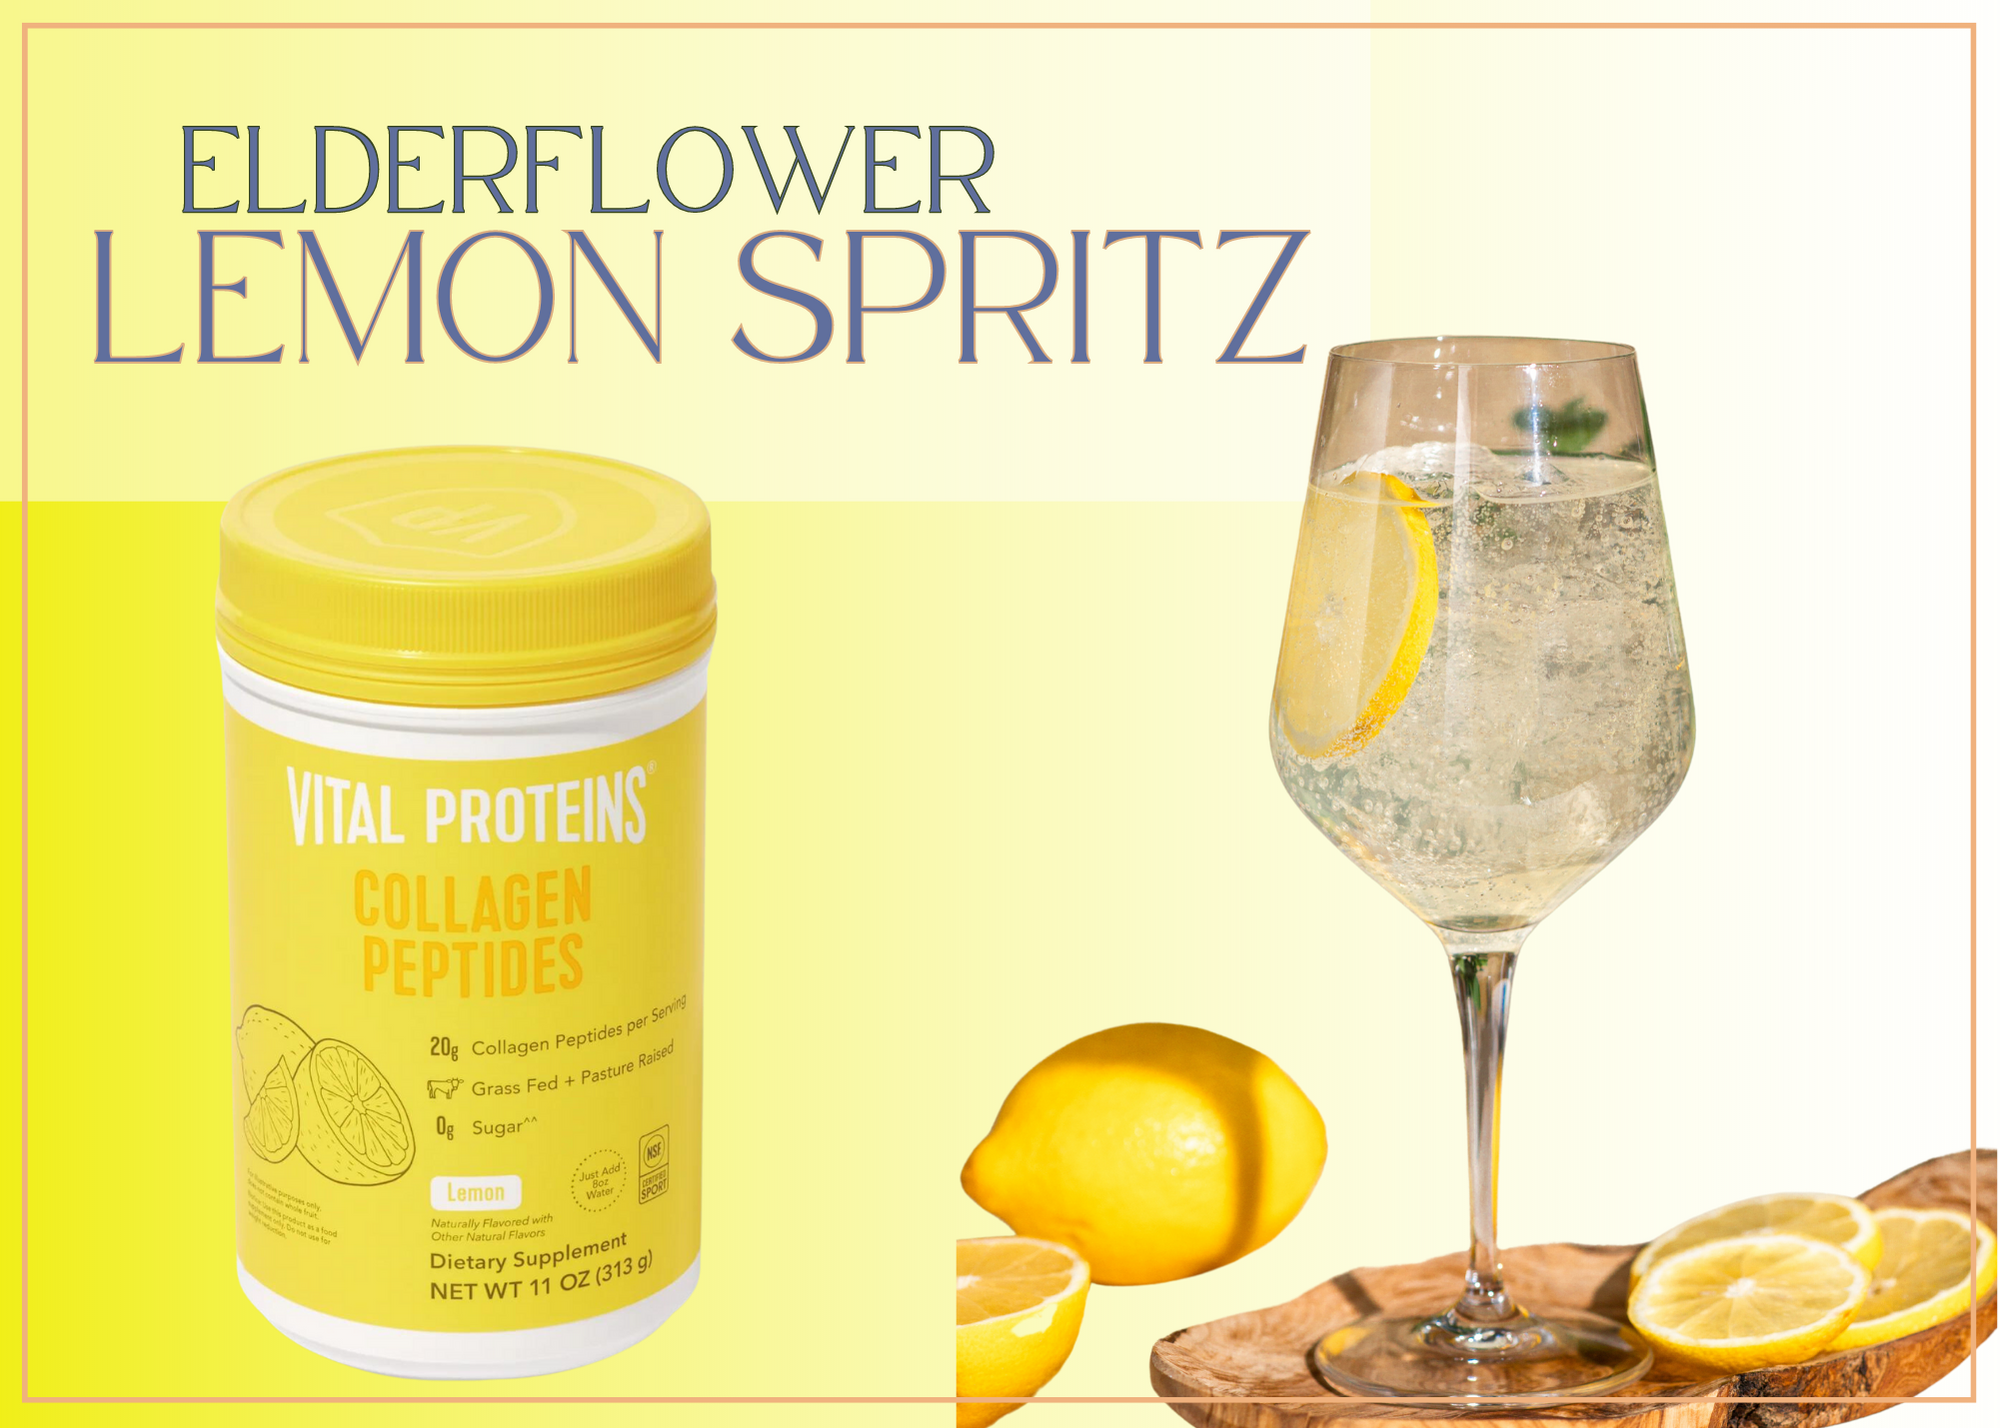
Elderflower Lemon Spritz with Vital Proteins® Lemon Collagen Peptides
The Elderflower Spritz is a refreshing pick-me up mocktail for that 3pm slump.
Everyone has the same number of hours in a day, but sometimes you just don’t feel like using those hours for sleeping. Sometimes you feel like watching one too many episodes of your favorite reality TV show. Made with green tea, lemon juice, mint leaves, and elderflower tonic water, this fizzy and floral drink is the perfect mocktail recipe.
But what really sets this mocktail apart is the addition of Vital Proteins® Lemon Collagen Peptides. With just one serving, you can add the collagen that you love with a lemony flavor you’ll love even more.
Go ahead and indulge in a delicious drink that’s also good for your daily dose of collagen. Make it squeezier.
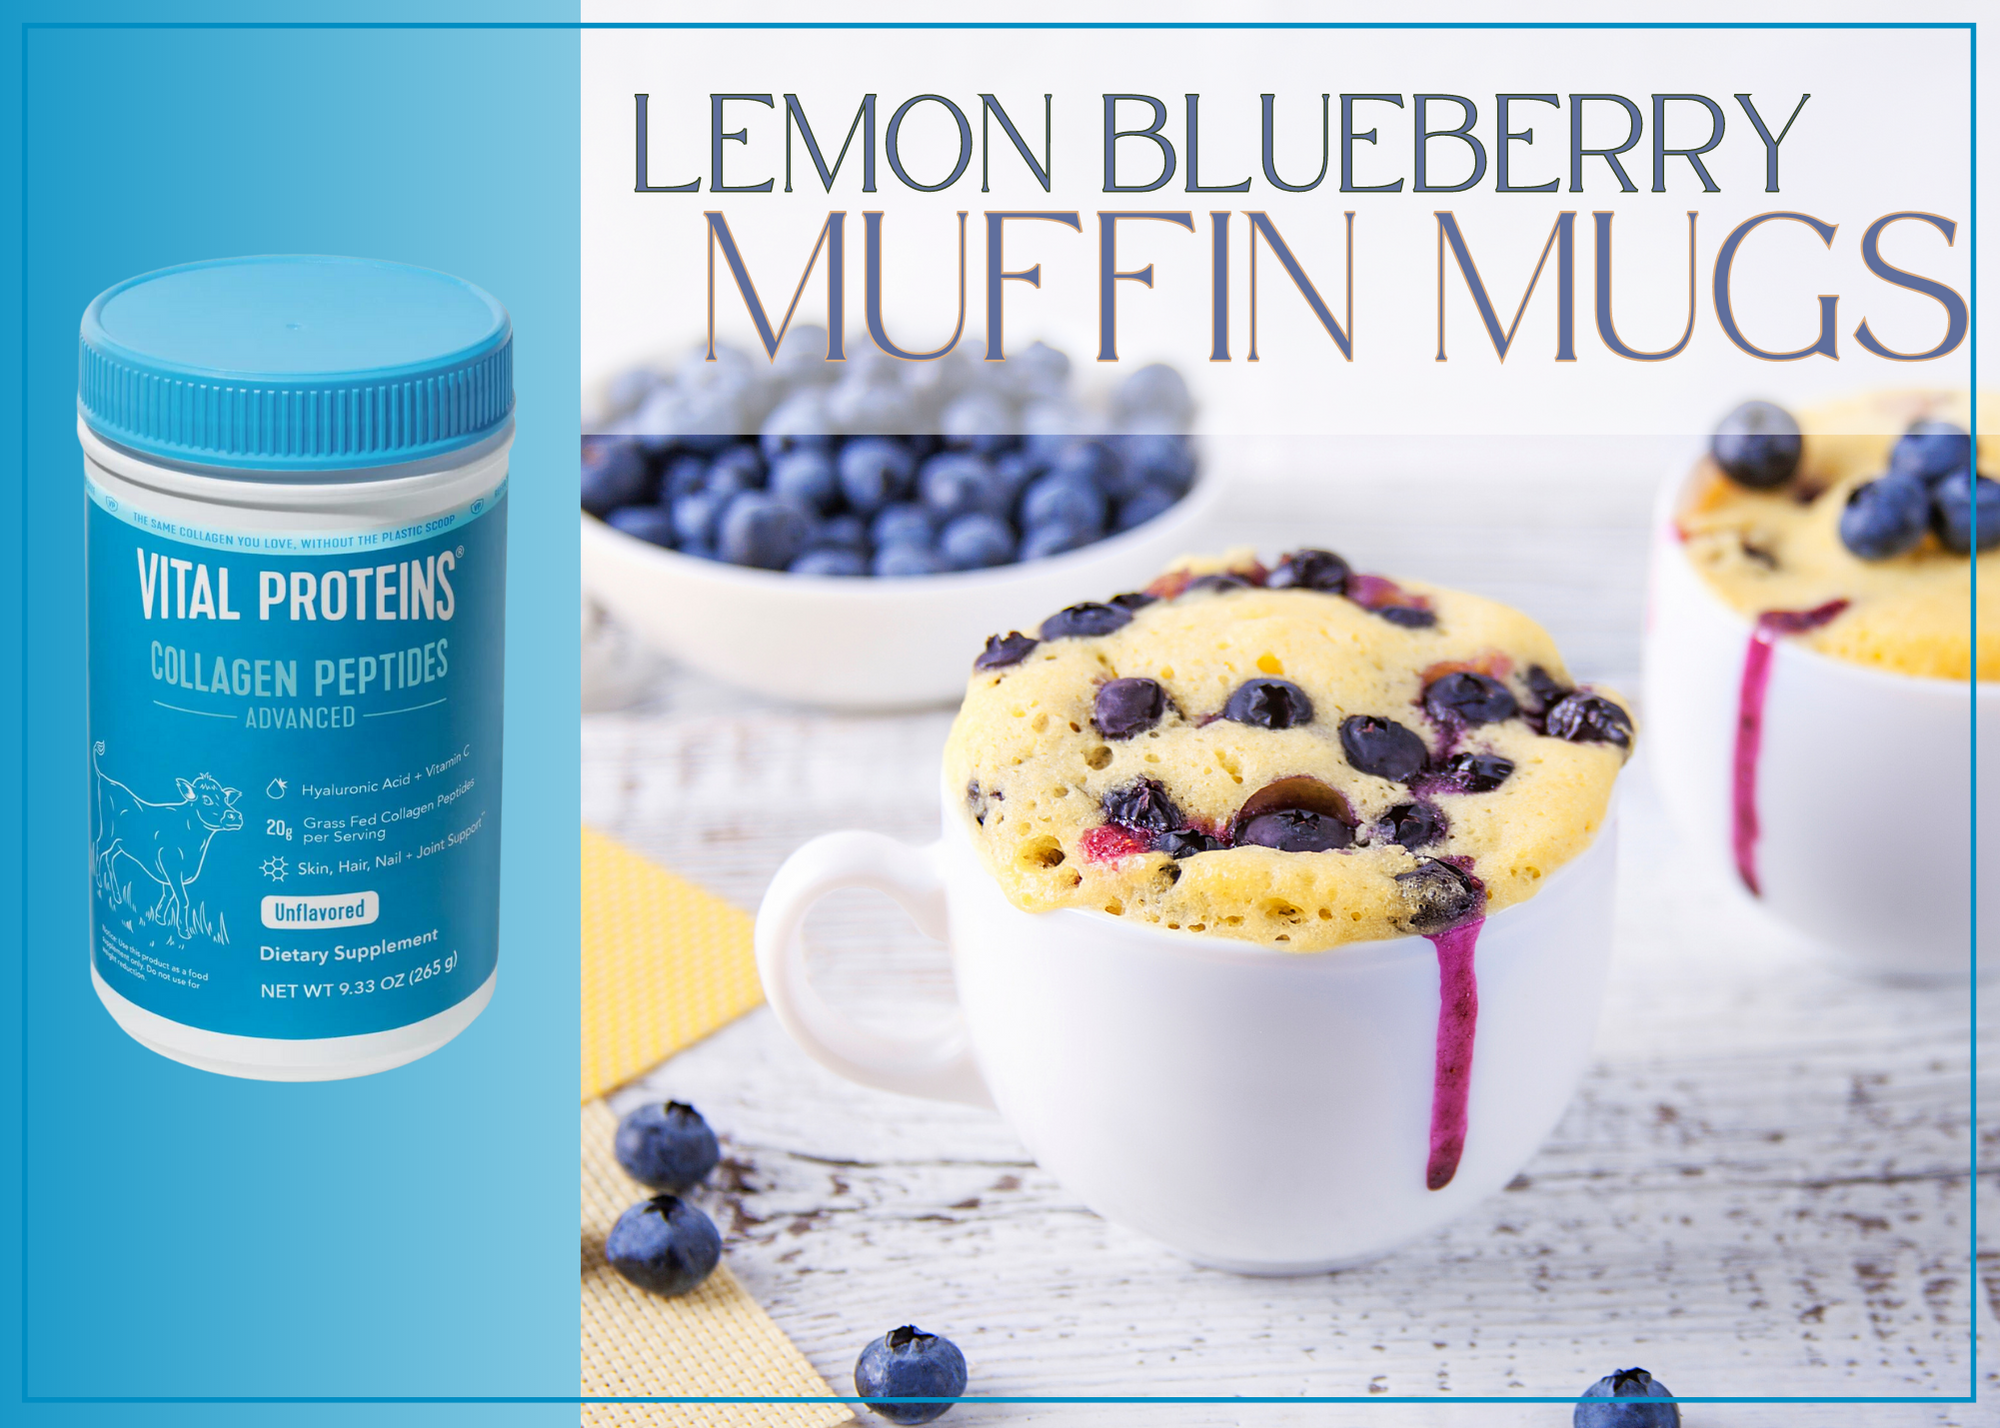
Lemon Blueberry Muffin Mugs with Vital Proteins® Collagen Peptides
This Lemon Blueberry Muffin is the perfect dessert when you are looking for something simple and easy to make that will fulfill your sweet cravings.
Mug recipes are great because there are many different flavors and types you can make, they require minimal time and use just one dish.
A serving of Vital Proteins® Collagen Peptides is featured in this recipe, which provides 20g collagen peptides per serving and hair, skin, nail, bone and joint health benefits.**
The blueberries are a perfect touch as they have a sweet, yet neutral flavor that balances out the other ingredients. Topped with a coconut whipped cream, it captures all of the flavors together creating a perfect and sweet treat.
1/2Cupflourgluten free 1:1 flour is used in this recipe
1/2 Teaspoonbaking powder
1/2Teaspoonbaking soda
1Tablespooncinnamon
1 ServingVital Proteins® Collagen Peptides
1.5Tablespoonsmaple syrup
1Teaspoonvanilla extract
1/4Cupalmond milk
1/2Teaspoonlemon rindsgrated
1Tablespoonbuttermelted or use any oil
1/4Cupblueberriesfresh or frozen
coconut whipped creamfor topping
Method
In a large mug, combine all of the dry ingredients except blueberries and mix together.
Whisk in the wet ingredients and combine until they form a batter-like consistency.
Add in the blueberries and then place on a plate in the microwave.
Microwave for 2.5–3 minutes, pausing if batter looks like it may overflow. (Pausing will allow it to settle and not make a mess.)
Take out of the microwave and top with coconut whipped cream and blueberries.
Enjoy!
**These statements have not been evaluated by the Food and Drug Administration. This product is not intended to diagnose, treat, cure, or prevent any disease.
Pomegranate “Gin” Fizz Mocktail with Vital Proteins® Marine Collagen Peptides
A fun, effervescent way to enjoy your summer evenings.
Filled with pomegranate juice, freshly squeezed lime juice, maple syrup, soda water, with a sprig of rosemary, this mocktail brings in flavors from the garden with a sweet twist. This mocktail is a great alternative when you are looking for something to sip on that is alcohol-free.
What makes this mocktail toast-worthy, is the Vital Proteins® Marine Collagen Peptides that dissolves so effortlessly into the mixture and provides hair, skin, nail, bone and joint support.**
Pomegranate “Gin” Fizz Mocktail
Time to enjoy this delicious and simple Pomegranate Fizz Mocktail!
In a glass, add the lime, maple syrup, pomegranate juice and mix together well.
Next, add the Marine Collagen and mix until it fully dissolves.
Add the soda water to fill the glass.
Top with a lime wedge, pomegranate and a rosemary sprig.
Enjoy!
**These statements have not been evaluated by the Food and Drug Administration. This product is not intended to diagnose, treat, cure, or prevent any disease.
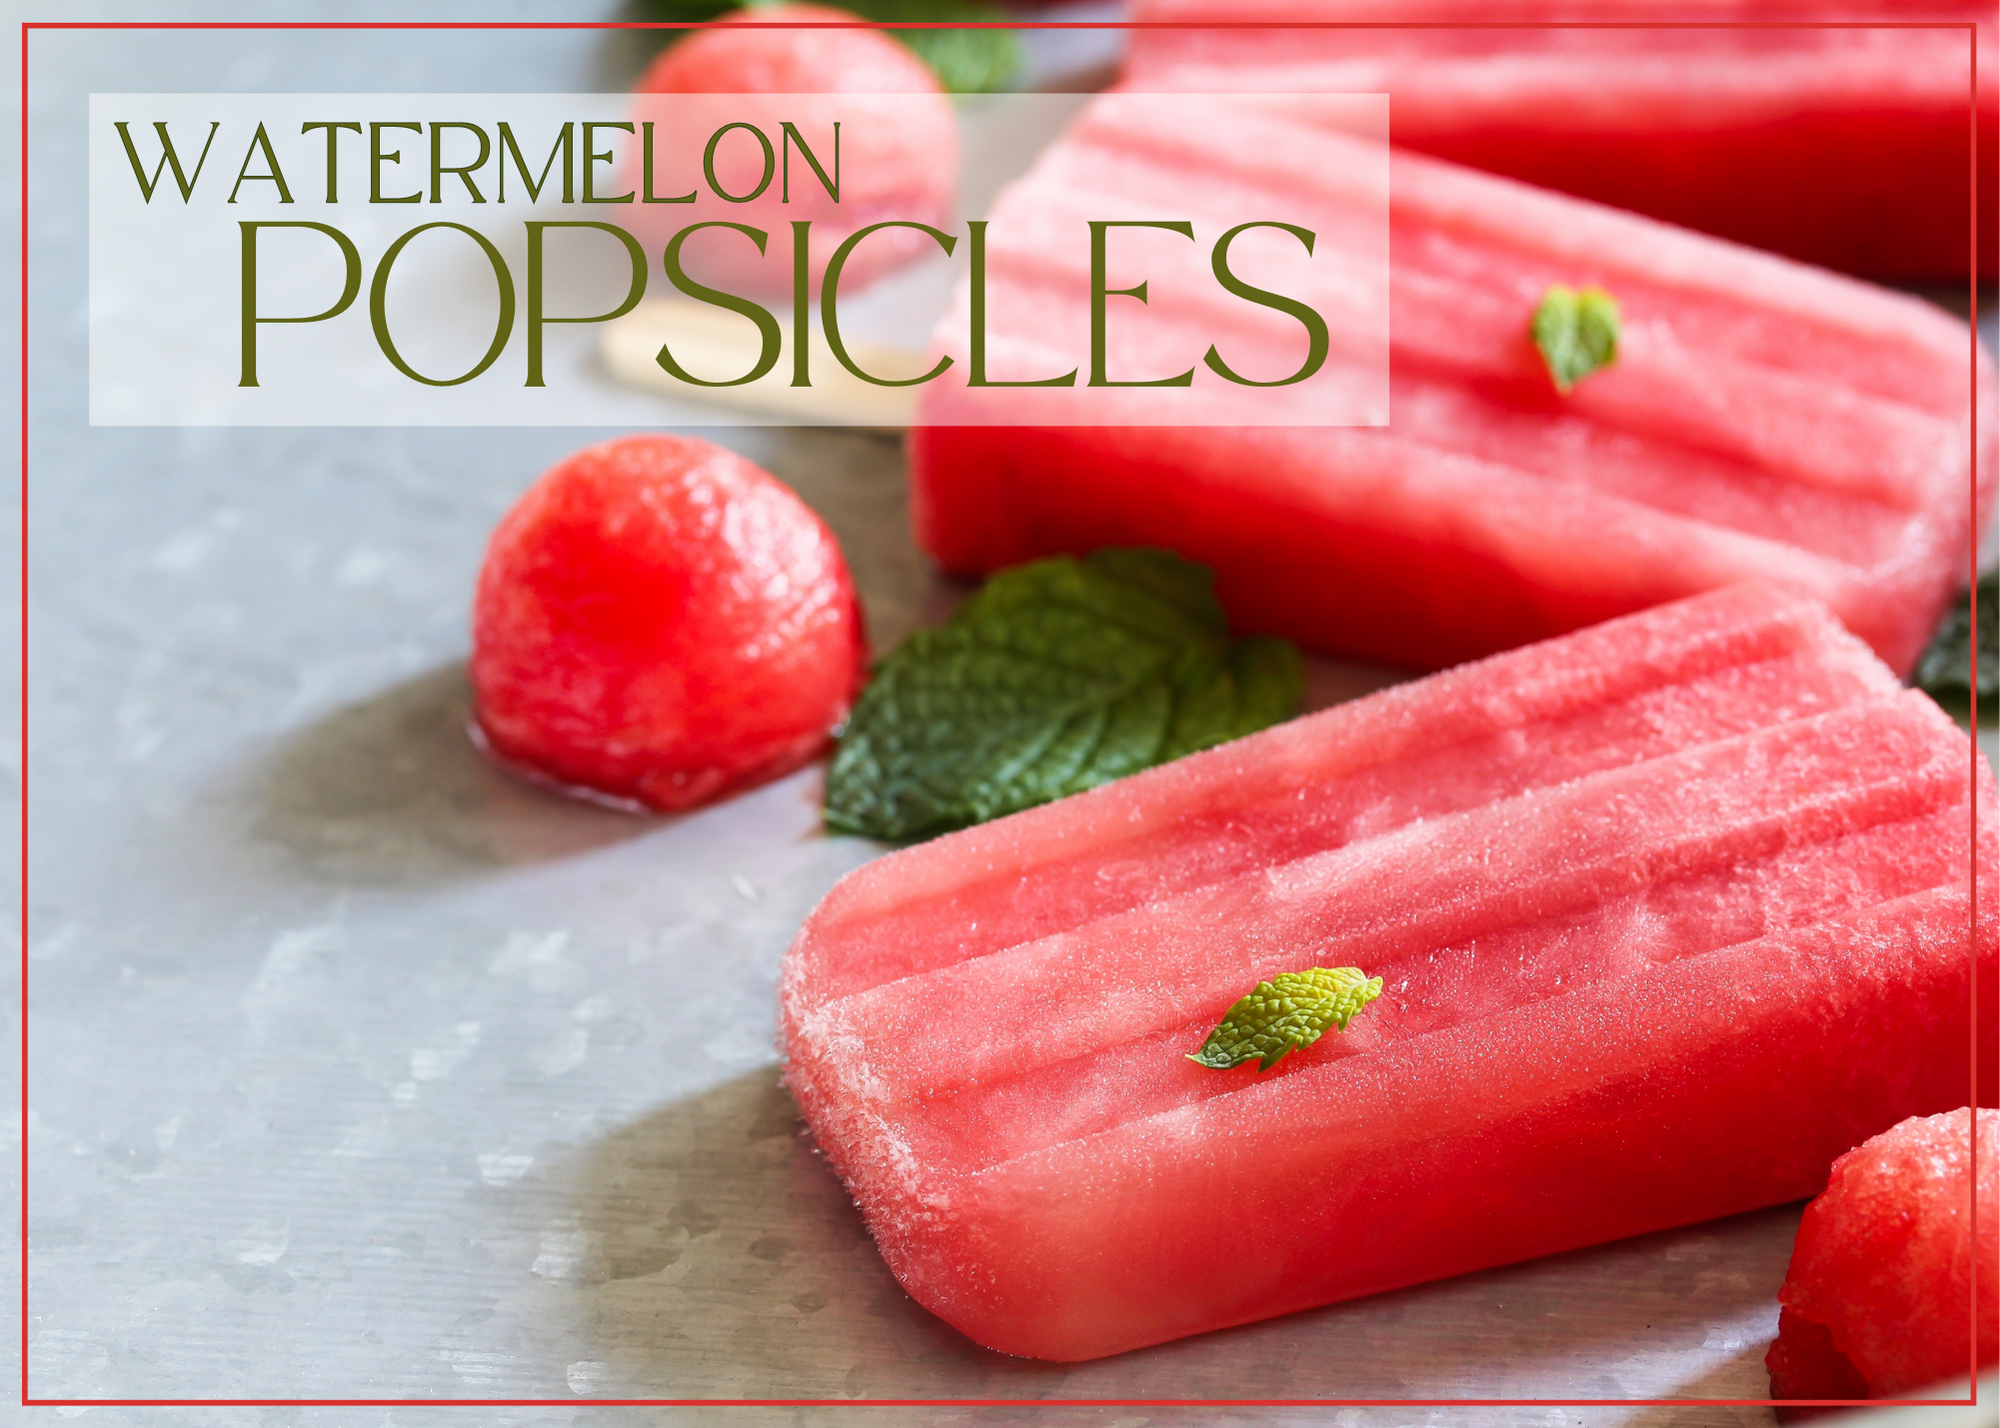
On a hot summer day, nothing beats the sweet, juicy goodness of watermelon.
Imagine that refreshing flavor transformed into a delightful frozen treat: watermelon popsicles! These vibrant and mouthwatering popsicles are incredibly easy to make and will keep you cool all summer long.
Bursting with natural sweetness and hydration, they are perfect for both kids and adults alike.
So let’s dive into this simple yet delicious recipe and get ready to savor the essence of summer in every bite.
Nicole Catenaro
Refreshing Watermelon Popsicles
These delightful watermelon popsicles are a cool and healthy way to beat the summer heat. With just a few simple steps, you can enjoy the refreshing taste of watermelon popsicles! So gather your ingredients, get creative with your molds, and let the sweet flavors of this frozen treat transport you to a sunny paradise. Enjoy!
1-2tablespoonsHoney or sweetener of choice(optional, adjust to taste)
Method
Start by cutting the watermelon into small chunks, removing any seeds if necessary. Ensure the watermelon is ripe and juicy for the best flavor.
If you're using wooden popsicle sticks, soak them in water for about 10 minutes to prevent them from splintering during freezing.
Place the watermelon chunks into a blender or food processor. Blend until you achieve a smooth and liquid consistency.
Add the freshly squeezed lime juice to the watermelon puree. Lime juice enhances the overall flavor and adds a tangy kick.
Taste the watermelon mixture and assess its sweetness. Depending on the natural sweetness of the watermelon, you may choose to add a little honey or sweetener of choice.
If desired, gradually add the sweetener of your choice, blending again until well combined. Remember, watermelons are already sweet, so add sweeteners sparingly to maintain a balanced taste.
Carefully pour the watermelon mixture into popsicle molds or small paper cups, leaving a little space at the top for expansion during freezing.
Place the popsicles in the freezer and let them set for about 30 minutes to an hour, or until they become partially frozen.
Once partially frozen, insert the popsicle sticks deeper into the molds or cups to secure them in place. This will help the sticks stand straight when the popsicles are fully frozen.
Return the popsicles to the freezer and allow them to freeze completely for about 4-6 hours or overnight.
When ready to enjoy, remove the popsicles from the molds or peel away the paper cups. If the popsicles don't easily release from the molds, run the bottom of the molds under warm water for a few seconds to loosen them.
Serve the watermelon popsicles immediately and relish in the refreshing taste of summer. They are perfect for poolside lounging, backyard barbecues, or simply as a guilt-free dessert.
Piling into the car and hitting the open road presents both challenges and delights. When planning your on-the-road menu, choose dishes that pack well or that get better as leftovers. Dig out your cooler and read on—it’s time to hit the road!
Kale and Napa Cabbage Salad with Sumac Pickled Onions
Kale and Napa cabbage stand up for hours to the sweet and puckery dressing, and hearty farro will keep you going while on the road.
In small bowl, combine onion, vinegar, red pepper flakes, maple syrup, sumac, salt, and pepper, and set aside.
In large bowl, add 1 Tbsp olive oil and kale, and massage kale for a few minutes with your hands. Let stand for 20 minutes.
To assemble salad, toss kale, pickled onion dressing, and remaining olive oil with cabbage, mint, dates, and farro. Keep cool or refrigerate for up to 4 hours before enjoying.
Freeze-Ahead Breakfast Wraps
Make these wraps anytime and stick them in the freezer for your next excursion.
For wraps, in large skillet on medium-high, heat 1 Tbsp olive oil, add sweet potatoes, and cook for about 5 to 7 minutes, stirring occasionally. Once sweet potatoes are tender, pour into bowl and add sweet smoked paprika; stir through.
In the same skillet, add 1 Tbsp olive oil, shallots, and red bell pepper and cook on medium-low heat for 2 to 3 minutes, until soft and shallots are translucent. Scrape into bowl with sweet potatoes and add goat cheese and spinach leaves; stir to combine.
Wipe out skillet, add remaining 1 tsp olive oil, and heat on medium. Pour in beaten eggs and stir while cooking until you have a loose custard, approximately 3 minutes. Add vegetables from bowl into skillet and stir through to combine, being careful not to overcook eggs. Remove from heat.
Lay out tortillas, divide egg-vegetable mixture evenly among them, and wrap or roll. Allow to cool completely and pack for freezing.
To make ketchup, rub red bell pepper and tomatoes with olive oil, add to baking dish, then place under oven broiler. Turn pepper, broiling for 5 minutes on each side, until the whole pepper is blackened. Toss tomatoes occasionally and remove them in advance of the pepper if they’re getting too dark. They should be slightly charred. When pepper is black on all sides, remove from oven and place in paper bag to cool. Tomatoes can cool in baking dish.
Meanwhile, in food processor, pulse dates to chop. Once bell pepper is cool, remove and discard skin. In bowl of food processor, place pepper, tomatoes, and remaining ingredients and pulse until you have a sauce with a loose texture. Seal in container and refrigerate or freeze.
When it’s time to cook, thaw wraps and sauce in fridge or cooler for 8 hours or overnight. To cook wraps, warm on medium-hot grill for 5 to 7 minutes each side, until center of wrap is warm.
Vegetable and Cashew Salad Rolls with Peanut Sauce
Veggies and dip are a healthy road trip staple. Take them a step further in this recipe, inspired by Vietnamese-style salad rolls.
24cashewspulsed in food processor to pea-sized pieces
2medium carrotscut into matchsticks
1Cupbaby spinach leavesstems removed
Method
In small bowl, combine peanut butter, rice wine vinegar, sesame oil, and tamari. Add water, a little at a time, and mix slowly with a fork or spoon to gradually loosen the stiff peanut butter mixture. Once sauce is smooth, if you want a looser consistency, add more water, a teaspoon at a time. Once you’re happy with the consistency, add gingerroot, garlic, and red pepper flakes; mix through, and then pack into a sealable container.
To assemble rolls, first set out a clean cutting board for your workspace. Fill a wide, shallow bowl with hot (not boiling) water and, working quickly, soften one wrapper in water and lay it on your cutting board. Place 3 mint leaves and 3 radish slices on wrapper. Add lettuce, fill with cashews, a few slices of broccoli, and a few carrot matchsticks, and finally spinach. Roll tightly and repeat with remaining wrappers until you have 8 rolls.
Pack in a sealable container, keep cold, and eat within 24 hours with spicy peanut sauce.
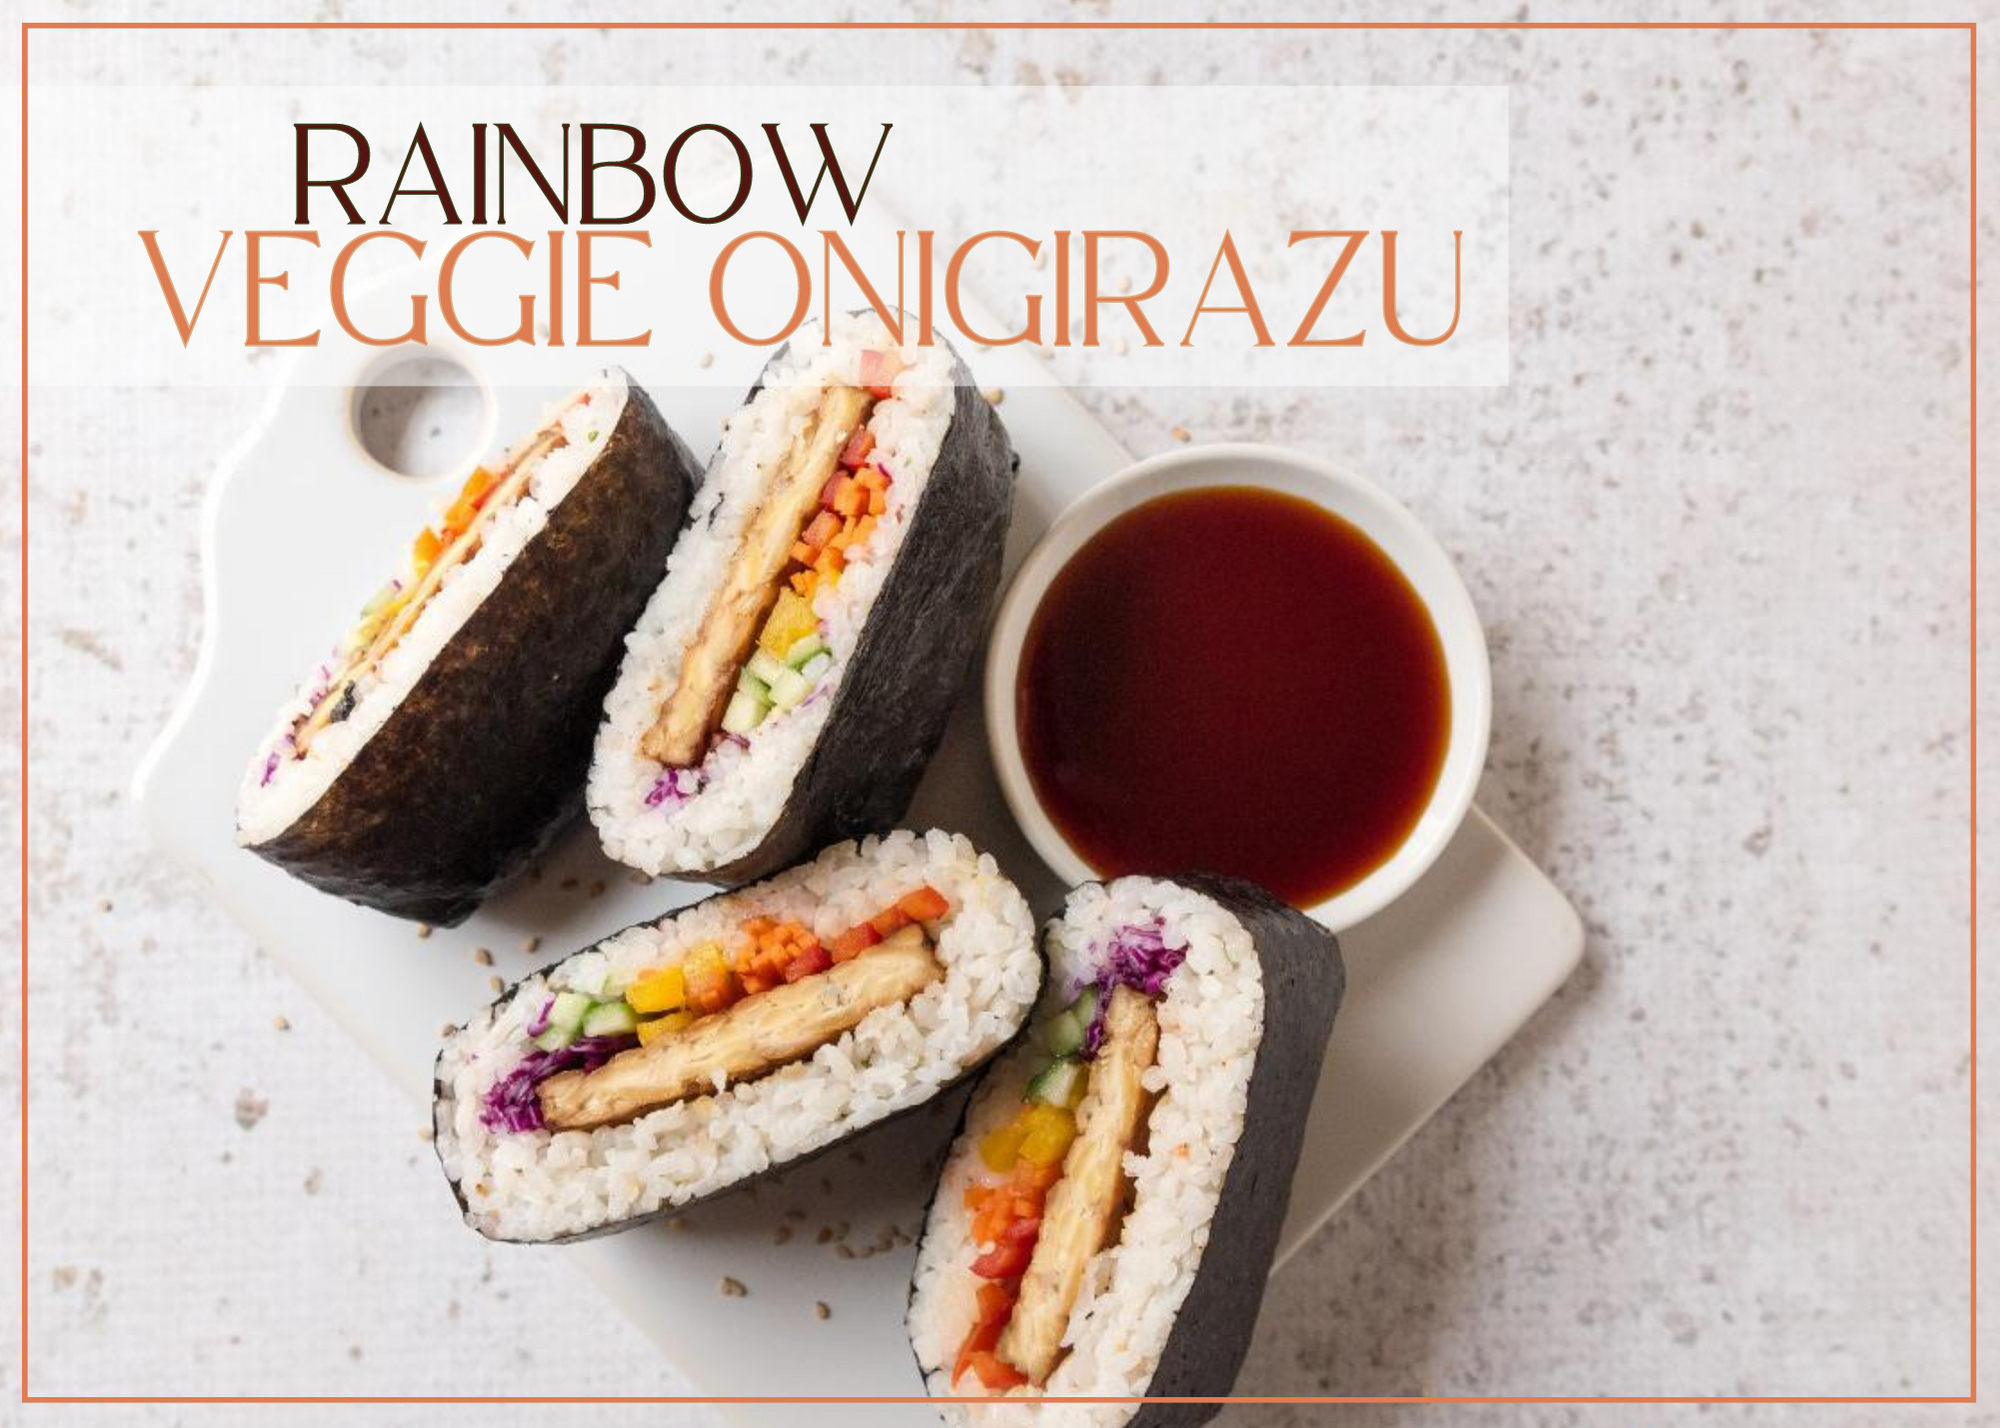
Are you tired of the same old lunch options? Do you want to add more plant-based protein to your diet? Look no further than this Rainbow Veggie Onigirazu recipe, featuring tempeh!
For those who are unfamiliar, onigirazu is a Japanese rice ball sandwich that’s wrapped in sheets of seaweed called nori instead of bread. It’s a convenient and portable option for lunch on-the-go. Plus, it’s easy to customize with your favorite fillings.
In this recipe, we’re using colorful veggies like carrots, bell peppers, and cabbage, along with tempeh, a fermented soy product that’s packed with protein and nutrients. Tempeh has a nutty flavor and a firm texture, making it a great meat substitute for those who are trying to cut back on animal products.
Not only is this Rainbow Veggie Onigirazu recipe beautiful to look at, but it’s also delicious and satisfying. The combination of nutty tempeh, crunchy veggies, and fluffy rice is a match made in heaven. Plus, it’s a great way to pack in a variety of nutrients in one meal.
Give this recipe a try for your next lunch or meal prep session. You won’t be disappointed!
Rainbow Veggie Onigirazu
For this recipe, use a variety of colorful veggies like carrots, bell peppers, and purple cabbage, along with some tempeh for protein. The result is not only visually stunning but also incredibly tasty!
Place rice, water, and salt in a medium pan and bring toa simmer. Cover and reduce heat to low, cooking for 15-18 minutes. Turn offheat and allow rice to rest for 10 minutes.
Whisk together the pickling liquid ingredients and tosswith vegetables. Allow to rest for 15 minutes, stirring occasionally.
Stir together rice vinegar and cane sugar untildissolved. Place rice on a large baking sheet and pour over mixture, sprinkleon furikake, and fold rice to incorporate. Divide rice mixture into 16 evenportions.
To assemble: place a nori sheet on a dry surface, lay arice portion in the center creating a flat 3-inch square shape, use wet handsto keep rice from sticking. Next, dollop 2 teaspoons sriracha mayo in thecenter then place a piece of tempeh on top. Arrange pickled vegetables,cucumber, and purple cabbage to form a rainbow pattern. Finish off with anotherportion of rice, forming it into a square and covering the fillings. Fold upnori sides, using water to seal the seams. Tightly wrap completed sandwich inplastic film and allow to rest for 15 minutes before eating.
Notes
Furikake seasoning contains fish. For a vegan version, use toasted sesame seeds and crushed nori.