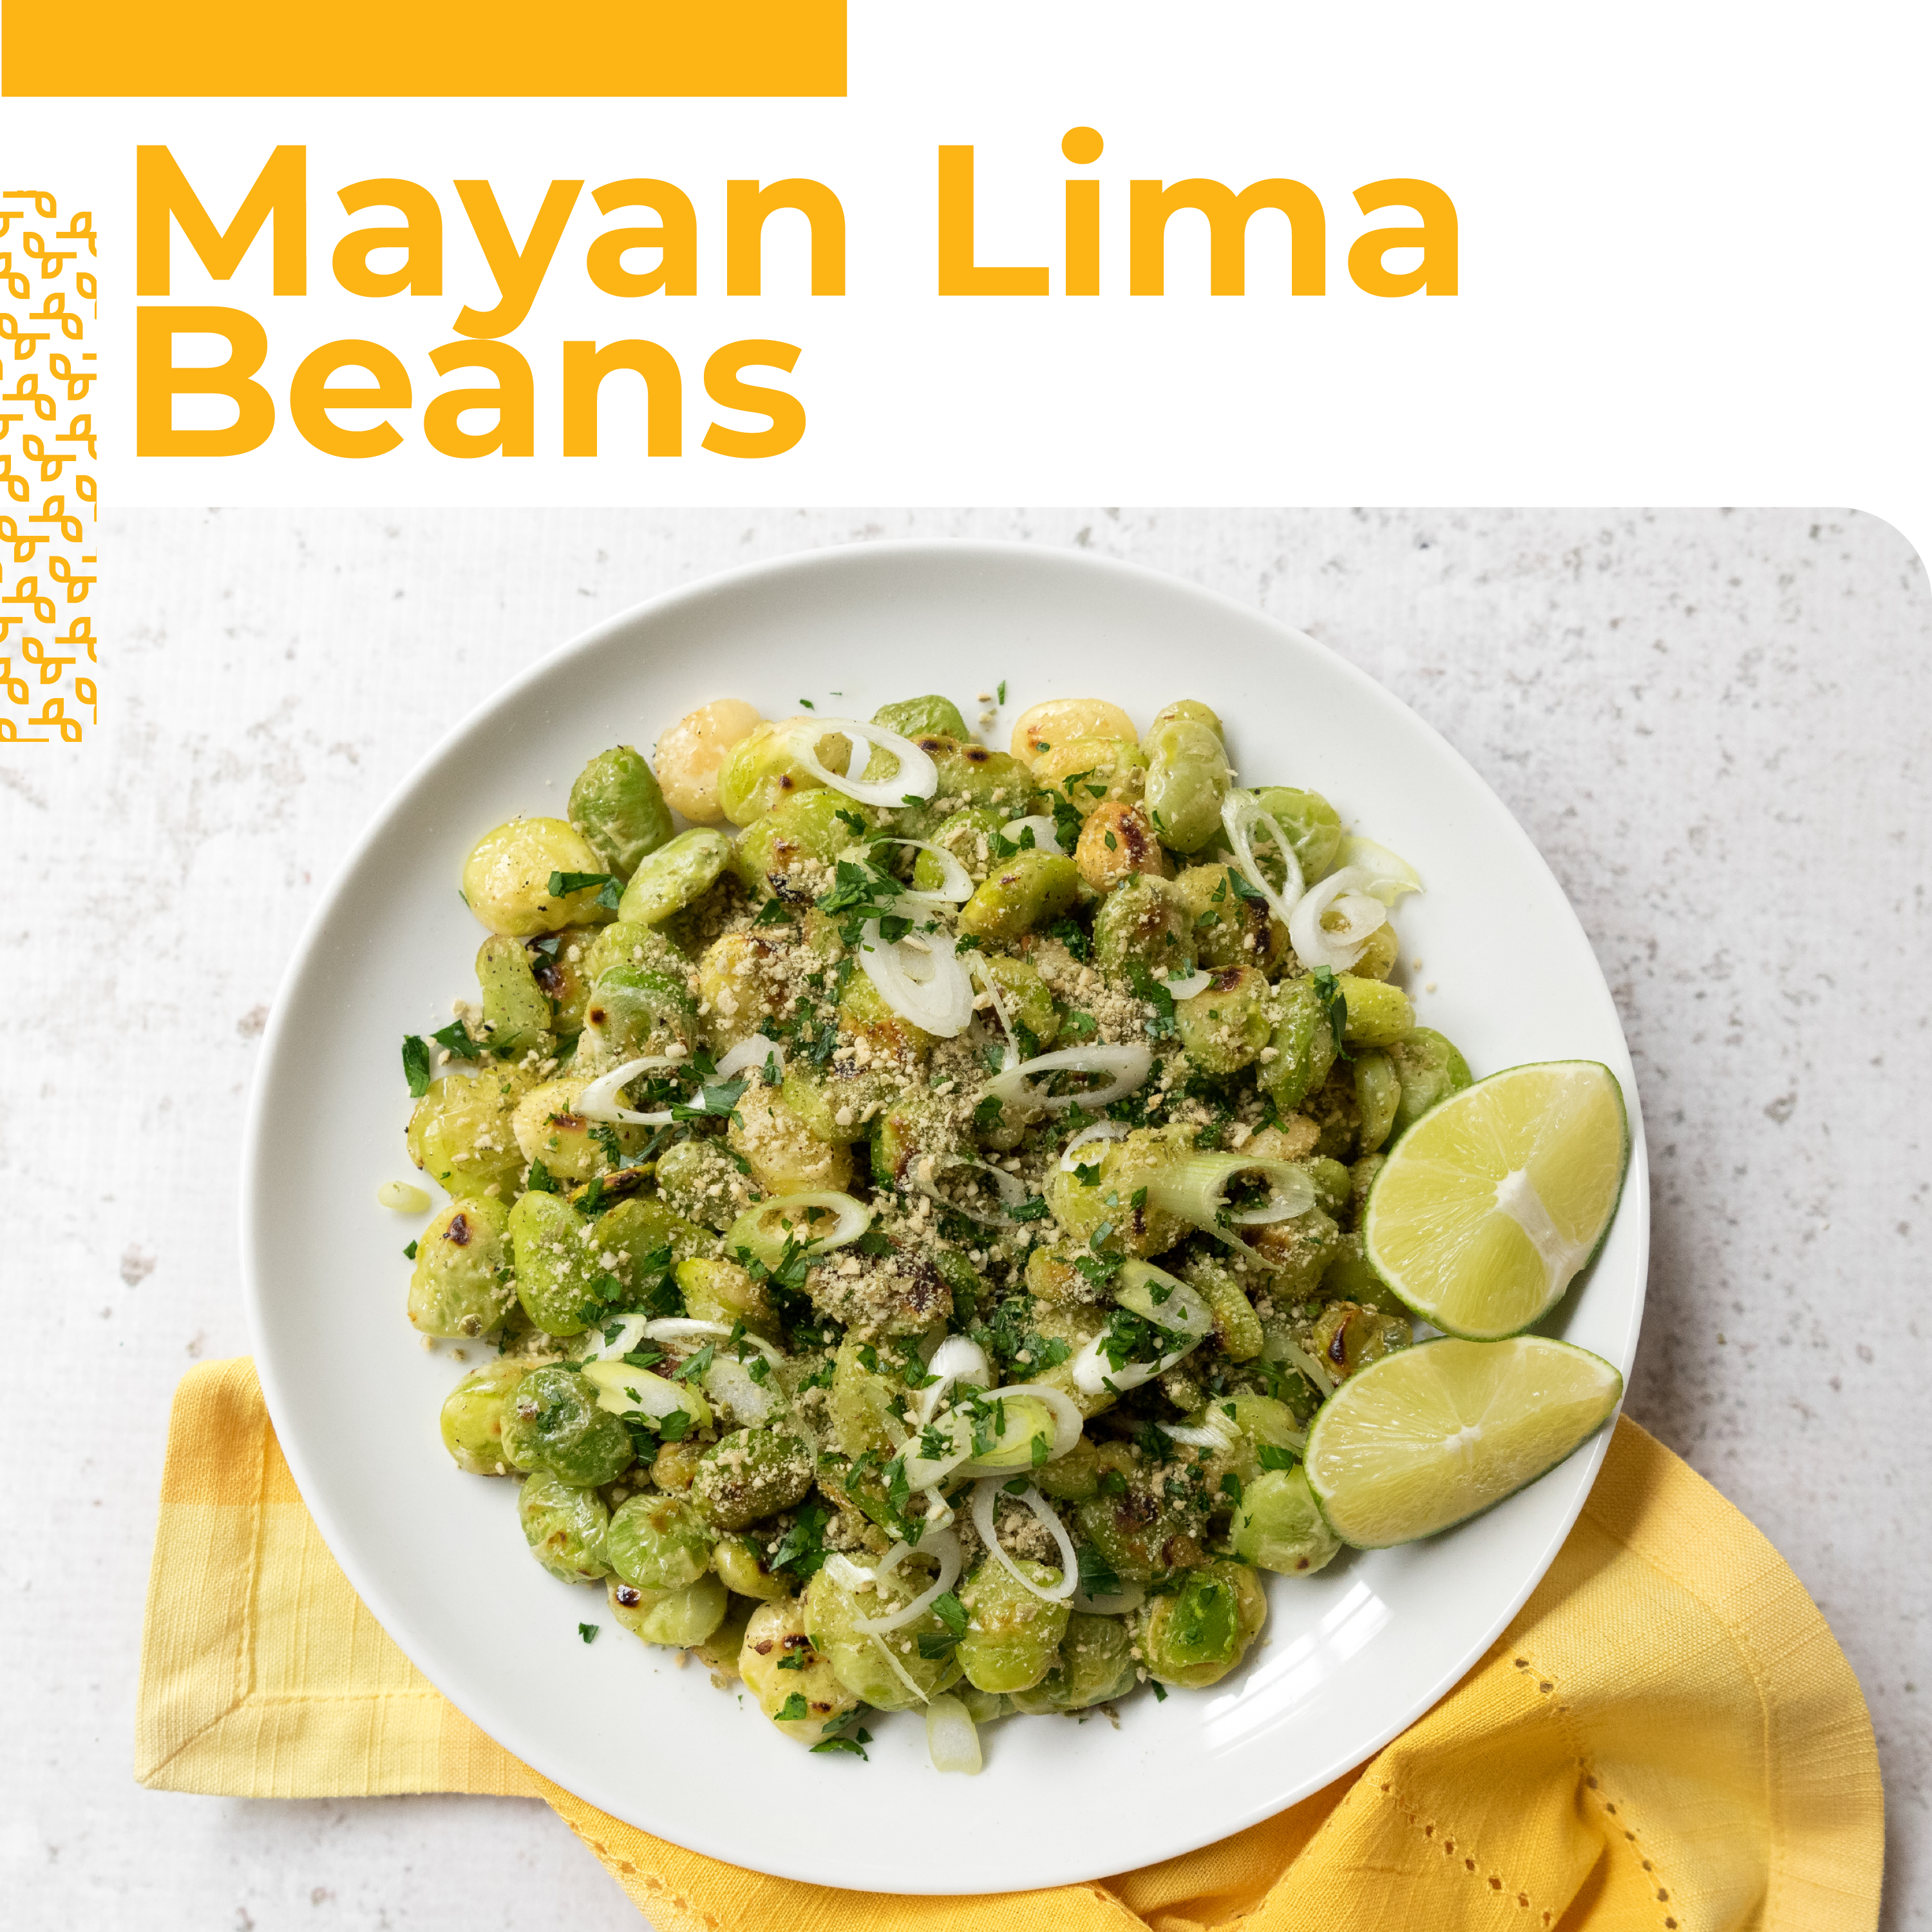
Category: Recipes

  • Easy Homemade Cherry Ice Cream

    Easy Homemade Cherry Ice Cream

    Easy Homemade Cherry Ice Cream

    Thanks to Christine Waltermyer & The Natural Kitchen Cooking School!

    Christine Waltermyer is a local and renowned Wellness Chef, private chef to celebrities, published cookbook author and founder of the Natural Kitchen Cooking School, which offers an online Plant-Based Cooking Program. She also loves shopping at Basil Bandwagon! Visit naturalkitchenschool.com to subscribe to her email newsletter for new recipes, tips, and FREE access to the Power of Veggies mini-course!


    Summer is time for ice cream – but let’s make it homemade! It’s easier than you think and thanks to Christine Waltermyer and the Natural Kitchen Cooking School, we have an easy cherry vanilla ice cream recipe that you can try at home today 🍒🍦

    Easy Homemade Cherry Ice Cream

    Homemade ice cream couldn't be easier!
    Course Dessert
    Keyword cherry, dessert, easy, homemade, ice cream
    Servings 1

    Ingredients

    • 1 cup heavy cream (I used dairy but you could use coconut-based cream for non-dairy)
    • 2 cups frozen sweet cherries
    • ¼ cup powdered sugar
    • Pinch sea salt
    • 1 teaspoon vanilla powder (or vanilla extract)
    • 1 teaspoon lemon juice optional
    • 1 pasteurized egg yolk optional

    Instructions

    • Pour the heavy cream into the bowl of a food processor. Whip it until fluffy. Add the frozen cherries, heavy cream, sugar, sea salt, vanilla powder, and optional lemon juice and egg yolk. Puree until completely smooth.
    • Freeze the ice cream using one of these two methods:
      1. Pour the ice cream into small single serving containers and freeze them. This makes it easy to take out and bring to room temperature for a few minutes to help it soften before serving.
      2. Or, pour the whole batch into a shallow pan and freeze for 1 hour. Swirl with a fork and freeze again. Stir every hour until firm, then transfer into a storage container.
    • Enjoy!

    Notes

    This is a firmer ice cream once it’s frozen, so just allow for letting it sit at room temperature for a few minutes before serving and you’ll be all set to enjoy delicious creamy ice cream!

    Thank you to Christine Waltermyer and the Natural Kitchen Cooking School for working with us to help promote healthy, nutritious meals and products that are affordable, full of nutrients, and simple to make at home!

  • Tomato and Melon Caprese

    Tomato and Melon Caprese

    Tomato and Melon Caprese


    Take a caprese salad to the next level. Instead of a mild, sweet Italian basil, Thai basil has a more spicy, assertive flavor. It will stand up to the other ingredients here and pairs well with the melon and tomatoes. These juicy melons and ripe tomatoes are at their peak, so you don’t need much to make them shine. With prosciutto and melon, this caprese salad can serve as a lunch all on its own or pair nicely as a side dish for your next celebratory dinner. 

    Tomato and Melon Caprese

    Course Appetizer, Lunch, Salad
    Keyword appetizer, gluten free, lunch, salad
    Servings 1

    Ingredients

    • 2 ½ pounds cantaloupe
    • 1 pint cherry tomatoes halved
    • 8 ounces ciliegine mozzarella halved
    • 6 slices prosciutto torn
    • ¾ ounce Thai basil stemmed

    Dressing

    • 2 tablespoons sunflower oil
    • 2 tablespoons honey
    • 2 tablespoons lemon juice
    • Pinch of sea salt
    • ½ teaspoon fresh thyme leaves

    Instructions

    • Whisk dressing ingredients together until emulsified. Set aside.
    • Cut melon in half and remove seeds. Use a melon baller to scoop the fruit or peel and chop into bite-sized pieces.
    • To assemble, arrange melon, tomatoes, mozzarella, and prosciutto on a serving vessel. Drizzle dressing over salad and garnish with basil. Serve promptly.
    • Enjoy!

    Recipe Provided by INFRA

  • Traditional Chorizo Pupusas

    Traditional Chorizo Pupusas

    Traditional Chorizo Pupusas


    Pupusas are a thick griddled corn cake from El Salvador and Honduras. They are filled with savory ingredients and typically served with a pickled vegetable slaw called curtido. You can get creative with the fillings! Beans, squash, peppers, and even shrimp find their way into pupusas. While you can get pupusas from a restaurant or even the freezer section, this is a really approachable recipe to try at home! If you can roll a ball of dough and cook pancakes, you’ll have no trouble with pupusas! 

    Traditional Chorizo Pupusas

    Course Appetizer, dinner, Lunch, Side Dish
    Keyword appetizer, chorizo, dinner, gluten free, lunch, pupusas, side
    Servings 4

    Ingredients

    • 2 cups masa harina
    • 1 ½ cups water
    • 1 teaspoon sea salt
    • ¾ cup cooked chorizo sausage crumbled
    • 1 ¼ cup shredded mozzarella cheese

    Instructions

    • Prepare the pupusa dough by mixing the masa with the salt. Add water and stir until fully incorporated. The dough should be firm yet pliable, add more masa or water depending on how the dough turns out after stirring in the water described above.
    • Scoop dough into approximately ¼ cup amounts and roll into balls.
    • Heat a skillet over medium-low heat. It is best to assemble and cook the pupusas as you go, one or more at a time depending on the size of the skillet.
    • Using wet hands, flatten a dough ball to a diameter of five inches and place three tablespoons of cheese and two tablespoons of chorizo into the center. Flatten another dough ball and place on top of the filling. Press and shape the pupusa into a round form with a quarter inch of thickness.
    • Place in an oil coated skillet and cook 3-5 minutes per side. Repeat with remaining dough and filling.
    • Enjoy!

    Notes

    SUBSTITUTIONS: Replace chorizo with any other seasoned meat, plant-based alternatives, or refried beans. Cheese can be swapped out for a non-dairy cheese that has good melting properties.

    Recipe Provided by INFRA

  • Watermelon Jicama Salad

    Watermelon Jicama Salad

    Watermelon Jicama Salad


    Sweet, spicy, crisp, and refreshing. Forget your usual potluck sides and make this watermelon jicama salad instead! It’s both hydrating and delicious! We love the juicy melon mixed with a slightly spicy dressing. You can control the heat by using less serrano pepper or amp it up by using the seeds and ribs. It may get spicier over time as the peppers marinate in the dressing, so be careful if you’re prepping this ahead of time. Don’t have any jicama? Daikon radish, a green apple, or even a firm pear will work here. 

    Watermelon Jicama Salad

    Course Appetizer, dinner, Lunch, Salad
    Keyword appetizer, dinner, gluten free, grain-free, lunch, salad, vegan
    Servings 2

    Ingredients

    • 3 pounds watermelon
    • 1 ½ pounds jicama
    • 2 scallions

    Dressing

    • 1 tablespoon avocado oil
    • 2 tablespoons fresh lime juice
    • ¼ teaspoon crushed red chilies
    • ½ teaspoon ground cumin
    • ¼ teaspoon sea salt
    • 1 medium serrano pepper seeded and minced

    Instructions

    • Prepare salad ingredients. Peel and chop watermelon. Peel jicama and cut into matchsticks. Thinly slice scallions.
    • Whisk together dressing ingredients, adjust heat to taste.
    • Toss dressing with jicama and watermelon in a large bowl. Top with scallions and serve.
    • Enjoy!

    Recipe Provided by INFRA

  • Vegan Breakfast Tacos

    Vegan Breakfast Tacos

    Vegan Breakfast Tacos


    These vegan breakfast tacos are so easy to make, you won’t know what to do with all your new free time, except eat more tacos. Even better? They’re 100% plant-based!

    Vegan Breakfast Tacos

    Course Breakfast
    Keyword breakfast, tacos, vegan
    Servings 2

    Ingredients

    • 6 tortillas corn or wheat
    • 1 16 ounce bottle of Simply Eggless
    • 3 radishes sliced thin
    • 1 large avocado sliced or cubed
    • ¼ cup cilantro chopped roughly
    • ¾ cup chunky salsa or pico de gallo
    • 1 lime sliced into wedges

    Instructions

    • In a large, nonstick, skillet, scramble the Simply Eggless over medium-low heat until all the liquid is cooked through.
    • Warm the tortillas and divide the scrambled vegan egg between the six tortillas.
    • Top with fillings as desired and serve immediately with wedges of lime.
    • Enjoy!

    Recipe Provided by INFRA

  • Butter-For-You Banana Split

    Butter-For-You Banana Split

    Butter-For-You Banana Split


    When is the last time you had a banana split? Enjoy this Butter-For-You Banana Split and lean into the nostalgia. With nut butter and a literal cherry on top, this is a delicious alternative to the American classic.

    Butter-For-You Banana Split

    Course Dessert
    Keyword banana split, dessert, nut butter
    Servings 1

    Ingredients

    • 1 banana
    • cup plain Greek yogurt
    • ¼ cup mixed fruit
    • 2 tablespoons Justin's Nut Butter
    • 1 tablespoon granola
    • 1 cherry for garnish

    Instructions

    • Slice banana in half lengthwise and place in a dish.
    • Scoop the Greek yogurt in the center of the split banana.
    • Top yogurt with fruit, and drizzle Justin's Nut Butter evenly on top.
    • Sprinkle with granola and place cherry on top.
    • Enjoy!

    Recipe Provided by INFRA

  • Breaded Fish Tacos

    Breaded Fish Tacos

    Breaded Fish Tacos


     If you’re fishing for compliments, these gluten-free crispy fish tacos will certainly help you reel them in! Great for a crowd, everyone can build their own tasty tacos.

    Breaded Fish Tacos

    Course dinner
    Keyword dinner, entree, fish, tacos
    Servings 5

    Ingredients

    • 1 pound wild cod cut into strips
    • 1 egg beaten
    • 1 box Simple Mills Cracked Black Pepper or Fine Ground Sea Salt Almond Flour Crackers
    • 1 teaspoon dried parsley
    • ½ teaspoon salt
    • Olive oil optional
    • 10 paleo, gluten-free tortillas
    • Organic or vegan ranch dressing
    • ½ cup shredded cabbage
    • ½ red onion thinly sliced
    • 2 avocados sliced
    • Fresh cilantro

    Instructions

    • Preheat oven to 400°F and line a baking sheet with parchment paper. Set aside.
    • Add Simple Mills crackers to a food processor and pulse until a coarse meal is formed. Transfer to a large bowl along with the parsley and salt. Mix and set aside.
    • Drop fish strips into the beaten egg then into the cracker mixture, ensuring the fish is well coated. Place on the prepared baking sheet. Drizzle with a touch of olive oil for an extra crispy exterior.
    • Bake for 15 minutes or until the fish is flaky.
    • Assemble your tacos by spreading 1 teaspoon of your favorite Organic or Vegan Ranch Dressing onto warmed tortillas. Top with shredded cabbage, red onion, avocado, fresh baked cod, fresh cilantro, and a drizzle of your favorite dressing.
    • Enjoy!

    Recipe Provided by INFRA

  • Snack Smarter!

    Snack Smarter!

    Snack Smarter!

    Kid-approved snacks

    Smart snacking can mean the difference between feeling energetic or fatigued. Plus, proper snacking can help deliver the nutrients children need to properly develop, both physically and mentally. When your household is craving something sweet or savory to tide everyone over to the next meal, these make-ahead wee-eats will earn you the Snack Master crown!

    Pesto Dip Pepper Poppers

    Sweet baby peppers serve as a nutritious delivery method for this pesto-like dip. You can also spread the dip into celery crevices.
    Servings: 6
    Course: Appetizer, Snack

    Ingredients
      

    • 1 ½ cups cooked or canned navy beans
    • ½ cup soft tofu
    • 1 cup fresh basil
    • 2 tablespoons olive oil
    • Juice of ½ lemon
    • 1 garlic clove chopped
    • ½ teaspoon salt
    • 12 mini bell peppers

    Method
     

    1. In food processor container, place beans, tofu, basil, olive oil, lemon juice, garlic, and salt and blend until smooth.
    2. Slice off tops of bell peppers and remove seeds inside with either a small knife or your finger. Using small spoon, stuff peppers with dip.
    3. Enjoy!

    PB&J Ice Cream Bars

    This riff on everyone’s favorite childhood sandwich is a delicious snack on a sultry summer day.
    Servings: 6
    Course: Dessert

    Ingredients
      

    • 3 large frozen bananas cut into chunks
    • 1 cup raspberries
    • cup peanut butter
    • 1 teaspoon vanilla extract
    • teaspoon salt
    • cup unsalted roasted peanuts

    Method
     

    1. Line 9 x 5 in (23 x 13 cm) loaf pan with parchment paper large enough so there is a 1 in (2.5 cm) overhang.
    2. In food processor container, place banana; turn machine on and let it run until banana is reduced to the size of small pebbles. Scrape down sides of bowl; add raspberries, peanut butter, vanilla, and salt; continue blending until creamy. Be careful not to over blend to the point where bananas begin to melt. Pulse in peanuts.
    3. Place banana mixture in pan and spread out into an even layer. If desired, sprinkle some additional peanuts on top. Place in freezer until frozen solid, at least 4 hours.
    4. Using parchment paper overhang, lift frozen block out of pan and, using serrated knife, carefully slice into 8 bars. Store in airtight container in freezer for up to 1 month.
    5. Enjoy!

    Sweet Potato Mini Egg Cakes

    These mini-sized egg cakes offer up a savory way to work more protein and vegetables into snack time. Serve at room temperature or warm in the microwave.
    Servings: 6
    Course: Breakfast, Snack

    Ingredients
      

    • 1 tablespoon grapeseed oil or avocado oil
    • 1 cup diced yellow onion
    • ½ teaspoon salt divided
    • 2 cups grated sweet potato
    • 2 garlic cloves minced
    • 6 large eggs
    • ¼ cup milk
    • 1 large red bell pepper chopped
    • ½ cup grated parmesean or gruyere cheese
    • 2 teaspoon fresh thyme
    • ¼ teaspoon black pepper

    Method
     

    1. Preheat oven to 375 F (190 C).
    2. In large skillet over medium, heat oil. Add onion and 1/4 tsp (1 mL) salt; cook for 5 minutes, or until softened. Add sweet potato and garlic; heat just until potato is tender, about 2 minutes.
    3. In large bowl, whisk together eggs and milk. Stir in red bell pepper, cheese, thyme, remaining 1/4 tsp (1 mL) salt, and black pepper. Stir in cooked vegetables. Divide among 16 mini-sized greased muffin cups. Bake until egg cakes are set, about 15 minutes. Let cool for a couple of minutes before unmoulding.
    4. Enjoy!

    Recipes Provided by Alive Magazine

  • Candied Cranberries

    Candied Cranberries

    Candied Cranberries

    Candied Cranberries

    Course Dessert

    Ingredients

    • 2 cups sugar divided
    • ½ cup water
    • 12 ounces fresh cranberries washed

    Instructions

    • Combine ½ cup sugar and ½ cup water in a medium saucepan over medium heat, stirring, until sugar is dissolved. Do not boil.
    • Stir in cranberries and stir to coat all cranberries. Use a slotted spoon and transfer cranberries to a wire rack (set it on top of a lined baking sheet for easy clean up). Reserve syrup if you want – it's great to sweeten cocktails!
    • Let cranberries dry for 1 hour. After one hour, roll cranberries in remaining sugar until completely coated.
    • Store in an airtight container in the fridge for 2-3 days.
    • Enjoy!

    Notes

    • These may start to “weep” some liquid after 2-3 days. If that happens, you can re-roll them in sugar to extend their life.
    • Use on charcuterie platters, baked brie, atop desserts or cocktails.
    • Use vanilla bean or orange zest to vary the flavor.

    Recipe Provided by UNFI Fresh

  • Cranberry Champagne Mug Cakes

    Cranberry Champagne Mug Cakes

    Cranberry Champagne Mug Cakes

    Cranberry Champagne Mug Cake

    Course Dessert
    Keyword cranberry, dessert, mug cake

    Ingredients

    • Canola oil, olive oil or butter
    • 2 tablespoons dried cranberries
    • ¼ cup champagne or sparkling wine divided
    • 2 cups whipped cream
    • ¼ cup egg whites
    • ½ cup white cake mix

    Instructions

    • Coat insides of 2 large microwave-safe mugs with oil or butter.
    • Place cranberries and 1 tablespoon champagne in small bowl. Microwave on HIGH 10 seconds; drain. Divide cranberries and place in bottom of mugs.
    • Whisk together whipped cream, egg whites and cake mix in medium bowl. Place half of batter in each mug.
    • Microwave each mug individually on HIGH 1 minute 15 seconds to 1 minutes 30 seconds or until set. Invert each cake onto a plate. Spoon 1 ½ tablespoons champagne over top of each cake. Serve with additional whipped cream, if desired.
    • Enjoy!

    Recipe Provided by UNFI Fresh