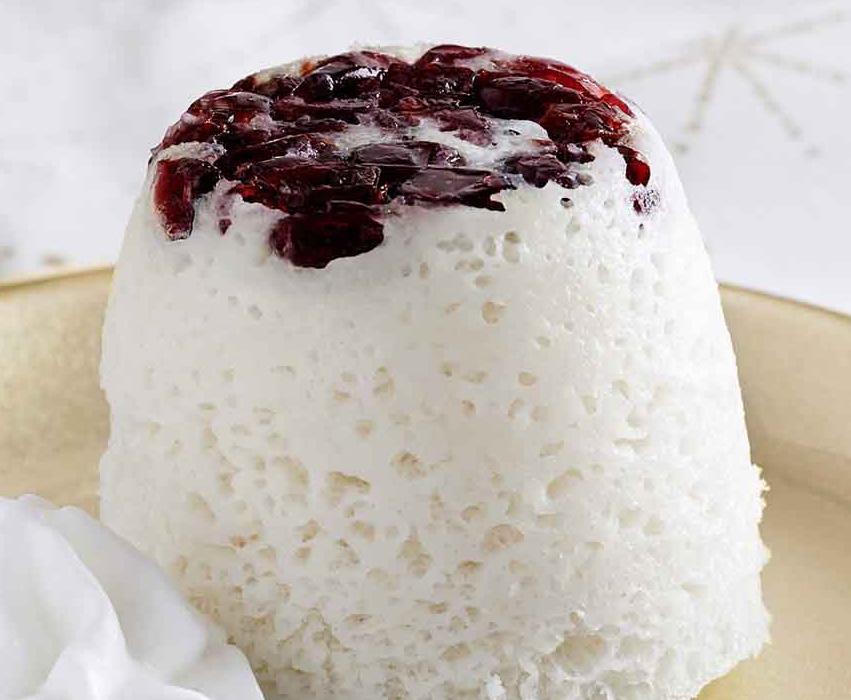
Coat insides of 2 large microwave-safe mugs with oil or butter.
Place cranberries and 1 tablespoon champagne in small bowl. Microwave on HIGH 10 seconds; drain. Divide cranberries and place in bottom of mugs.
Whisk together whipped cream, egg whites and cake mix in medium bowl. Place half of batter in each mug.
Microwave each mug individually on HIGH 1 minute 15 seconds to 1 minutes 30 seconds or until set. Invert each cake onto a plate. Spoon 1 ½ tablespoons champagne over top of each cake. Serve with additional whipped cream, if desired.
We all know and love the classic crispy rice bar. Take it up a notch by adding natural peanut butter and fair-trade chocolate for these chocolate peanut butter crispy rice treats. The result? A portable treat that you can take to picnics by the water, camping under the stars, or your next backyard barbecue.
Melt butter in pan over low heat. Add agave to the pan and stir together until combined. Add peanut butter. Stir to combine.
Let this mixture cook on low for three to four minutes, stirring frequently. It should start to thicken slightly but still be a liquid when you take it off the heat. Take pan off heat. Add vanilla extract. Stir to combine.
Pour the peanut butter mixture over the rice crisp cereal. Stir to combine. Pour mixture into parchment-lined pan. Press mixture down firmly to be sure it all sticks together.
Let set in the fridge for one hour. Chop roasted and salted peanuts. Set aside.
Melt chocolate in microwave in 20 second increments. Stir well between each increment. Stop microwaving when there is still a bit of solid chocolate remaining.
Pour the chocolate over the top of the rice crispy treats. Spread out evenly with a spatula or the back of a spoon. Sprinkle chopped nuts on top while chocolate is liquid.
Let set in fridge. Once chocolate is firm cut into 12 squares and serve.
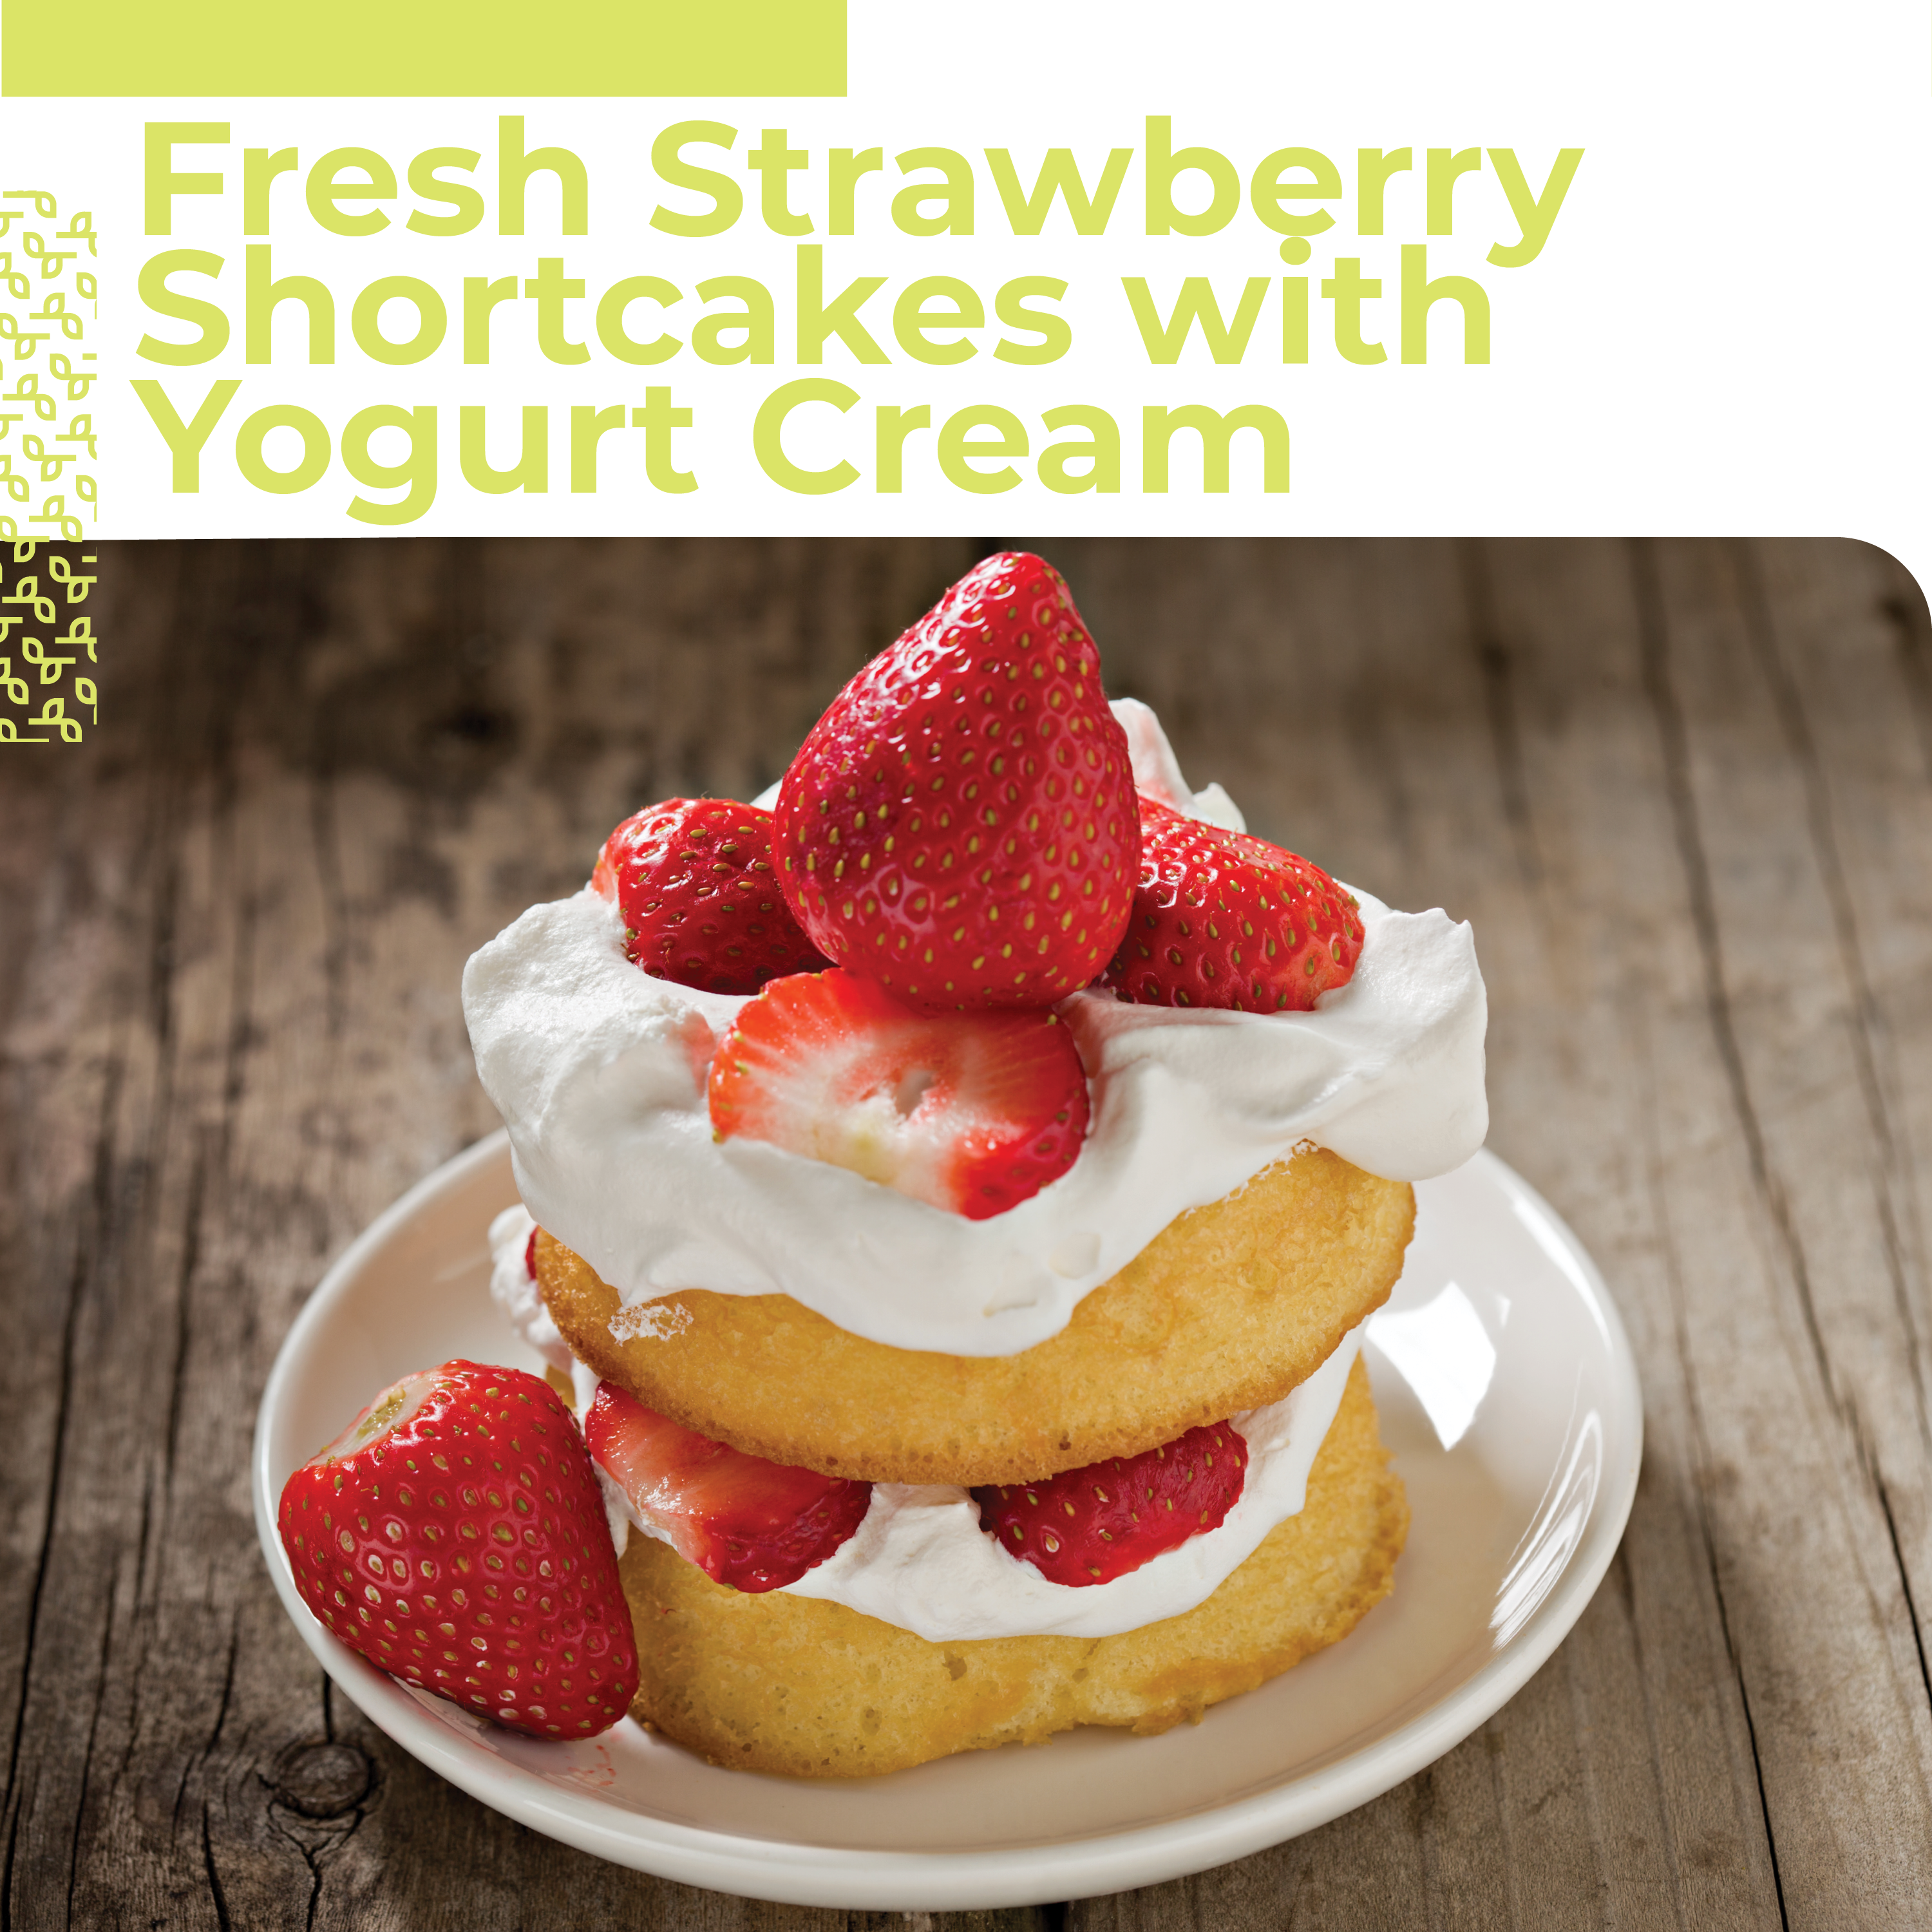
Berries and cream come together in this classic dessert with a twist! Using plain yogurt in the shortcakes and whipped topping add a probiotic boost and a tangy zip. Fresh Strawberry Shortcakes with Yogurt Cream are the perfect way to end a meal with family and friends.
To make the macerated strawberries combine the chopped strawberries, sugar, vanilla extract, and salt in a medium size bowl. Mix well to combine. Cover and let sit at room temperature or in the fridge for at least an hour.
Preheat the oven to 425°F, and line a baking sheet with parchment paper. In a large bowl, combine the flour, sugar, baking powder, and salt. Whisk to combine. In a large measuring cup combine the cream, yogurt, and egg, whisk well. Make a well in the center of the dry ingredients and add the egg and cream mixture. Use a wooden spoon to mix well, until the dough just comes together, and no dry patches of flour remain – do not overmix.
Pour the dough out onto a lightly floured work surface. Lightly dust the top of the dough with flour as well as your hand, and press the dough out into a rectangle about 8 x 10". Fold the dough in thirds like a letter, then press back out into a rectangle. fold in thirds again, the press back out into a rectangle. Use a bench scraper to cut the dough into either six large shortcakes or eight smaller shortcakes.
Place the shortcakes on the prepared baking sheet. Use a pastry brush to brush the tops of the shortcakes with cream, and generously sprinkle turbinado sugar on top. Bake for 15-18 minutes until golden brown. Set aside to cool.
To make the whipped yogurt cream, add the cream and sugar into the bowl of a stand mixer. Whip on medium speed until soft peaks form. Add the yogurt, and gently fold in.
Assemble the shortcakes right before serving. Split the shortcakes in half. Spoon strawberries on the bottom half and add yogurt whipped cream. Place the other half of the shortcake on top.
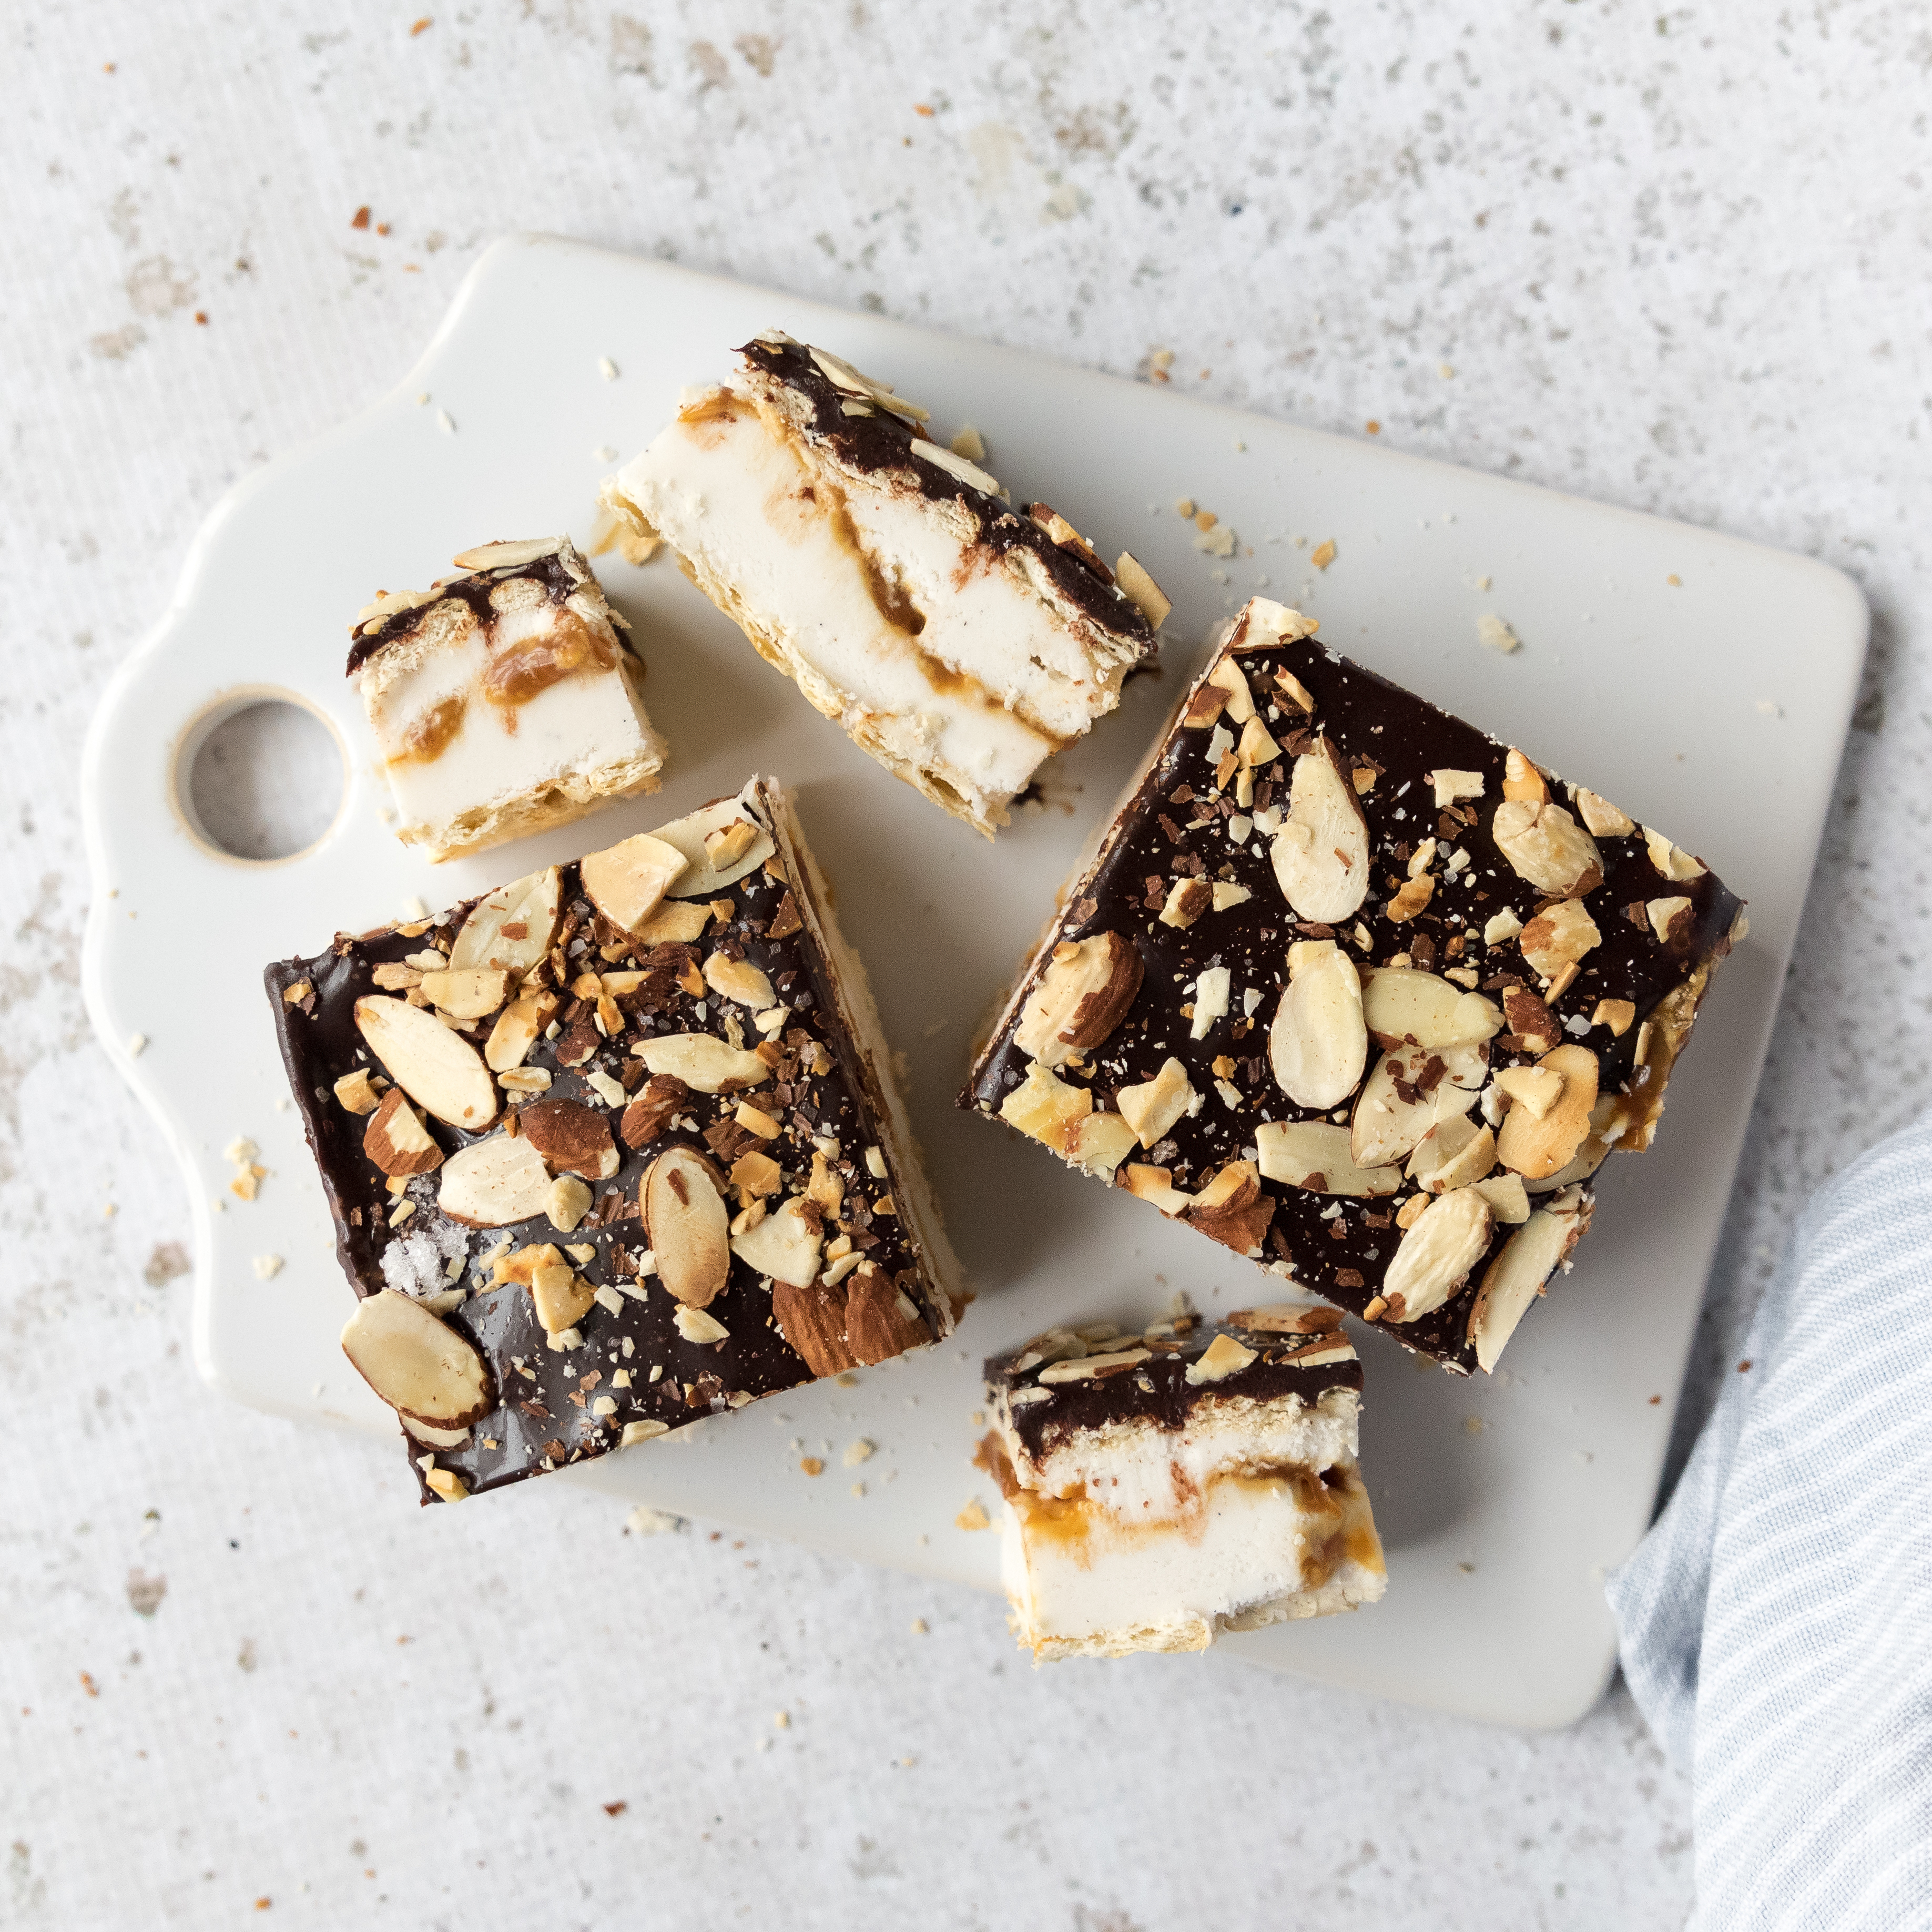
Salted caramel is a popular ice cream flavor for a reason. The salt balances the potentially cloying sugar overload of caramel. When making an ice cream sandwich, we doubled down on this notion. Instead of using a traditional cookie base, swap the pantry staple saltine cracker! While the ice cream sets, the crackers get slightly soft, which means you can cut and eat this ice cream sandwich without worrying about cracker crumbs everywhere. To drive up the flavor factor, swirl caramel sauce between softened vanilla ice cream for another frozen dessert that’s sure to be an instant classic!
Thanks to Christine Waltermyer & The Natural Kitchen Cooking School!
Christine Waltermyer is a local and renowned Wellness Chef, private chef to celebrities, published cookbook author and founder of the Natural Kitchen Cooking School, which offers an online Plant-Based Cooking Program. She also loves shopping at Basil Bandwagon! Visit naturalkitchenschool.com to subscribe to her email newsletter for new recipes, tips, and FREE access to the Power of Veggies mini-course!
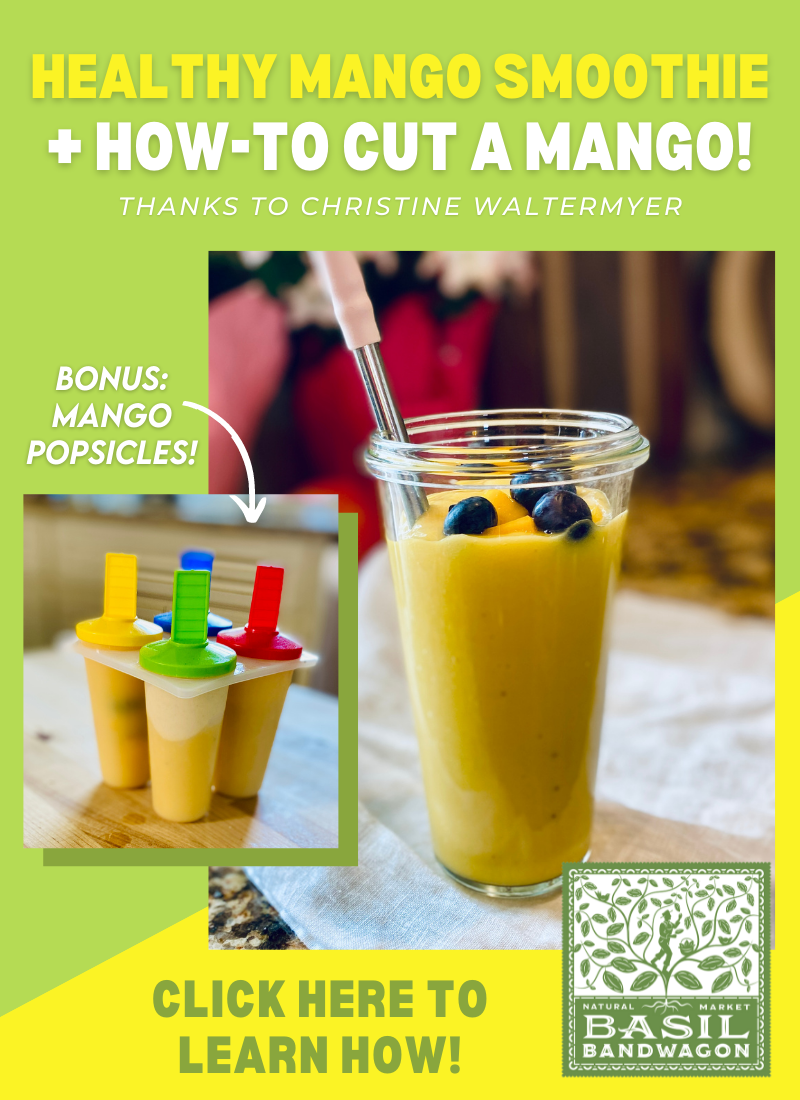
If you LOVE mangoes then this recipe is just what you’re looking for. Thanks to Christine Waltermyer and The Natural Kitchen Cooking School, we’re learning how to cut a mango and use them to make a refreshing smoothie that you and your kids will love! Bonus – if you have leftover smoothie, you can turn them into frozen popsicles. Whether you like mangoes fresh or frozen, you’ll always know your snack is nutritious, delicious and will bring you an instant energy boost!
Place all ingredients in a high-powered blender and puree until smooth. Enjoy served in a tall glass with a straw!
Notes
Leftover smoothie makes great popsicles! Just pour into popsicle molds and freeze.
Thank you to Christine Waltermyer and the Natural Kitchen Cooking School for working with us to help promote healthy, nutritious meals and products that are affordable, full of nutrients, and simple to make at home!
Christine Waltermyer is a local and renowned Wellness Chef, private chef to celebrities, published cookbook author and founder of the Natural Kitchen Cooking School, which offers an online Plant-Based Cooking Program. She also loves shopping at Basil Bandwagon! Visit naturalkitchenschool.com to subscribe to her email newsletter for new recipes, tips, and FREE access to the Power of Veggies mini-course!
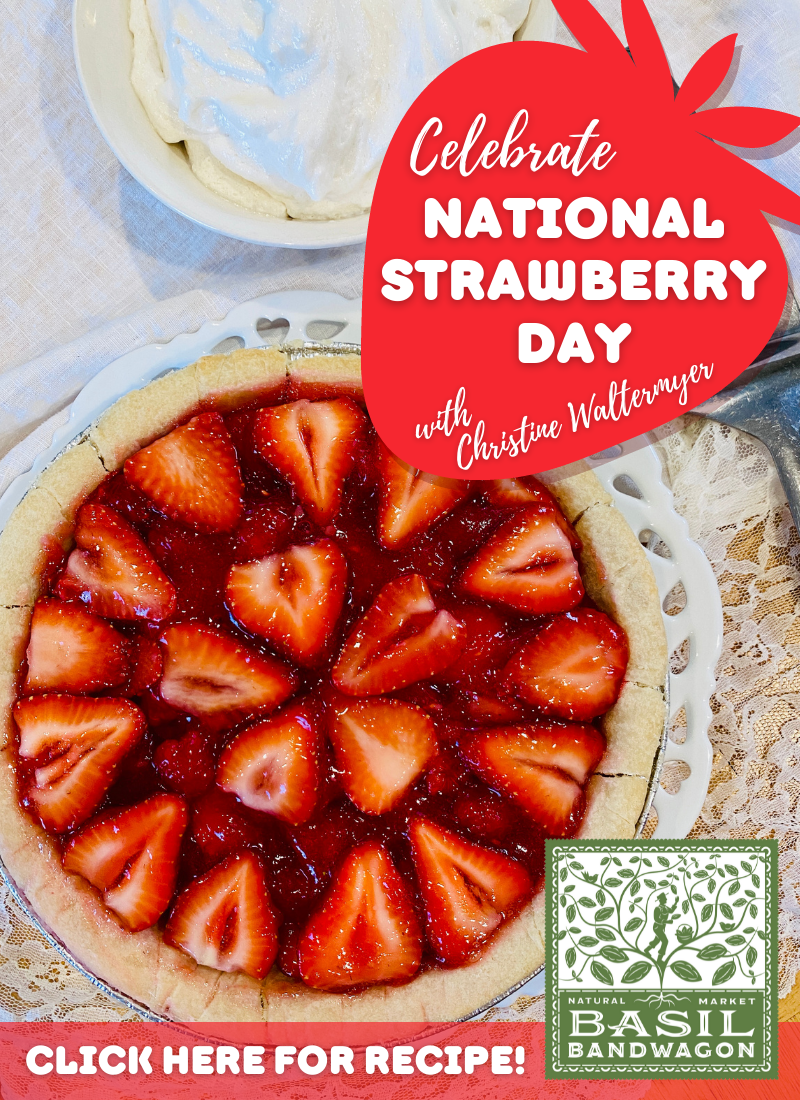
Did you know: strawberries are packed with vitamins, fiber, and particularly high levels of antioxidants known as polyphenols. They are a sodium-free, fat-free, cholesterol-free, low-calorie food AND they’re a good source of manganese and potassium. How cool is that!
Thanks to Christine Waltermyer and The Natural Kitchen Cooking School, we’re passing along a delicious and nutritious Strawberry Pie recipe to help celebrate these incredible fruits on National Strawberry Day! All ingredients can be found at your favorite local Basil Bandwagon Natural Market location.
Want to know another fun fact about strawberries? The average strawberry contains 200 seeds!
¾cupLakanto sugar free powdered monkfruit sweetener with erythritol
2tablespoonsarrowroot flour
1cupwater
10.7 oz. package Simply Delish strawberry jel dessert
3cupssliced strawberries
1cupred raspberries
Dairy-free whipped topping
Instructions
Preheat the oven to 425° F. Line the unpricked crust with a piece of parchment paper. Fill with pie weights or dried beans to cover the bottom. Bake for 9 minutes. Remove the parchment paper. If you wish, you can bake for a few more minutes to make the bottom more crisp. Cool the baked pie shell on a wire rack.
In a small saucepan, combine the powdered monkfruit sweetener, arrowroot flour and water. Stir with a whisk until smooth. Bring to a boil over medium high heat, stirring frequently. Cook for about 2 minutes. Remove the mixture from the heat. Stir in the Simply Delish strawberry jel dessert powder until dissolved. Set aside to cool.
Add the strawberries and raspberries to the strawberry jel mixture. Carefully fold them in. Pour into the prepared crust. Arrange the berries in a pretty pattern, adding extra fresh berries on top if you wish. Refrigerate until set. Serve with optional whipped topping.
Enjoy!
Thank you to Christine Waltermyer and the Natural Kitchen Cooking School for working with us to help promote healthy, nutritious meals and products that are affordable, full of nutrients, and simple to make at home!
Christine Waltermyer is a local and renowned Wellness Chef, private chef to celebrities, published cookbook author and founder of the Natural Kitchen Cooking School, which offers an online Plant-Based Cooking Program. She also loves shopping at Basil Bandwagon! Visit naturalkitchenschool.com to subscribe to her email newsletter for new recipes, tips, and FREE access to the Power of Veggies mini-course!
Impress your friends at this year’s cookie exchange with Christine Waltermyer’s Holiday Frosted Sugar Cookies! This sweet recipe can be decorated any way you’d like – maybe plant-based food dyes? How about festive Supernatural sprinkles? The sky’s the limit!
Share your special creations by tagging us on social media:
sprinkles of your choice (I used Supernatural Sprinkles)
colored sugar
coconut sugar
cinnamon
Instructions
In a large bowl (or stand mixer or food processor), combine the ghee, maple syrup, egg and vanilla. Whisk well to blend.
Add the almond flour, arrowroot flour, cassava flour, sea salt and cream of tartar. Whisk again or use a fork to combine into a smooth dough.
Wrap the dough with plastic wrap and form into a flat disc. Refrigerate for two hours.
Preheat the oven to 350 degrees F. Line a baking sheet with parchment paper. Place the chilled dough on a piece of parchment paper. Place another piece of parchment paper on top. Roll out the dough to desired thickness, about ¼-inch thick. Or you can make it slightly thinner if you prefer. Use cookie cutters or a glass jar to cut out shapes of your choice.
Transfer the cut out cookies onto the prepared baking sheet. If you want to make some cinnamon sugar variety, top them with a mixture of half coconut sugar mixed with half cinnamon. Leave the rest of the cookies plain for frosting later when cool. Bake for 10 minutes, or until lightly golden on the bottoms.
Cool the cookies. Prepare your toppings. If you want to add food coloring to white frosting, place ½ cup of the frosting in a small bowl and add a teaspoon of the desired dry food coloring powder. If using liquid food coloring drops you will need less. Mix until completely uniform in color. Carefully frost the cookies and add sprinkles of your choice. Store cookies in a single layer in a glass storage container, lightly covered.
Enjoy!
Thank you to Christine Waltermyer and the Natural Kitchen Cooking School for working with us to help promote healthy, nutritious meals and products that are affordable, full of nutrients, and simple to make at home!
Christine Waltermyer is a local and renowned Wellness Chef, private chef to celebrities, published cookbook author and founder of the Natural Kitchen Cooking School, which offers an online Plant-Based Cooking Program. She also loves shopping at Basil Bandwagon! Visit naturalkitchenschool.com to subscribe to her email newsletter for new recipes, tips, and FREE access to the Power of Veggies mini-course!
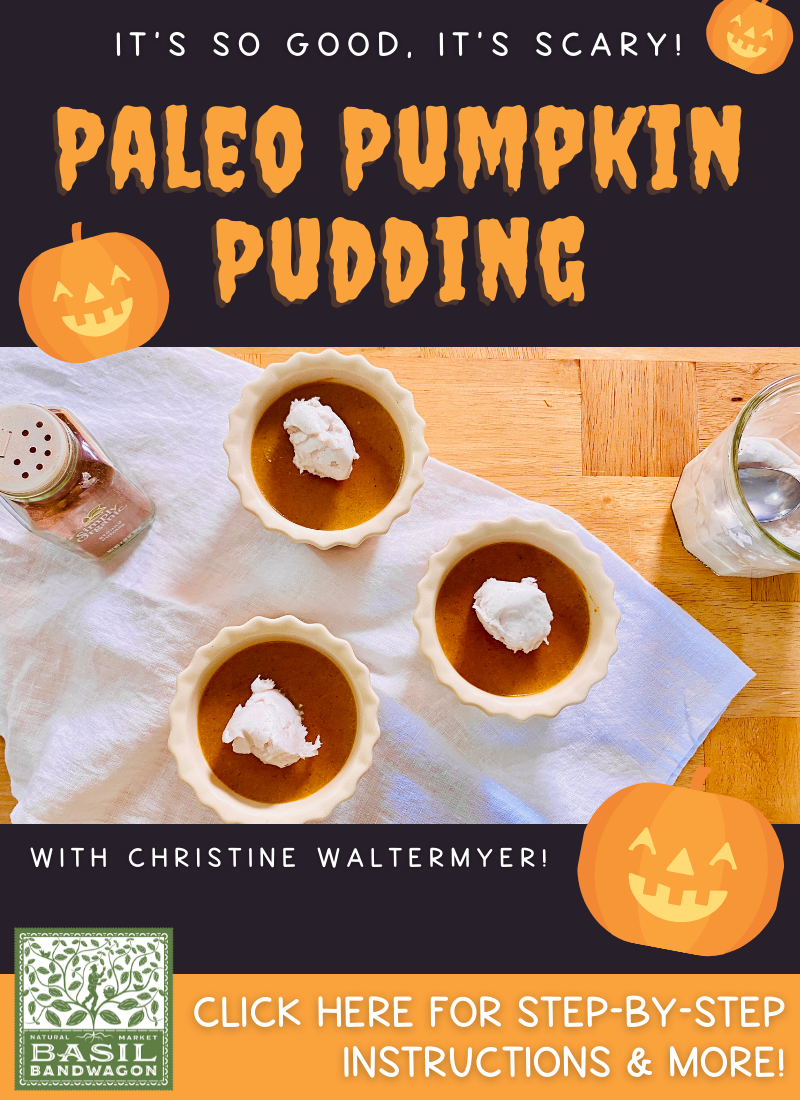
Tuesday, 10/26/21 is National Pumpkin Day! 🎃 What’s your favorite way to incorporate pumpkins this fall? Whether it’s as a decoration, gutted out for the seeds, or used in a recipe, the possibilities are endless. Christine Waltermyer and the Natural Kitchen Cooking School have picked the perfect recipe… that’s gluten-free AND egg-free! Shop all of the needed ingredients for this Paleo Pumpkin Pudding in all of our locations today!
Prep and cook the pumpkin if using: Cut the pumpkin in half. Use a large spoon to remove the seeds. Cut into big chunks. Place the chunks into a medium size saucepan. Add enough water to cover the bottom of the pan by one inch. Cover and bring to a boil over medium high heat. Reduce to simmer on medium low, covered, for 25 minutes, or until easily pierced with a fork. Transfer to a blender and blend until smooth.
In a small bowl, mix together the agar powder and warm water.
In a blender or food processor, combine ¾ cup of the pumpkin purée, coconut milk, maple syrup, almond butter, pumpkin pie spice, sea salt and vanilla bean powder. Blend for a minute or two. Transfer to a medium saucepan.
Over medium-high heat, bring the pumpkin mixture to a gentle boil, stirring occasionally. Stir in the agar-water mixture. Whisk well. Reduce the heat to low, cover, and cook for 20 minutes, whisking occasionally.
Meanwhile, make the coconut whipped cream: Place the heavy coconut cream, powdered monkfruit sweetener and vanilla bean powder in a blender. Blend until smooth. Drain any excess liquid that separates from the cream. Set aside. I don’t recommend chilling as it will get too hard.
Remove the pumpkin custard mixture from the heat. Transfer to 3 or 4 small pudding dishes. Cool to room temperature, then chill for 1 hour before serving. Serve the pumpkin custard with a dollop of coconut whipped cream and a pinch of nutmeg.
Enjoy!
Notes
Leftover pumpkin custard will keep in the refrigerator for up to 4 days.
Thank you to Christine Waltermyer and the Natural Kitchen Cooking School for working with us to help promote healthy, nutritious meals and products that are affordable, full of nutrients, and simple to make at home!
Christine Waltermyer is a local and renowned Wellness Chef, private chef to celebrities, published cookbook author and founder of the Natural Kitchen Cooking School, which offers an online Plant-Based Cooking Program. She also loves shopping at Basil Bandwagon! Visit naturalkitchenschool.com to subscribe to her email newsletter for new recipes, tips, and FREE access to the Power of Veggies mini-course!
Christine Waltermyer and the Natural Kitchen Cooking School are awesome to the CORE! 🍎Whether you pick-your-own or you pick some up the next time you’re shopping with us, we have the perfect recipe for you – and it’s GRAIN-FREE! Just in time for National Apple Day on Thursday, October 21, 2021. Trust us, you’ll live apple-ly ever after once you’ve made some at home! (Okay, we’ll stop with the apple puns now 😄)
Keyword apple, breakfast, dessert, dumplings, grain-free, side
Servings 3
Ingredients
3applespeeled and cored
1tablespoonbutter of your choice
½ cupbutter of your choice
2teaspoonsmonkfruit sweetener with erythritol + extra for sprinkling the apples before baking
1teaspooncinnamon
1 ½cupsalmond flourdivided
1tablespooncoconut flour
2tablespoonsarrowroot powder
½teaspoonsea salt
½teaspoonbaking powder
¼cupalmond milk
Sauce
1-2cupswater
1teaspoonarrowroot powder+ 1 tablespoon cold water
½cupmonkfruit erythritol sweetner
2tablespoonsbutter of your choice
1 teaspoonmolasses
½teaspooncinnamon
Fewpinchessea salt
Instructions
Lightly oil a medium size baking dish.
Slice a thin piece off the bottom of each apple so that they sit evenly. In a small bowl, combine together 1 tablespoon of the butter, 1 teaspoon of the monkfruit sweetener and cinnamon. Fill each apple with a spoonful of this mixture.
Make the dough: In a food processor, combine ¾ cup of the almond flour, coconut flour, arrowroot powder, sea salt, baking powder and 1 teaspoon of the monkfruit sweetener. Process to blend. Add ½ cup of cold, cubed butter. Add the almond milk. Add the remaining ¾ cup almond flour. Blend again. Turn the dough onto a piece of parchment paper dusted with arrowroot powder. Shape the dough into a flat disk. Cut into 3 equal size pieces and reform the pieces into a round flat disk. Wrap each disk of dough with parchment paper or plastic wrap. Chill in the refrigerator for 30 minutes.
Make the sauce: In a small saucepan, place the water. Use less water for a sweeter, more concentrated sauce. Or use 2 cups if you like more sauce with your dumplings. In a small bowl, stir together the arrowroot and the tablespoon of cold water. To the saucepan, add the monk fruit sweetener, butter, molasses, diluted arrowroot, cinnamon and sea salt. Simmer over medium low heat for 30 minutes. If you like your sauce sweeter, feel free to add more sweetener.
Preheat the oven to 350 degrees F. Remove chilled dough from the refrigerator. Place one disk of dough between two sheets of parchment paper. Roll into a 6-inch circle. Place one of the prepared apples in the center of the dough. Use the parchment paper to wrap the dough up around the sides of the apple, covering it with the circle of dough. Repeat with remaining dough and apples. Place the apples in the prepared baking dish. Bake for 30 minutes.
Spoon the sauce over the apples to fill the baking dish. Sprinkle with a little extra monkfruit sweetener. Bake for another 20 minutes. Serve warm, drizzled with the sauce.
Enjoy!
Thank you to Christine Waltermyer and the Natural Kitchen Cooking School for working with us to help promote healthy, nutritious meals and products that are affordable, full of nutrients, and simple to make at home!
Christine Waltermyer is a local and renowned Wellness Chef, private chef to celebrities, published cookbook author and founder of the Natural Kitchen Cooking School, which offers an online Plant-Based Cooking Program. She also loves shopping at Basil Bandwagon! Visit naturalkitchenschool.com to subscribe to her email newsletter for new recipes, tips, and FREE access to the Power of Veggies mini-course!
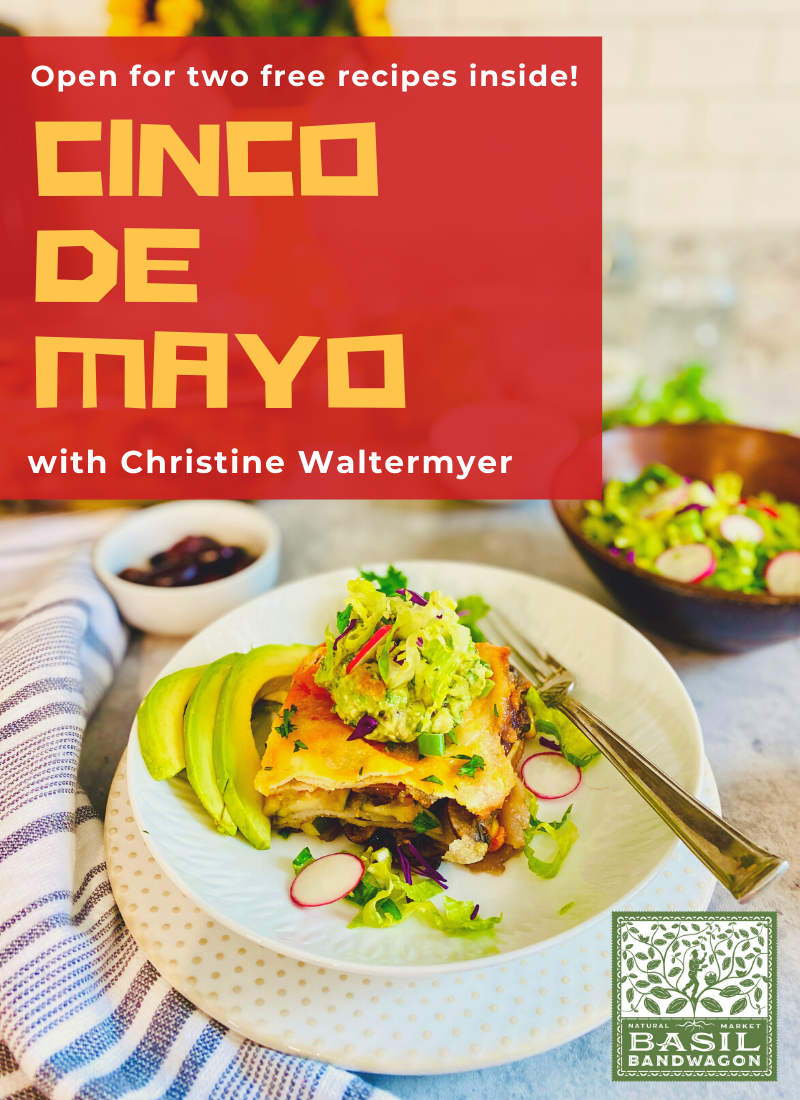
Happy Cinco de Mayo! Looking for some healthy plant-based alternatives for your favorite traditional holiday recipes? Check out two of our Cinco de Mayo favorites from Christine Waltermyer and The Natural Kitchen Cooking School below!
Keyword appetizer, chips and dip, cinco de mayo, dessert, fruit salsa, pita chips, salsa, snack, summer
Servings 4
Ingredients
16ozripe strawberriesdiced
½golden delicious applediced
½granny smith applediced
½any red variety red-skinned applediced
1kiwi fruitpeeled and diced
8ozred raspberries
2tablespoonspure maple syrup
pinchsea salt
½teaspoonpure vanilla extract
2tablespoonsall-fruit strawberry jam
juice of ½ a lime
juice of a mandarin orange (or a few tablespoons fresh orange juice)
Pita Chips
4whole grain pita pockets
avocado oil (spray or oil)
4teaspoonscinnamon
4tablespoonsraw cane sugar
Instructions
Preheat the oven to 350 degrees F.
In a large bowl, place all of the fruit. Add the maple syrup, sea salt, vanilla, jam, lime juice and orange juice. Stir gently.
Place the whole pita pockets on a baking sheet. Lightly spray or brush each one with a little avocado oil. Sprinkle each one with a tablespoon of raw cane sugar and a teaspoon of cinnamon. Cut each pita pocket into 4 pieces. Bake the pita chips in the preheated 350 degrees F. oven for 8 to 10 minutes. Cool for at least 15 minutes before serving them with the salsa.
Keyword casserole, cinco de mayo, enchilada, entree, vegan
Servings 6
Ingredients
Carrot Sauce
3large carrotscut into big chunks
¼large red onionchopped (½ cup)
1teaspoonchopped red beet
water
sea salt
lime (½ lime, juiced)optional
Casserole
2cloves garlicminced
1 yellow oniondiced
1medium zucchinicut into half moons
1 cupblack kalamata oliveschopped
16ozcrimini or button mushroomsde-stemmed and sliced
2teaspoonsolive oil
1teaspoonground cumin
½cupfrozen corn kernels
chili powder or crushed red pepperoptional
26ozcooked kidney beans
½cupvegan shredded cheese or cheese of your choice, for the top (plus extra if you want to add some in the layers)
18-count pack cassava flour tortillas or other tortillas
Instructions
Lightly oil a 9 x 13 glass casserole dish.
Make the sauce: In a medium saucepan, place the carrots, red onion and red beet. Add just enough water to almost cover the vegetables. Bring to a boil over medium high heat. Cover and reduce the heat to simmer on low for 20 minutes, or until the vegetables are fork-tender.
Once the vegetables are soft, place the cooked carrots, red onion and any remaining cooking liquid in a small blender. Add ½ teaspoon of the sea salt. You can also add a squeeze of fresh lime juice.
Preheat the oven to 400 degrees F.
In a large frypan, heat the olive oil over medium heat for a minute. Add the onion and garlic. Add a sprinkle of the sea salt to help the onions soften. Cook and stir for a few minutes. Add the mushrooms. Add another generous pinch or two of sea salt. Cover and cook for a few more minutes, or until the mushrooms soften. Add the zucchini, a little more salt, the corn kernels and the black olives. If you want to add spicy ingredients like chili powder or crushed red pepper, you can add that now.
In the prepared casserole, place about ½ cup of the carrot sauce on the bottom. Spread it around. Add a layer of tortillas, then top with ½ of the vegetables and ½ of the kidney beans. Feel free to add a little vegan cheese in the layers. Top with ½ cup of the sauce. Repeat the layers with another layer of tortillas, then the remaining beans and veggies, another ½ cup sauce, and another layer of tortillas. Spread with any remaining sauce.
Cover with foil. Bake for 15 minutes. Uncover the casserole and bake for another 8 minutes. Top with cheese and bake for another minute. Let the casserole cool for 5 minutes before slicing into squares. Serve with a side salad and guacamole.
Enjoy!
Notes
Note: If you want more sauce in this casserole, feel free to double the amount of sauce ingredients.
Thank you to Christine Waltermyer and the Natural Kitchen Cooking School for working with us to help promote healthy, nutritious meals and products that are affordable, full of nutrients, and simple to make at home!